Showing posts with label shell module. Show all posts

Sunday, November 27, 2022

Ansible real-time project - Installing and configure Tomcat 10

 Hey DevOps or DevSecOps or SRE Guys!!

What's up? in the automation journey one more wonderful learning here! 


In this post we will be implementing all our Ansible modules one after other to build a complete solution for Java based Application server installation and running using Ansible playbook.

At present Tomcat latest version is 10.0.27 so I've used same 

Pre-requisites: 

  • To install Apache Tomcat there is separate JDK/JRE compatibility we need to validate before we proceed
  • Create a dedicated user account as 'tomcat' with shell as bash to manage Tomcat application server
  • Create a separate directory for tomcat server to be installed
Execution of multiple tasks in the Playbook will be as follows:
  • Download the Tomcat software from Apache Tomcat 10.0.27.tar.gz
  • Uncompressing the tomcat tar.gz file
  • Change the file permissions and ownership
  • Cleanup after unarchive the tar.gz file
  • Start the Tomcat server
  • Have a task to stop the Tomcat server

---
- name: Installation and setup Apache Tomcat 10
  hosts: "{{ targets | default('localhost') }}"
  become: yes
  gather_facts: no
  tasks:
  
    - name: Install openjdk
      yum:
        name: java-1.8.0-openjdk
        state: present
      tags: install_openjdk

    - name: Create user as tomcat
      user:
        name: tomcat
        state: present
        home: /home/tomcat
        shell: /bin/bash
      tags: pre-install

    - name: Create a directory - /opt/tomcat
      file:
        path: /opt/tomcat
        state: directory
        mode: 0755
        owner: tomcat
        group: tomcat
      tags: pre-install

    - name: Download tomcat - apache-tomcat-10.0.27.tar.gz
      get_url:
        url:  https://dlcdn.apache.org/tomcat/tomcat-10/v10.0.27/bin/apache-tomcat-10.0.27.tar.gz
        dest: /opt/tomcat
      tags: pre-install 

    - name: Extract tomcat inside directory and set ownership, permissions
      unarchive:
        src: /opt/tomcat/apache-tomcat-10.0.27.tar.gz
        dest: /opt/tomcat
        extra_opts: [--strip-components=1]
        remote_src: yes
        owner: tomcat
        group: tomcat
        mode: "u+rwx,g+rx,o=rx"
      tags: tomcat-install

    - name: Remove gz file apache-tomcat-10.0.27.tar.gz
      file:
        path: /opt/tomcat/apache-tomcat-10.0.27.tar.gz
        state: absent
      tags: post-install

    - name: Start the Tomcat server
      become_user: tomcat
      shell:
        cmd: nohup ./startup.sh
        chdir: /opt/tomcat/bin
      tags: start-tomcat

    - name: Stop the Tomcat server
      become_user: tomcat
      shell:
        cmd: nohup ./shutdown.sh
        chdir: /opt/tomcat/bin
      tags: stop-tomcat, never
      
You can run the playbook in multiple ways
1. Use the target as webserver group to install Tomcat only on them.   
ansible-playbook tomcat-solutoin.yaml -e targets=webservers
2. Use the tags to stop the Tomcat servers.   
ansible-playbook tomcat-solutoin.yaml -t stop-tomcat -e targets=webservers

3. Use the tags to start the Tomcat server.   
ansible-playbook tomcat-solutoin.yaml -e targets=webservers

Finding & Terminating a process on remote VM

The play can be having two tasks where you need to find the running process by process name or command used to run it. If there is any error ignore them. Try to catch the result into a variable to pass it to next task.
Example - find process which is started with java
Second task is to terminating a process which is identified in the first task. Here we can use 'shell' module where we can use 'kill' running process.
---
 - name: Find Java process and Terminate
   hosts: "{{ targets | default ('localhost') }}"
   gather_facts: false

   tasks:
     - name: Get the running Java process
       shell: "ps -ef|grep tomcat |grep -v grep | awk {'print $2'}"
       register: JavaProcessID

     - name: Print Java Process
       debug:
         msg: "{{ JavaProcessID.stdout }}"

     - name: Terminating Java Process
       become: yes
       become_user: tomcat
       shell: "kill -9 {{ JavaProcessID.stdout }}"

Execute the playbook as follows:
ansible-playbook find_killtomcat.yaml -e targets=webservers
The output Image:
Using shell module to find and kill tomcat process


Tuesday, July 13, 2021

Installation of Ansible on CentOS 7 | RHEL | OpenSuse | Ubuntu

 Hello Guys!! 

In this post let's explore the installation options for Ansible Core. We can get the detailed Documentation provided by Ansible in the Installation Guide. I've also gone through the Amazing Book : Ansible for DevOps  Here he explained that beginners can start with playing in Laptop by setting up the Virtual Boxes for Ansible learnings. 

Today I have started experimenting with Ansible installation on the CentOS 7 Vagrant box, As you know Ansible is from the RedHat.

Ansible having 3300+ modules freely available. At the end of the installation, we can test the connectivity with the 'ping' and 'shell' module which will be referred to the inventory hosts which is present in the "/etc/ansible/hosts" location.

Prerequisites for Ansible installation

  • Create Vagrant Boxes where Ansible engine runs on the master node and SSH-Agents will run on two different nodes.
  • PasswordAuthentication enable for sshd_config
  • SSH Connectivity with ssh-keygen
Ansible ready to use on Vagrant boxes

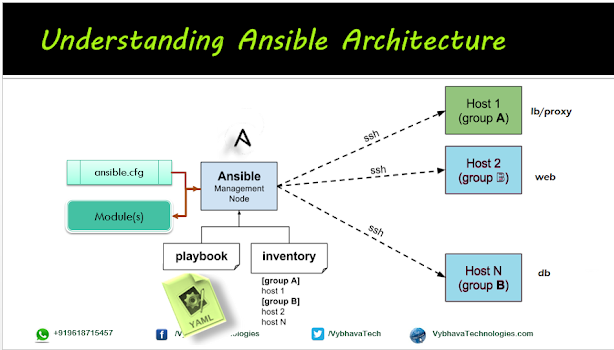
My understanding review about Ansible Architecture

Ansible Architecture
Ansible Architecture 


Steps for Installing and Configuration of Ansible on CentOS 7


Step 1. Installation of yum repo and Ansible
To install the Ansible using yum package manager we must get update the repo

Alternative Vagrant optons as
Vagrant.configure(2) do |config|
    #config.vm.box = "centos/8"
    config.vm.boot_timeout=600
    config.landrush.enabled = true
  
    config.vm.define "mstr" do |mstr|
      mstr.vm.host_name = "mstr.devopshunter.com"
      mstr.vm.box= "ansible/tower"
      mstr.vm.network "private_network", ip: "192.168.33.100"
      mstr.vm.provider "virtualbox" do |vb|
        vb.cpus = "2"
        vb.memory = "2048"
      end
    end
    config.vm.box = "centos/8"  
    config.vm.define "node1" do |node1|
      node1.vm.network "private_network", ip: "192.168.33.110"
      node1.vm.hostname = "node1.devopshunter.com"
      node1.vm.provider "virtualbox" do |vb|
        vb.cpus = "2"
        vb.memory = "1024"
      end
    end
   
    config.vm.define "node2" do |node2|
      node2.vm.network "private_network", ip: "192.168.33.120"
      node2.vm.hostname = "node2.devopshunter.com"
      node2.vm.provider "virtualbox" do |vb|
        vb.cpus = "2"
        vb.memory = "1024"
      end
    end  
  end
  
You can run `vagrant up' to bring up the 3 boxes as defined in the
sudo yum install -y epel-release
sudo yum install -y ansible

# To get the latest version of ansible use the following 

# Remove ansible older version
sudo yum remove -y ansible

# Install python3 includes pip3
sudo yum install -y python3

wget https://bootstrap.pypa.io/get-pip.py
python3 get-pip.py
python3 -m pip install --upgrade pip
pip3 install ansible==4.6.0 --user
ansible --version # this will show warning older version 
python3 -c 'from ansible_collections.ansible_release import ansible_version; print(ansible_version)'

Step 2: Change sshd_config file on Vagrant based CentOS box

Better to edit with root user the /etc/ssh/sshd_config cotaining PasswordAuthentication no to PasswordAuthentication yes and restart the sshd services.

vi /etc/ssh/sshd_config
# Search and comment 
#PasswordAuthentication no
# Search uncomment for yes value
PasswordAuthentication yes
Save the file and restart the sshd services on all the CentOS boxes.
systemctl restart sshd # Restart sshd service
systemctl status  sshd #Check the status

Confirmation on the sshd_config changes as shown below:


ssh_config modified and restart service in CentOS 7

same step 2 ssh_config changes can be repeated on the all target boxes as well.

ssh service restart on remote nodes


Step 3: Ansible inventory creation on Controller

Update the hostname and IP address correctly mapped on VMs. There are many ways to add the machines on your Ansible Engine running VM. Same IP or VM can be part of multiple groups also allowed. Example host2 is member in appservers and also dbserver due to its capabilities we can assign.


[nodes]
192.168.33.210
192.168.33.220

Step 4: SSH Key Generation with RSA algorithm.

We can use any algorithm

ssh-keygen -t rsa -b 4096 -C "ansible-engine"
 ls -rlta ~/.ssh 
 ssh-copy-id -i ~/.ssh/id_rsa.pub vagrant@192.168.33.210
 # Say 'yes' to add to known_hosts
 # Enter the password to connect remote host 
 # Validate
 ssh vagrant@192.168.33.210
 exit # exit from remote host
 # Repeat above steps for remaining hosts
 ssh-copy-id -i ~/.ssh/id_rsa.pub vagrant@192.168.33.220
 ssh vagrant@192.168.33.220
 exit 

SSH Key generation for Ansible
ssh-keygen for ansible 


Observe that two rsa files created in the ~/.ssh folder one is key and other one with .pub extentiona is public key

Step 5: Adding SSH Key to Authorized keys of remote hosts


ssh-copy-id -i ~/.ssh/id_rsa.pub vagrant@192.168.33.210
ssh-copy-id -i ~/.ssh/id_rsa.pub vagrant@192.168.33.220

SSH copy id

Regular test-case after Ansible installation we have multiple options test with the ping module:
ansible -m ping all
ansible -m ping nodes

Ansible installation on Ubuntu

As we have multiple ways to install the Ansible Core on any Linux platform, Here we will see the option to install it on Ubuntu 20.04.  Specialty of this is we will be getting the latest installation because the repository will be update on your Ubuntu System. 

You can see the video session for Ansible installation on Ubuntu with latest repository updated : 

 sudo apt update
 sudo apt install software-properties-common
 sudo add-apt-repository --yes --update ppa:ansible/ansible
 sudo apt install ansible


Please write your feedback on this post, and also your experiment problems if in case you followed my steps.

Categories

Kubernetes (25) Docker (20) git (15) Jenkins (12) AWS (7) Jenkins CI (5) Vagrant (5) K8s (4) VirtualBox (4) CentOS7 (3) docker registry (3) docker-ee (3) ucp (3) Jenkins Automation (2) Jenkins Master Slave (2) Jenkins Project (2) containers (2) create deployment (2) docker EE (2) docker private registry (2) dockers (2) dtr (2) kubeadm (2) kubectl (2) kubelet (2) openssl (2) Alert Manager CLI (1) AlertManager (1) Apache Maven (1) Best DevOps interview questions (1) CentOS (1) Container as a Service (1) DevOps Interview Questions (1) Docker 19 CE on Ubuntu 19.04 (1) Docker Tutorial (1) Docker UCP (1) Docker installation on Ubunutu (1) Docker interview questions (1) Docker on PowerShell (1) Docker on Windows (1) Docker version (1) Docker-ee installation on CentOS (1) DockerHub (1) Features of DTR (1) Fedora (1) Freestyle Project (1) Git Install on CentOS (1) Git Install on Oracle Linux (1) Git Install on RHEL (1) Git Source based installation (1) Git line ending setup (1) Git migration (1) Grafana on Windows (1) Install DTR (1) Install Docker on Windows Server (1) Install Maven on CentOS (1) Issues (1) Jenkins CI server on AWS instance (1) Jenkins First Job (1) Jenkins Installation on CentOS7 (1) Jenkins Master (1) Jenkins automatic build (1) Jenkins installation on Ubuntu 18.04 (1) Jenkins integration with GitHub server (1) Jenkins on AWS Ubuntu (1) Kubernetes Cluster provisioning (1) Kubernetes interview questions (1) Kuberntes Installation (1) Maven (1) Maven installation on Unix (1) Operations interview Questions (1) Oracle Linux (1) Personal access tokens on GitHub (1) Problem in Docker (1) Prometheus (1) Prometheus CLI (1) RHEL (1) SCM (1) SCM Poll (1) SRE interview questions (1) Troubleshooting (1) Uninstall Git (1) Uninstall Git on CentOS7 (1) Universal Control Plane (1) Vagrantfile (1) amtool (1) aws IAM Role (1) aws policy (1) caas (1) chef installation (1) create organization on UCP (1) create team on UCP (1) docker CE (1) docker UCP console (1) docker command line (1) docker commands (1) docker community edition (1) docker container (1) docker editions (1) docker enterprise edition (1) docker enterprise edition deep dive (1) docker for windows (1) docker hub (1) docker installation (1) docker node (1) docker releases (1) docker secure registry (1) docker service (1) docker swarm init (1) docker swarm join (1) docker trusted registry (1) elasticBeanStalk (1) global configurations (1) helm installation issue (1) mvn (1) namespaces (1) promtool (1) service creation (1) slack (1)