Saturday, April 24, 2021

Docker Volumes - Deep Dive with Use Cases

Understanding  Docker Volumes in-depth with real-time scenarios. Where the MongoDB is the backend tier Database and frontend web application using - Mongo-Express container.

Use Case 1: MongoDB container without volume observe what happens to the data.

Use Case 2: After attaching volume = persistence - confirm re-create containers data persist 

Use Case 3: Database containerversion changes does not impacts the Data persisted

Let's start the experiment on data persistance.

Docker Volume Persistant
Docker Volume deep dive - MongoDB persistant 


To share the sensitive data we use network isolation, which is already discussed in Docker Networks post.

# Create Network
docker network create mynet 
Now let's use this mynet throughout all our use-case examples. MongoDB Connect to Mongo-express which is a member in the same network so that it can access the database


Use Case 1: MongoDB Without any volume - Non Persistence

MongoDB Container without any persistance storage :
docker run -d --name mongodb01 --network mynet \
    -e MONGO_INITDB_ROOT_USERNAME=admin \
    -e MONGO_INITDB_ROOT_PASSWORD="vybhavatechnologies" mongo

Aa we have not mentioned any tag after mongo so it will pull the latest mongo image from the docker hub. Validate mongodb container

docker ps -a

If you don't see running docker container for mongodb check the logs using
docker logs mangodb -f
here -f is optional to see the floating log content. If all good, we can run the next container Mongo-express
# Web client - based on nodejs express fraework  package
  docker run -it --rm \
    --network mynet \
    --name mongo-express \
    -p 8081:8081 \
    -e ME_CONFIG_OPTIONS_EDITORTHEME="ambiance" \
    -e ME_CONFIG_MONGODB_SERVER="mongodb01" \
    -e ME_CONFIG_BASICAUTH_USERNAME="admin" \
    -e ME_CONFIG_BASICAUTH_PASSWORD="vybhavatechnologies" \
    mongo-express
This container is for the use-and-throw container so used --rm in the above command.

On the browser open the mongoexpress web application for example as : http://192.168.33.250:8081/ Enter the user: admin and password as vybhavatechnologies
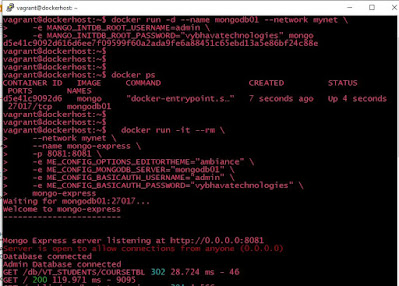


MangoDB non-persistence
Build Stateful application with MongoDB container

after login to the mongo-express webpage and perform above steps looks as 

Jyotsna Document added to Mongo-express
Collection adding document on mongo-express


Use Case 2: Docker Volume attached to mongo container

In Use Case 2 let's create the volume and use it while creating the mongo database container:
  docker volume create myvol  
  docker volume ls
Now let's use the volume which is created as named volume on the Docker host machine. Attach it to the MongoDB container.
  
docker run -d --name mongodb02 --network mynet \
    -v myvol:/data/db  \
    -e MONGO_INITDB_ROOT_USERNAME=admin \
    -e MANGO_INITDB_ROOT_PASSWORD="vybhavatechnologies" mongo:4.4.5-bionic
	
This time image tag I'm using mongo:4.4.5-bionic, I've tried windows server but it didn't work!
  # Check the contianer up
  docker ps
  
  # Web client - nodejs express 
docker run -it --rm \
    --network mynet \
    --name mongo-express \
    -p 8081:8081 \
    -e ME_CONFIG_OPTIONS_EDITORTHEME="ambiance" \
    -e ME_CONFIG_MONGODB_SERVER="mongodb02" \
    -e ME_CONFIG_BASICAUTH_USERNAME="admin" \
    -e ME_CONFIG_BASICAUTH_PASSWORD="vybhavatechnologies" \
    mongo-express
Now let's add documents for each student data

[
    { "name": "Vignesh", "Course": "Automations"},
    { "name": "Srinivas", "Course": "AWS Solutions"},
    { "name": "Abhijoy", "Course": "WebLogic"},
    { "name": "Shammi", "Course": "Continerized Solutions"},
    { "name": "Rajsekhar", "Course": "Microsoft Azure DevOps"},
    { "name": "Srikant", "Course": "DB Solutions"},
    { "name": "Viswasri", "Course": "AWS DevOps Solutions"},
    { "name": "Melvin", "Course": "DevOps Solutions"}
]

Now run the removal of containers, add the following alias to .bashrc your docker host machine.
  alias dc='docker rm -v -f $(docker ps -aq)'
  dc
  docker ps -a # confirm all containers removed  
Now run the same steps to create the mongodb02 and mongoexpress containers check the data exists and now try to add new document:
  {
    _id: ObjectId(),
    "name": 'Pranavsai',
    "Course": 'Analytics'
}
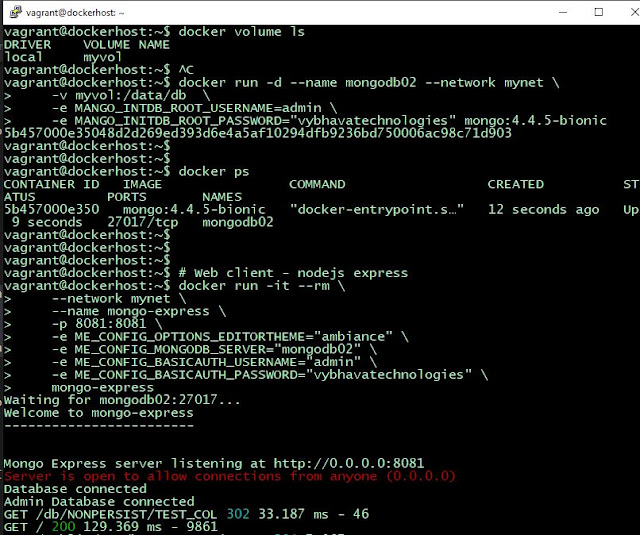
New data loaded
Document collection added to MongoDB 

mongodb with Volume
MongoDB with Volume


The data volume attached so we can re-start the container any time number of times !!!

Use Case 3: Database container version changes do not impact Data persistence

In this Use Case 3 experiment, I thought of taking MongoDB 3 and MongoDB 4 version images. But unfortunately, it didn't work for me the issue was with the version 3 image. So this experiment we can do with the same major version 4 and it's sub-versions then it is compatible to test this use-case.

  
docker run -d --name mongodb03 --network mynet \
    -v myvol:/data/db  \
    -e MONGO_INITDB_ROOT_USERNAME=admin \
    -e MONGO_INITDB_ROOT_PASSWORD="vybhavatechnologies" mongo:4
The rest of the steps are the same as the above use case 2

We can pick the latest version (say n) then before version (n-1 if exists) but here is the current (year 2021) mongo version tags are here:

Docker Hub mongo DB image tags


References:

Saturday, April 17, 2021

Docker Expose Port Understanding Port Mapping and Port Forwarding

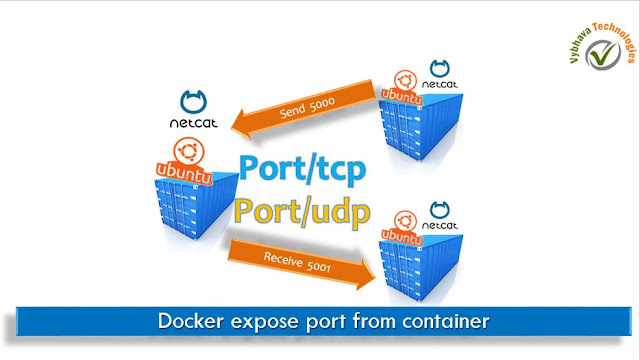
 In this, we will discuss an experiment on Docker Container Network port exposed or published. A Netcat command utility will be used to make an echo server. which will be read the message on one socket and the other end sends the message to the terminal.


Docker expose ports
Understanding Port forwarding in Docker Containers


Background on Docker Port

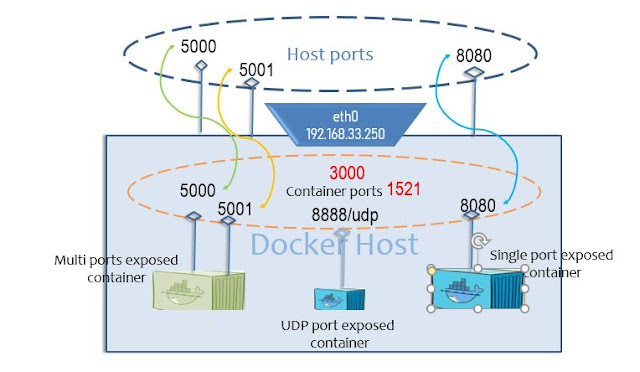
Docker container ports by default mapping to host ports.

The -P option will bind the container exposed ports (EXPOSE command in Dockerfile) to random available ports of the host.

We can bind any port of the container even though it is not pre-defined with EXPOSE ones. For this, you can use -p (lower case) with host port followed by a colon (:) container port 

Note: This experiment can be successful on ubuntu:14.04 image only. Because other than that ubuntu images don't support nc and host.docker.internal to look into the docker network.

Here we have four use cases:

  1. Two ports open to run the echo server 
  2. Container access host network
  3. Dynamically port mapping
  4. Expose Port using TCP/UDP protocol

To understand more on docker network isolation with namespaces, Open 3 terminal set to view all 3 on a single screen.

Docker expose ports
Examples of Docker container port 


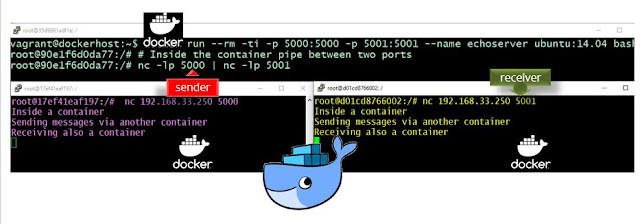
USE CASE 1: TWO PORTS EXPOSED - USED AS ECHO-SERVER 

In this case, let's use three terminals  on the same screen

Terminal 1: 

# Create a container as echo-server with expose of 2 different ports 
docker run --rm -ti --name echoserver \
 -p 5000:5000 -p 5001:5001  \
 ubuntu:14.04 /bin/bash
# Inside the container pipe between two ports
nc -lp 5000 | nc -lp 5001
To validate this experiment, how this netcat command will be used to communicate betwen two ports inside the container they work as echoserver.

Now open the Terminal 2 window and send the text message to localhost with 5000 will be forward to localhost with 5001

Terminal 2: Run the nc command as shown

nc localhost 5000
Vybhava Technologies gives knowledge on Docker

Terminal 3: Now open the third terminal and run the nc command with 5001 port this will be in waiting state

nc localhost 5001

Here you can observe that Terminal 3 having output automatically displaying the same message that you entered and send in Terminal 2 where the docker container acted as echo server

Docker Expose port forwarding
Docker Port Fortwarding withing container


USE CASE 2: Containers using host network - host.docker.internal/host IP 

Terminal 1 remain the same as we have done it earlier in this Blog post 

Terminal 2: 

Note: Docker version 20.x supports following --add-host option way to communicate with host network from container.
docker run -it --name echoclient1 \
--add-host=host.docker.internal:host-gateway \
ubuntu:14.04 bash

#inside contianer 

nc host.docker.internal 5000
echo message here

Terminal 3: Now run the ubuntu container

docker run -it --name echoclient2 \
--add-host=host.docker.internal:host-gateway \
ubuntu:14.04 bash

#inside contianer 

nc host.docker.internal 5001
container Communicate with Host
Expose port used by Sender and Receiver container


Observe that in terminal 2 write message same will displayed into the terminal 3 

USE CASE 3: Dynamically port mapping to exposed container ports 

The port inside the container is fixed port

The port on the host machine or VM is chosen from the available unused ports 

This allows many containers to run programs with fixed ports 

this often is used with service discovery programs 


Terminal 1: 

docker run --rm -ti \
-p 5000 -p 5001 --name echoserver \
ubuntu:14.04 bash

#inside container 

nc -lp 5000|nc -lp 5001


Terminal 2:

docker port echoserver


#shows port mappings 

nc localhost hostport1


#change hostport1

Enter a message to echo

Terminal 3:

nc localhost hostport2

#change hostport2

Now in this case you can observe that text automatically sends the message to Terminal 3 where netcat ready to display on to your terimal with the open port 


USE CASE 4: USING Export Port with a Protocol TCP or UDP

docker run -p host-port:container-port/protocol 

# protocal can be tcp or udp 

Terminal

docker run --rm -ti -p 8888/udp \
--name echoserver ubuntu:14.04 bash

Here we have not used any host-port to forward it so Docker engine will help us to select the random port from host machine available ports.


Terminal 2:

First check the port to which it is bind from the container
docker port echoserver


Use the random port to send the message from localhost.
nc -u localhost mapport1-from-above
hello from udp

Now here observe that message send back to the terminal running container.

Docker container echoserver run netcat with UDP
Expose UDP Port for docker container


Reference: 

  1. Docker official document port link
  2. Discuss on host docker internal 
  3. Play with NetCat on ubuntu  

.

Saturday, April 3, 2021

Jenkins integration with SonarQube Scanner

Hello Guys, DevSecOps team members, In this post I would like to integrate Jenkins with SonarQube.  SonarQube is an open-source product for continuous inspection of code quality.  

The main objective of SonarQube to check Code Quality and provide the Code Security.
SonarQube empowers and ensure all developers to write cleaner and safer code. 
In this experiment we will be running the SonarQube on a Docker Engine.

Prerequisites

We must have following pre-requisites to do this experiment
  1. SonarQube Server installed, up and running state
  2. Jenkins installed and Master is up and running
  3. Sonar Scanner installed on same machine(container) where Jenkins build job executes

Important URLs 

The following links are very helpful while dealing with the SonarQube and its integration with Jenkins.
 Step 1: Preparing SonarQube on the Docker
You could installed Docker and it is Up and running,  then run the following docker run command to bring up the SonarQube server.
 
docker run -d --name sonarqube \
-e SONAR_ES_BOOTSTRAP_CHECKS_DISABLE=true \
-p 9000:9000 sonarqube:latest

Open the 9000 port if it is not open automatically.

SonarQube Login

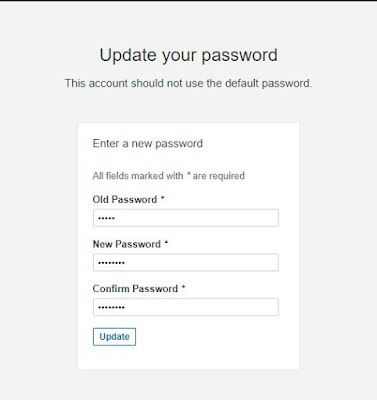
Please enter the default username as admin and the password as admin on the SonarQube login page.
Then immediately it will prompt for "Update your password". Here you can use the old password and new password, confirm password as per you company strong password rules.

SonarQube update password
Reset the password for SonarQube

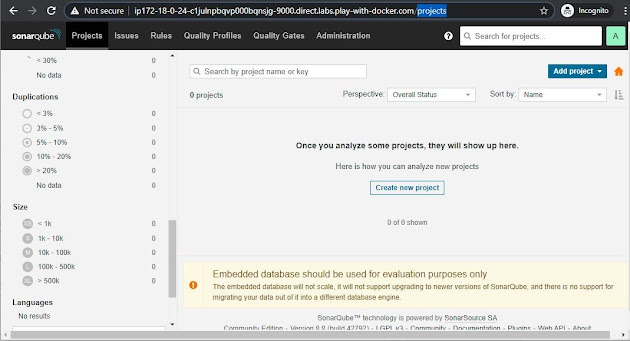
after reset password for the SonarQube server, the web UI as shown:


SonarQube Console
SonarQube Web UI console
On the top right "Add project" or else in the middle of the work area "Create new project" button to start a project. which will be used to show up the analyzed report after SonarQube scan

Create User in SonarQube

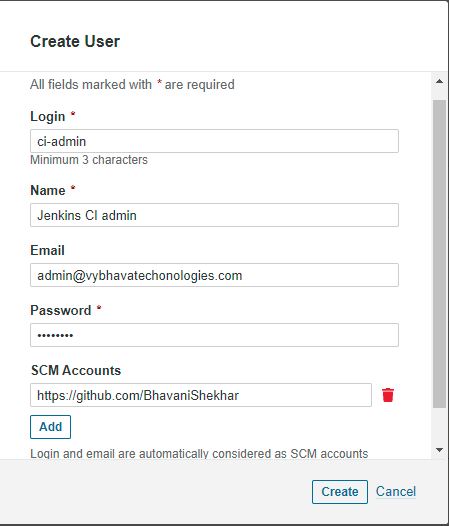
In the SonarQube UI we will create User as "ci-admin" that can be used in the Jenkins.

In the "Administration" tab on the right side you can click on "Create User" button for creating individual user and manage.

Please enter the following fields
Login - Mandatory field the user which we can use in Jenkins
Name - Mandatory field to identify this user
Email - optional 
Password - Mandatory where this value should be strong password
SCM Account - Multiple values can be entered here using "Add" button below given to enter more GIT URLs.

SonarQube User Creation
SonarQube Administration tab select Security Create user

Click on the "Create" button on the right buttom side. 

After User creation you can see the updates as shown in the SonarQube Administration console select the tab Security and in the newly created User click on the Update Token

SonarQube Security User Token
SonarQube user token generation


Enter the required fields as expected. 
a. Enter Token Name: Jenkins CI admin
b. Generate
c. Copy the token value that can be used in the Jenkins Global credential creation scope as "secret text"

Generate Token
SonarQube User Token Generation

After Token Generation completes click on the "Done".


Running Jenkins on Docker

This step is optional step, you can have a individually Jenkins installed on your VM.
docker run --name jenkins-master -u root --rm \
 -d -p 8081:8080  -p 50001:50000 \
 -v jenkins-data:/var/jenkins_home \
 -v /var/run/docker.sock:/var/run/docker.sock \
 jenkinsci/blueocean

On the PWD automatically opens 8081 if not manually you can open that port, To view log files of Jenkins container you can run the following:
  docker logs jenkins-master
  
On the Jenkins Dashboard Sample credentials : SonarQube : admin/welcome1 Jenkins: ci-admin/welcome123

Jenkins Integration Setup for SonarQube

Step 1. Install plugin - SonarQube Scanner
Navigate to Manage Jenkins > Manage Plugin > Available > on the search for the word 'sonarqube'  select SonarQube Scanner to "Install without resart".

SonarQube Scanner plugin installation


Configure System for SonarQube

 
Step 2: Configure SonarQube Server on the Jenkins 
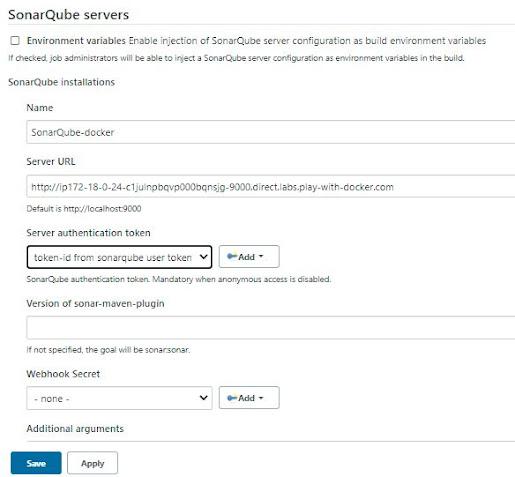
Manage Jenkins > Configure System > SonarQube Server 

a. Select the check box - Environment variables Enable injection of SonarQube server configuration as build environment variables 

Here you can give any name which is easy to represent that SonarQube Server. And enter the SonarQube Server URL and Save this confiburation.

SonarQube Server Configuration
Configure System on Jenkins for SonarQube Server


b. click on the 'Add SonarQube' under section SonarQube installations SonarQube URL [ You can enter your SonarQube running URL here]
http://ip172-18-0-13-c1ja09je75e000b5n1m0-9000.direct.labs.play-with-docker.com/projects 

c. Please enter the server authentication token clicks on the 'Add' button to SonarQube authentication token. 
Select the 'Secret Text' option. 
Keep in Global scope. Mandatory when anonymous access is disabled. [Remember this Token which you have generated and saved on the SonarQube console]

d. Save this SonarQube 'Configure System'.

Sonar scanner installation on Jenkins Container 


Enter into the Jenkins-master container and then do the following steps
1. Download Sonar scanner zip file
2. unzip it to /opt path rename the folder with sonar-scanner instead of having lengthy version attached.
3. modify the sonar-runner.properties file by adding following line 

Assuming you are using Docker Jenkins container so entering into the container

$ docker exec -it jenkins-master bash 
cd /tmp
wget https://binaries.sonarsource.com/Distribution/sonar-scanner-cli/sonar-scanner-cli-4.6.0.2311-linux.zip
unzip sonar-scanner-cli-4.6.0.2311-linux.zip -d /opt
cd /opt
mv sonar-scanner-4.6.0.2311-linux sonar-scanner
ls # confirm
modify the properties file present in the conf folder
 vi /opt/sonar-scanner/conf/sonar-scanner.properties  
Now update the line as follows:
#----- Default SonarQube server
#sonar.host.url=http://localhost:9000
sonar.host.url=http://192.168.0.28:9000
  
update only the Default SonarQube server url line as shown above. 
Reference link : https://binaries.sonarsource.com/Distribution/sonar-scanner-cli/sonar-scanner-cli-4.6.0.2311-linux.zip

Global Tool Configuration

On the Global tool configuration page search for the "SonarQube Scanner" section under SonarQube Scanner Installation, Click on the   "Add SonarQube Scanner" button

 a. SonarQube Scanner Name: sonarqube-scanner 
 b. Deselect the 'Install Automatically' option. Enter the path for SONARQUBE_RUNNER_HOME /opt/sonar-scanner, make sure that correct path you have used here. 
 c. 'Apply and Save' the Global Tool configuration

Now all set to run the Jenkins Job!    

Create Jenkins FreeStyle project 

1. Create Job - Name it as 'SonarCodeAnalysisJob' 

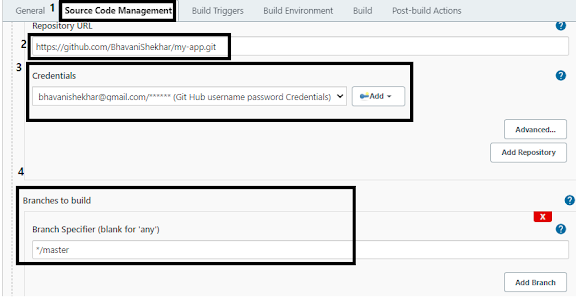
2. Source Code management: Git Url where code resides to scan.

Example I've used:  https://github.com/BhavaniShekhar/my-app.git

 a. Please enter the Git repo URL : https://samsonawane@bitbucket.org/websym12/sampleweb.git 

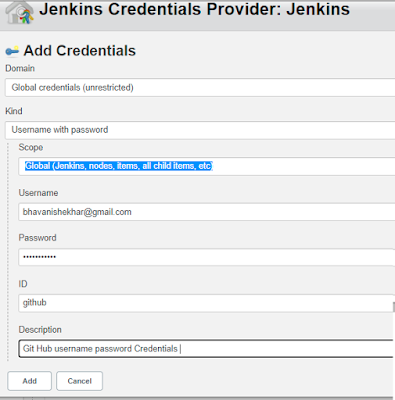
 b. Add Credentials -> use Jenkins Credential provider on the pop-up window to enter the username and password for your git URL to access. then back select the newly created credentials. \


Jenkins Credentials Provider for Jenkins

Select the GitHub credentials [optional if GIT repo is Public not required]

Jenkins SCM configuration Git
Git as SCM on Jenkins

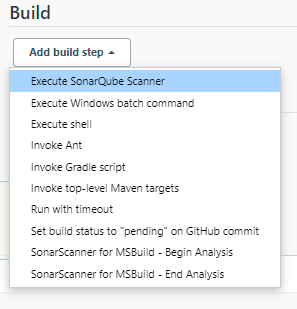
3. Go to the Build section

"Execute SonarQube Scanner" Task to run JDK to be used for the sonar analysis path to project properties Analysis properties

Jenkins Build select Execute SonarQube Scanner


        #Required props as metadata
        sonar.projectKey=Vybhava
        sonar.projectName=Robotics
        sonar.projectVersion=1.0

        #Path to source code 
        sonar.sources=/var/jenkins_home/workspace/$JOB_NAME/src         
    
Additional arguments JVM Options Save the job Click on 'Build Now'.

It should trigger SonarQube Server Report


Categories

Kubernetes (24) Docker (20) git (13) Jenkins (12) AWS (7) Jenkins CI (5) Vagrant (5) K8s (4) VirtualBox (4) CentOS7 (3) docker registry (3) docker-ee (3) ucp (3) Jenkins Automation (2) Jenkins Master Slave (2) Jenkins Project (2) containers (2) docker EE (2) docker private registry (2) dockers (2) dtr (2) kubeadm (2) kubectl (2) kubelet (2) openssl (2) Alert Manager CLI (1) AlertManager (1) Apache Maven (1) Best DevOps interview questions (1) CentOS (1) Container as a Service (1) DevOps Interview Questions (1) Docker 19 CE on Ubuntu 19.04 (1) Docker Tutorial (1) Docker UCP (1) Docker installation on Ubunutu (1) Docker interview questions (1) Docker on PowerShell (1) Docker on Windows (1) Docker version (1) Docker-ee installation on CentOS (1) DockerHub (1) Features of DTR (1) Fedora (1) Freestyle Project (1) Git Install on CentOS (1) Git Install on Oracle Linux (1) Git Install on RHEL (1) Git Source based installation (1) Git line ending setup (1) Git migration (1) Grafana on Windows (1) Install DTR (1) Install Docker on Windows Server (1) Install Maven on CentOS (1) Issues (1) Jenkins CI server on AWS instance (1) Jenkins First Job (1) Jenkins Installation on CentOS7 (1) Jenkins Master (1) Jenkins automatic build (1) Jenkins installation on Ubuntu 18.04 (1) Jenkins integration with GitHub server (1) Jenkins on AWS Ubuntu (1) Kubernetes Cluster provisioning (1) Kubernetes interview questions (1) Kuberntes Installation (1) Maven (1) Maven installation on Unix (1) Operations interview Questions (1) Oracle Linux (1) Personal access tokens on GitHub (1) Problem in Docker (1) Prometheus (1) Prometheus CLI (1) RHEL (1) SCM (1) SCM Poll (1) SRE interview questions (1) Troubleshooting (1) Uninstall Git (1) Uninstall Git on CentOS7 (1) Universal Control Plane (1) Vagrantfile (1) amtool (1) aws IAM Role (1) aws policy (1) caas (1) chef installation (1) create deployment (1) create organization on UCP (1) create team on UCP (1) docker CE (1) docker UCP console (1) docker command line (1) docker commands (1) docker community edition (1) docker container (1) docker editions (1) docker enterprise edition (1) docker enterprise edition deep dive (1) docker for windows (1) docker hub (1) docker installation (1) docker node (1) docker releases (1) docker secure registry (1) docker service (1) docker swarm init (1) docker swarm join (1) docker trusted registry (1) elasticBeanStalk (1) global configurations (1) helm installation issue (1) mvn (1) namespaces (1) promtool (1) service creation (1) slack (1)