Kubernetes cluster configuration in a Virtualbox with vagrant
Thanks to Rajkumar who had developed the Vagrantfile and published in the github on Kubernetes cluster configuration in a Virtualbox with vagrant. For those who don't know about Vagrant it is a tool that will be used for virtualization into a different level and more powerful way of using your system resources to run multiple operating virtual boxes in your Laptop/Desktop systems.
You just need to follow the simple steps which I had done in my experiment:
Prerequisites for Kubernetes Cluster Creation
The Vagrantfile will be composed with the Ruby array that creates k8s-head and k8s-node1, k8s-node2 definitions. Once the Ubuntu Xenial boxes provisioned custom shell scripts are used for boot time execution.
check the VM are created as expected
Check that all are in running state, if not you need to check the log file that is generated in the same path where Vagrantfile exists.
Connect with your PuTTY to k8s-master that is running on 192.168.33.10 IP address.
Check the versions of kubeadm, kubectl, and kubelet
Check the nodes list
Note: Make sure that your Windows firewall disabled to run the Vagrant on your Windows laptop.
You might be more interested to explore and know about the latest Docker 19 Community Edition learning experiments on Ubuntu 19.04
You just need to follow the simple steps which I had done in my experiment:
Prerequisites for Kubernetes Cluster Creation
System resources requirements on VirtualBox
- 2 GB for each node
- 2 cores CPUs for each node
Here I have don this expeiment on my Windows 7 laptop. You could do same on any Windows higher version as well. Total 3 VMs will be created under a group named as - "Kubernetes Cluster" as defined in Vagrantfile.
Infrastructure as a Code: Vagrantfile
This file contains hidden or bidirectional Unicode text that may be interpreted or compiled differently than what appears below. To review, open the file in an editor that reveals hidden Unicode characters.
Learn more about bidirectional Unicode characters
# -*- mode: ruby -*- | |
# vi: set ft=ruby : | |
#Vagrant::DEFAULT_SERVER_URL.replace('https://vagrantcloud.com') | |
servers = [ | |
{ | |
:name => "k8s-master", | |
:type => "master", | |
:box => "ubuntu/xenial64", | |
:box_version => "20180831.0.0", | |
:enp0s8 => "192.168.33.10", | |
:mem => "2048", | |
:cpu => "2" | |
}, | |
{ | |
:name => "k8s-slave-1", | |
:type => "node", | |
:box => "ubuntu/xenial64", | |
:box_version => "20180831.0.0", | |
:enp0s8 => "192.168.33.11", | |
:mem => "2048", | |
:cpu => "2" | |
}, | |
{ | |
:name => "k8s-slave-2", | |
:type => "node", | |
:box => "ubuntu/xenial64", | |
:box_version => "20180831.0.0", | |
:enp0s8 => "192.168.33.12", | |
:mem => "2048", | |
:cpu => "2" | |
} | |
] | |
# This script to install k8s using kubeadm will get executed after a box is provisioned | |
$configureBox = <<-SCRIPT | |
# install docker v17.03 | |
# reason for not using docker provision is that it always installs latest version of the docker, but kubeadm requires 17.03 or older | |
apt-get update | |
apt-get install -y apt-transport-https ca-certificates curl software-properties-common | |
curl -fsSL https://download.docker.com/linux/ubuntu/gpg | apt-key add - | |
add-apt-repository "deb https://download.docker.com/linux/$(. /etc/os-release; echo "$ID") $(lsb_release -cs) stable" | |
apt-get update && apt-get install -y docker-ce=$(apt-cache madison docker-ce | grep 17.03 | head -1 | awk '{print $3}') | |
# run docker commands as vagrant user (sudo not required) | |
usermod -aG docker vagrant | |
# install kubeadm | |
apt-get install -y apt-transport-https curl | |
curl -s https://packages.cloud.google.com/apt/doc/apt-key.gpg | apt-key add - | |
cat <<EOF >/etc/apt/sources.list.d/kubernetes.list | |
deb http://apt.kubernetes.io/ kubernetes-xenial main | |
EOF | |
apt-get update | |
apt-get install -y kubelet kubeadm kubectl | |
apt-mark hold kubelet kubeadm kubectl | |
# kubelet requires swap off | |
swapoff -a | |
# keep swap off after reboot | |
sudo sed -i '/ swap / s/^\(.*\)$/#\1/g' /etc/fstab | |
# ip of this box | |
IP_ADDR=`ifconfig enp0s8 | grep Mask | awk '{print $2}'| cut -f2 -d:` | |
# set node-ip | |
sudo sed -i "/^[^#]*KUBELET_EXTRA_ARGS=/c\KUBELET_EXTRA_ARGS=--node-ip=$IP_ADDR" /etc/default/kubelet | |
sudo systemctl restart kubelet | |
SCRIPT | |
$configureMaster = <<-SCRIPT | |
echo "This is master" | |
# ip of this box | |
IP_ADDR=`ifconfig enp0s8 | grep Mask | awk '{print $2}'| cut -f2 -d:` | |
# install k8s master | |
HOST_NAME=$(hostname -s) | |
kubeadm init --apiserver-advertise-address=$IP_ADDR --apiserver-cert-extra-sans=$IP_ADDR --node-name $HOST_NAME --pod-network-cidr=172.16.0.0/16 | |
#copying credentials to regular user - vagrant | |
sudo --user=vagrant mkdir -p /home/vagrant/.kube | |
cp -i /etc/kubernetes/admin.conf /home/vagrant/.kube/config | |
chown $(id -u vagrant):$(id -g vagrant) /home/vagrant/.kube/config | |
# install Calico pod network addon | |
export KUBECONFIG=/etc/kubernetes/admin.conf | |
kubectl apply -f https://raw.githubusercontent.com/ecomm-integration-ballerina/kubernetes-cluster/master/calico/rbac-kdd.yaml | |
kubectl apply -f https://raw.githubusercontent.com/ecomm-integration-ballerina/kubernetes-cluster/master/calico/calico.yaml | |
kubeadm token create --print-join-command >> /etc/kubeadm_join_cmd.sh | |
chmod +x /etc/kubeadm_join_cmd.sh | |
# required for setting up password less ssh between guest VMs | |
sudo sed -i "/^[^#]*PasswordAuthentication[[:space:]]no/c\PasswordAuthentication yes" /etc/ssh/sshd_config | |
sudo service sshd restart | |
SCRIPT | |
$configureNode = <<-SCRIPT | |
echo "This is worker" | |
apt-get install -y sshpass | |
sshpass -p "vagrant" scp -o StrictHostKeyChecking=no vagrant@192.168.33.10:/etc/kubeadm_join_cmd.sh . | |
sh ./kubeadm_join_cmd.sh | |
SCRIPT | |
Vagrant.configure("2") do |config| | |
servers.each do |opts| | |
config.vm.define opts[:name] do |config| | |
config.vm.box = opts[:box] | |
config.vm.box_version = opts[:box_version] | |
config.vm.hostname = opts[:name] | |
config.vm.network :private_network, ip: opts[:enp0s8] | |
config.vm.provider "virtualbox" do |v| | |
v.name = opts[:name] | |
v.customize ["modifyvm", :id, "--groups", "/Kubernetes Cluster"] | |
v.customize ["modifyvm", :id, "--memory", opts[:mem]] | |
v.customize ["modifyvm", :id, "--cpus", opts[:cpu]] | |
end | |
# we cannot use this because we can't install the docker version we want - https://github.com/hashicorp/vagrant/issues/4871 | |
#config.vm.provision "docker" | |
config.vm.provision "shell", inline: $configureBox | |
if opts[:type] == "master" | |
config.vm.provision "shell", inline: $configureMaster | |
else | |
config.vm.provision "shell", inline: $configureNode | |
end | |
end | |
end | |
end |
The Vagrantfile will be composed with the Ruby array that creates k8s-head and k8s-node1, k8s-node2 definitions. Once the Ubuntu Xenial boxes provisioned custom shell scripts are used for boot time execution.
- Both Master, Slave nodes common tasks are executed with the Shell provisioning inline options.
- Install Docker CE 17.03
- Added vagrant user to docker group to run docker commands as vagrant user (without using sudo for each not required)
- Install the kubelet kubeadm kubectlk
- kubelet requires swap off
You can do all the setups required to run the following in the sequence :
- k8s-master node runs on 192.168.33.10
- k8s-slave1 node runs on 192.168.33.11
- k8s-slave2 node runs on 192.168.33.12
Bootstrap Setup
Master node will be required the following steps
Slave node will be running and after bootup only runs inline joining the kubernetes cluster with a script generated in the master. node.
Executing the setup
vagrant up
vagrant status
Vagrant status of kuberenetes cluster |
Connect with your PuTTY to k8s-master that is running on 192.168.33.10 IP address.
Check the versions of kubeadm, kubectl, and kubelet
kubectl version kubeadm version # Better format output kubectl version -o yaml kubeadm version -o yaml
Kubeadm, kubectl, kubelet versions |
kubectl get nodes
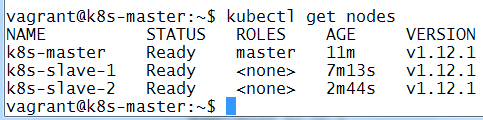
kubectl get nodes output |
Note: Make sure that your Windows firewall disabled to run the Vagrant on your Windows laptop.
You might be more interested to explore and know about the latest Docker 19 Community Edition learning experiments on Ubuntu 19.04
References:
Comments
I just followed your procedure & with in 30 min , Kubernetes Cluster was opearional.
Infact , it's "A Practical Guide , Hands on tutorial Kubernetes Cluster" gives remarkable insider's story of Kubernetes.
Great inspiration today!!! thanks for your blog.
android Training in Chennai
Python Training in Chennai
Best Spoken English Classes in Chennai
Java Training in Chennai
Spoken English Classes in Chennai
Spoken English in Chennai
vagrant@k8s-master:~$ kubectl describe no k8s-master | grep -i taint
Taints: node.kubernetes.io/not-ready:NoSchedule
vagrant@k8s-master:~$ kubectl describe no k8s-slave-1 | grep -i taint
Taints: node.kubernetes.io/not-ready:NoSchedule
vagrant@k8s-master:~$ kubectl describe no k8s-slave-2 | grep -i taint
Taints: node.kubernetes.io/not-ready:NoSchedule
vagrant@k8s-master:~$
Docker and Kubernetes Training
Kubernetes Online Training
Docker Online Training
NAME STATUS ROLES AGE VERSION
k8s-master NotReady master 41m v1.19.2
k8s-slave-1 NotReady 30m v1.19.2
k8s-slave-2 NotReady 22m v1.19.2
How can this be fixed?
"runtime network not ready: NetworkReady=false reason:NetworkPluginNotReady message:docker: network plugin is not ready: cni config uninitialize"