Showing posts with label Ansible. Show all posts

Thursday, February 9, 2023

Ansible Automations Designing & Implementation | Best Practices | Tricks and Tips

Hey DevOps, DevSecOps Engineers, SRE new bees here I am going to share the Learnings which I've executed every day found that this the best and new tip to improve the performance of ansible playbook executions sorted out and listed here.


Planning and designing automation with Ansible

  • Most common DevOps tool used for Planning and Designing is Confluence page
  • Design document must contain a  clear "Objective" - where you will be describe why you wish to do automation on what area
  • Tracking purpose always use a ticketing tool entry preferred tool Jira
  • The design can be breakdown into two levels
    • High level design where we will detail about what each task need to be covered
    • Low level design where we discuss in-depth ideology on each task along with the possible constraints
    •   Usage of global variables (AWX UI use extra vars, host_vars, group_vars etc) discuss their necessity
    • AWX/Tower Job template construct possible options as input to handle overall objective, if not sufficient then chain with Workflow constructs
    • The execution of Job template every possible option that is a valid to consider it as Test Case
    • References Each design document may have some researching requirements that may include your internal company confluence pages or external specific Ansible/AWX technical knowledge articles to help the overall objective.

Playbook Tricks and tips

  1. Ansible playbook directory the directory layout always have the playbooks in the Project directory preferable because Ansible/AWX tower can read the vars from that path to parallel directories such as group_vars, vars etc. 
  2. Playbook description : First thing fist always add a description comment and in that please mention how this playbook works. Other SRE/DevOps engineer should be able to run without asking you how to run this. 
    • In the description also include extra variable in order to execute the playbook in happy path also give clarity on mandatory or optional variables.
    • While defining the extra variables first list all mandatory variables and then go for optional
    • Better to include tags used in the playbook and their purpose so that end user can easily select for task execution or skip the tasks under certain conditions
    • Please add comment before every newly introduced task, that should be highlight the detail process task will do.
  3. Writing your Task always have named task, that should give brief understanding about what you will be doing in that task, 
    • Task name must have title cased
    • Sometime you might be copying the task from other playbooks re-check that name is appropriate or not. 
    • If a task have some critical logic must add comment on top of the task the purpose should be described
  4. Manage Facts : Ansible's gather_facts directive implies time consuming operations so it is a good practice to disable it, when it is not specifically needed in your play.
  5. Don'ts during execution: Do not use LIMIT option as much as possible there could be some plays which will skipped if you use LIMIT option on AWX templates. To resolve this, better option is to use hosts: value assigned to a define variable like targets and have a default value as 'all' or 'localhost as per your play need. When you use the hostvars in a play this limit value could be causes an issue to collect facts from the hostvars.
  6. I also recommend to specifically set "any_errors_fatal: true" in all the plays where we can expect/catch the ERRORs during the execution. 
  7. If you already defined a play with any_errors_fatal: false then DON'T define the ignore_errors to the same play.
  8. When you build the email notification logic in a play for successful flow,  always ensure that you must have failure email as well. You can limit the target audience in case of failure
  9. Encrypt the sensitive data content inside a playbook with ansible-vault command
  10. Always double check your inventory list with ansible-inventory command with list, graph options
  11. In production if all possible use cases tested in non-production then better to reduce the verbose level or suppress the logs this can be done from the task level by using `no_log: "{{ log_suppression| default(true) }}"` at the end of the task definition. Here log_suppression is an Ansible variable  this can be changed at the time of execution the value can be either 'true' or 'false'.
  12. While dealing with the when condition in Ansible number validation use the int filter, do not use character value comparisons ( x == '0' ) instead provide the numerical value( x == 0 ).
  13. While working with the lineinfile module, if same playbook is triggered from multiple AWX Consoles there could be a race condition and it can be fixed with throttle option.  use Ansible's setting "throttle" set to 1 in the task where lineinfile is executed "The throttle keyword limits the number of workers for a particular task. It can be set at the block and task level. Use throttle to restrict tasks that may be CPU-intensive or interact with a rate-limiting API" Example:
              - name: Updating hostname and uptime in days in file CSV
              lineinfile:
                path: /tmp/uptime-report.csv
                line: "{{ inventory_hostname }},{{ box_uptime }}"
              throttle: 1
              delegate_to: localhost

AWX Admins Tricks

  • When you install AWX BETTER version always prefer to use latest -1 version that could be stable and consistent during your installation process.
  • If you ae using existing AWX/Ansible job templates to test various Automations requirements/enhancements that we work on:
  • We usually need to alter the Job Templates temporarily to performing testing (i.e. we change the Projects, and besides we may add some Limits or Skip tags, or we may use some EXTRA Variables like 'block_reboot' or 'log_suppression') 
  • AWX Smart Inventory creation is simple to use only thing you need to know how to use the regex (regular expression) that will bring the combination that satisfies to the existing host list and then it will create the new inventory out of existing inventory hosts. To get all hosts
    name.regex:.*
    To get hosts that start with ec2
    name.regex:^ec2
    To get hosts that contains 'prod'
    name.regex:prod
  • Problem: there are good chances, that we may forget to undo all/some of these temporary changes, resulting in broke jobs or incomplete runs 
  • Solution(Best Practice): Always create a copy of the job you want to use for testing and alter that copy according to the needs, then just delete the temporary job once test finished 
  • making a copy of a job is trivial and will ensure we are not breaking anything in the existing system.
  • The latest AWX versions have different weird behavior! AWX 17.1.0 inventory creation from the source control is allowed only when the inventory yaml file-permissions have executable! 
    ## To set the permission in git
    git ls-files --stage
    git update-index --chmod=+x 'name-of-shell-script'
    git commit -m "made a file executable"
    git push
        
AWX Workflow flow control better to use "On Success" because we usually want to stop remaining actions/(in my scenario reboots) when there is a failure encountered (this may cause the affect to multiple/all remaining servers).

Best References:

  1. Change file permissions while running 
  2. Multi-line Strings in YAML
  3. In-memory inventory


Tuesday, February 7, 2023

Ansible Jinja2 Templates - ansible template module

Here I'm starting this post with famous ARISTOTLE quote.

"We are what we repeatedly do. Excellence, then is not an act, but a Habit"


Welcome back Ansible Automations and who are habituated as Ansible automation specialists this post for them to give boosted walk through, In this post, I would like to share my experiments with Jinja2 templates usage on the Ansible playbook. Of-course Jinja is from Japan it is world famous for templatization capabilities by integrating with multiple languages such as Python, Ruby, Salt talk etc.

In this post we will be cover the following topics:
  1. What is Jinja2 template do?
  2. Template with filters
  3. Template with Lists and sets
  4. Template module in Ansible
  5. Template with Flow Control
  6. Template using Looping
  7. Template inheritance**

What is Jinja template do?
Jinja2 is another Python library created for Flask web framework, that comes part of Ansible installation. It is special ability as interpolate or put stuff into YAML Variables(other strings). Those variables can be part of HTML document putting stuff at run-time.

A template is any string of text that contains placeholders {{ }} for the template language, to be able to replace those placeholders by some values. The syntax used for the placeholders and the whole syntax of the template as a whole is known as a template language and the underlying code that evaluates the template and puts the new values in is called a template engine Ansible comes with powerful Jinja2 template language.
 
Let's explore more about Ansible Jinja templates experiments with examples.


Prerequisites

Firstly you must have Ansible installed and the ssh-key authorized for all the managed nodes those are configured inside your targeted environment in the Ansible inventory host list.

How to use string filters in a playbook?

This is common requirement where we can use the different string filters such as: upper, lower, title, replace, default value in the following example.


---
- name: test string values
  hosts: localhost
  vars:
    my_name: 'Pavan Deverakonda the great'
  tasks:
    - name: String filter examples
      debug:
        msg: 
        - "The name is {{ my_name }}"
        - "The name is {{ my_name |upper }}"
        - "The name is {{ my_name |lower }}"
        - "The name is {{ my_name |title }}"
        - "The name is {{ my_name |replace('Pavan','Raghav') }}"
        - "The name is {{ title |default('Mr.') }}{{ my_name }}"
  
After the execution of the string filters the output :

Applying string filters on text in a Ansible playbook


How to play with Jinja2 lists and sets in Ansible?

It is very simple to understand about the Lists and Sets in Jinja2 they can be operated similar to Python Lists and Sets here in the Ansible we need to use them in the YAML as follows:

---
- name: test aggregate values
  hosts: localhost
  vars:
    mylist: [10,20,30]
    x: [8,3,9,5,1]
    y: [44, 5,5]
    words: ["Learning","by","doing"]
  tasks:
    - name: aggregate filter examples
      debug:
        msg: 
        - "The max {{ mylist|max }}"
        - "The min {{ mylist|min }}"
        - "The last {{ mylist|last}}"

    - name: set filters 
      debug:
        msg:
        - "The unique: {{ [2,5,2,9,7,5]|unique }}"
        - "The union: {{ x|union(y) }}"
        - "The another union: {{ [10,3.4]|union([4,2])}}"
        - "The intersect: {{ x|intersect(y) }}"
        - "The intersect: {{ [10,20,30,10]| intersect ([40,30])}}"
        - "The joining words: {{ words|join(' ') }}"
The execution on the lists and sets goes here as output:
Jinja2 Lists and Sets in Ansible playbooks

How to write an Ansible playbook using templates?

It's so simple to use the Jinja2 templates in the Ansible playbooks. To know all the available default ansible variables at the runtime, you can inspect with the following command:
ansible -m setup localhost
It will give you the facts about the localhost. To filtering out to get all the facts which starts with 'ansible_'
ansible -m setup db |grep ansible_


Ansible setup module
ansible_user details using ansible command setup module


Now, Let's move on to our main goal to playing with the templates in playbook and experiment to know how the template engine helps our examples.
 

Writing Simple Ansible playbook using templates module

Ansible uses Jinja2 templates where it can be lookup inside 'templates' folder, where your playbook runs. All the values of variables will replaced at the time of running the playbook. Runtime value replaces at the time of remote execution.
cat templates/sample-conf.j2
env = {{ env }}
remote_ip = {{ ansible_host }}
remote_user = {{ ansible_user_id}}
remote_hostname = {{ (ansible_fqdn|default(ansible_host)) }}
To test the template values in the playbook write it as :
# File: mytemplate-test.yaml
---
- name: test template values
  hosts: web
  vars:
    env: dev
  tasks:
    - name: template module runs on remote
      template:
        src: sample-conf.j2
        dest: /etc/sample.conf
      become: true
Advanced settings for templates adding the user, group, file permissions with mode attributes.
 ansible-playbook mytemplate-test.yaml -b
 

setup the permissions on the templated files.


Ansible Jinja template experiment

Now connect to the Node1 or Node2 where this hosts are in the play, and check that file content of /etc/sample.conf

Execution of Ansible template sample
Jinja2 template execution with ansible playbook

How to specify "if else" statements in Ansible Jinja2 (.j2) templates? 

Assuming that you are assigning somewhere in the playbook or at the time of launching the Ansible in the extra_vars, in AWX here we go with the "test_var" value with some bool value and you want to test the following is the Jinja syntax to test
- debug:
	msg: "{% if test_var == true %} Good to go!{% else %} Not operational!{% endif %}"
You can also include the ansible facts in the message content.
controlplane $ cat condition1.yml 
- name: Condition test
  hosts: localhost
  gather_facts: no
  vars:
    test_var: yes
  tasks:
    - name: checking if-condition
      debug:
        msg: "{% if test_var == true %} Good to go!{% else %} Not operational!{% endif %}"
	
Simple if-else Jinja template syntax in Ansible playbook

Looping with Jinja templates

Here is a fun looping playbook which will be using a list variable 'myex' that stored all my experiances in the IT industry.
---
- name: Testing Jinja templates with loops
  hosts: localhost
  vars:
    myex: ['Teleparadigm','IBM Global Services','BirlaSoft','Virtusa','Rubicon Red', 'Oracle Corporation','Garmin']
  tasks:
    - name: extracting my experiance
      template:
        src: myex.j2
        dest: /tmp/experiance.txt
  
Jinja template you can store in a file called myex.j2
This is my experience list:

{% for e in myex %}
 
{{loop.index}}. {{ e }}

{% endfor %}
 
When we run the playbook we could see a nice output as:
Loops in Jinja templates in Ansible playbook

Nested loops in Jinja template 

Many Thanks! to Mr. Tim Fairweather RedHat Solution Architect, who shared crazy and funny post "Mastering loops with Jinja templates in Ansible" with this inspiration I've created following nested loop section, where I would like to experiment with the template usage and that too the role created with the ansible-galaxy command as shown:
ansible-galaxy init jinja-templates
  tree jinja-templates/
  jinja-templates/
|-- README.md
|-- defaults
|   `-- main.yml
|-- files
|-- handlers
|   `-- main.yml
|-- meta
|   `-- main.yml
|-- tasks
|   `-- main.yml
|-- templates
|-- tests
|   |-- inventory
|   `-- test.yml
`-- vars
    `-- main.yml
Here is template using playbook my flow of developing code as follows:
  1. Create variables which will contain a map/dictionary
  2. Define a task that uses template module and generates output
  3. Create template that will referring to the variables defined in the step 1
  4. Add a configuration to work with the do statement in template
  5. Create main playbook to test the nested loop in Jinja Template
Create variables 
Let's create the variables which have dictonaries in a yaml format `vi jinja-templates/vars/main.yml`
---
    inspiring_people:
    - name: Nielgogte
      fav_colour: Blue
    - name: Siva
      fav_colour: Blue
    - name: RanjanShee
      fav_colour: Orange
    - name: Sanjeet
      fav_colour: Orange
    - name: Pankaj
      fav_colour: Yellow
    - name: Prateek
      fav_colour: Blue

  colours:
    - name: Blue
      thinks:
        - Sky is The Limit
        - See as sea into the Depth
    - name: Yellow
      thinks:
        - Expressive
        - Task Oriented
        - Brainstroming
    - name: Orange
      thinks:
        - Proactive
        - Extreme
        - Cares a lot
  
Create task using template module 
Now what we want to perform with this role contained task, we will define under the tasks folder where we can define multiple task `vi jinja-templates/tasks/main.yml`
  - name: Create the Jinja2 based template
	template:
	  src: inspiring.j2 
	  dest: /tmp/impactingMe.out
  
Create template with nested for-loop
See here is the logic that goes fantastic for the nested loops in a Jinja Template `jinja-templates/templates/inspiring.j2`

  • Some variable names modified to test how they are working
  • Inside the template I've used Jinja filter ' | upper'.
 
---
{% for colour in colours %}
Colour number {{ loop.index }} is {{ colour.name }}.
  {% set colour_count = 0 %}
{% for person in inspiring_people if person.fav_colour == colour.name %}
{{ person.name | upper }}
{% set colour_count = colour_count + 1 %}
     {% do colour.update({'inspiring_people_count':colour_count}) %}
{% endfor %}
Currently {{ colour.inspiring_people_count }} inspiring_people choose color {{ colour.name }} as their favourite.
And the following are their thoughts for {{ colour.name }} :
  {% for item in colour.thinks %}
  -> {{ item }}
  {% endfor %}
{% endfor %}
  
All set to test our new learning that is nested loop within Jinja2 templates in Ansible
---
- name: Demonstrating variables in Jinja2 Loops
  hosts: localhost
  connection: local
  gather_facts: no
  roles:
        - jinja-templates

  tasks:
    - name: display file
      shell: cat /tmp/impactingMe.out
      register: output

    - debug:
        msg: "{{ output.stdout.split('\n') }}"	
  
Here we go... that nice output of-course I've worked on it to get it working almost half day :)

Ansible nested loops in Jinja Templates

Template inherence


Ansible Jinja template inheritance allows you to create the building blocks that you can combine use them. Here is an example of an Ansible playbook that uses Jinja2 templates with inheritance to create an index.html page. As The head template implementation can be 'included' and the body template is extendes in the final index template to generate the complete index.html page.
---
- name: Create index.html page
  hosts: localhost
  gather_facts: false
  vars:
    title: My Ansible experiment Website
    description: A sample website created with Ansible and Jinja2 templates
    keywords: sample, website, Ansible, Jinja2
  tasks:
    - name: Create head template
      template:
        src: templates/head.j2
        dest: head.html

    - name: Create body template
      template:
        src: templates/body.j2
        dest: body.html

    - name: Create index.html
      template:
        src: templates/index.j2
        dest: index.html  
  

The head template, created with templates/head.j2, sample might look like this:
  
  
    {{ title }}


The body template, created with templates/body.j2, sample might look like this:


Welcome to {{ title }}

{{ description }}

Finally, here's an example of the index.j2 template, which extends the body.j2 and includes head.html that was generated with `head.j2` templates:
  
{% include "head.html" %}
{% extends "body.j2" %}
  

H A P P Y !!    Template using A U TO M A T I O N S !!

Good Document References:

Hope you enjoyed this post, Keep sharing your comments on this post.

Friday, December 23, 2022

Ansible powerful parameters - delegate_to, connection


Delegation to a host

Here is an example where we can delegate the task to a particular host. This play book is using inventory_hostname from the gather facts.
- name: Delegation to localhost
  hosts: all
  tasks:
  - name: create a file on target server
    file:
      path: /tmp/i_m_on_target_server.txt
      state: touch
  - name: create a file with host named file by delegation to localhost
    file:
      state: touch
      path: "/tmp/{{ inventory_hostname }}.txt"
    delegate_to: localhost

connection paramer

We can use this "connection" parameter add to your task level or play level.
# Filename: connection_local.yml 
# To do some task on ansible server
# local means  without doing ssh command (no need of  password and no need of ssh keys)
# with the local connection parameter for the play
---
- name: This is to determine how the connection parameter works  with local
  hosts: app
  connection: local
  gather_facts: false
  tasks:
  - name: connection local test
    file:
      state: touch
      path: /tmp/srirama.txt

local action

Now in the following example we will see how local_action will be working. The local_action is an Ansible module which will by pass the ssh connection to do command locally.
- name: Using local acion in this  playbook
  hosts: localhost
  vars: 
    test_file: /tmp/omnamahshivaya.txt
  tasks:
  - name: local action
    local_action: "command touch {{ test_file }}"
    
The better option to do it in local is using connection: local parameter at play level.

Monday, December 19, 2022

Ansible Vault - To save Secrets

Hello DevOps Automations Engineers!!

 Ansible provides us special command 'ansible-vault' that is used to encrypt, decrypt, view an Ansible  playbook, this is also have amazing feature specific to role, vars YAML files, we can apply this to string of text in regular variables. 

Why do we need to encrypt our Play books?

Our Ansible automation projects, we need to work on multiple tasks and which may have some sensitive data such as database user credentials, any cloud IAM role details or it can be some other applications login credentials that's used to validate URL availability. Or it can be used to store the SSL certificates. At any point of time if the system is using plain text and it  has trouble to your confidential and sensitive data otherwise it could causes huge damage to your organization. Where we need a way to store the sensitive data can be protected by data encryption tool, and this can be done using the Ansible-vault command. 


Let's see the ansible-vault command help, in this we will experiment with what all the options we have to play with encryption and decryption of plain text in a file, string, entire YAML file also can be locked with this.
ansible-vault --help
usage: ansible-vault [-h] [--version] [-v] {create,decrypt,edit,view,encrypt,encrypt_string,rekey} ...

encryption/decryption utility for Ansible data files

positional arguments:
  {create,decrypt,edit,view,encrypt,encrypt_string,rekey}
    create              Create new vault encrypted file
    decrypt             Decrypt vault encrypted file
    edit                Edit vault encrypted file
    view                View vault encrypted file
    encrypt             Encrypt YAML file
    encrypt_string      Encrypt a string
    rekey               Re-key a vault encrypted file

ansible-vault with create option

The create option will help us to create new encrypted file, when you execute this it will prompt for a password, confirm password for the Vaultify YAML file, once you entered the credentials it will be opens the default editor  and you may enter the text in that and save the file. When you view the content of the file it will be encrypted 

ansible-vault create vault.yml
Here in place of vault.yml you can use your confidential file.

ansible-vault create 


Encrypt

The encrypt option will enable us to do encrypt any file content, that can be a plain text file or our ansible playbooks.

echo "unencrypted stuff"> encrypt_me.txt
cat encrypt_me.txt
ansible-vault encrypt encrypt_me.txt
cat encrypt_me.txt
Ansible-vault for encryption of a file


Decrypt

ansible-vault decrypt vault.yml
  

View

You can view the content of a encrypted file it can be any playbook or vars which you only owner and  aware of the key to open it.

ansible-vault view valut.yml


Edit

When we have encrypted file that may be created using 'create' or 'encrypt' option of ansible-vault command we can use the following way to edit the file. where the Ansible will prompt for password.

Recreate the password with rekey


Using --ask-vault-pass
ansible-playbook vault_demo.yml --ask-vault-pass

Using --vault-password-file 
ansible-playbook vault_demo.yml --vault-password-file my_pass

Using --vault-id
ansible-playbook vault_demo.yml --valult-id my_pass

Courtesy by Krishna Tatepally[DevOPs Operations Expert]

Thursday, December 1, 2022

Ansible handlers

Hello DevOps Experts!! let's zoom  into the usage of the Ansible Handlers and notifies 

What are Ansible Handlers?

The handlers section or the tasks defined under the handlers folder are executed at the end of the play once all tasks are finished. In the handlers tasks we are typically do either start, reload, restart and stop services.

Sometimes we may need to execute the task only when a particular change is made that can be notified.  Simple example of Apache web server when we modify httpd.conf file then we want to restart the httpd service. 

When we were working on Tomcat, when tomcat service is enabled. then there is a need for the reload firewalld service this is where we need to move this reload task under handlers and the enable tomcat service should have notify the task name 'reload firewalld service'. These are the perfect examples for handlers usage in Ansible play.

So here the point is that handler tasks will be performed only when they are notified.

Ensure that handler task name should have a globally unique name.

 Let's see the example of notify and handlers

---
- name: install php
  yum:  name=((item))  state=latest
  with_items:
    - php 
	- php-gd
	- php-pear
	- php-mysql
  notify: restart httpd
  handler
	handler/main.yml

 - name: rstart apache
   service: name=httpd state=restarted

Now you can see how to include the role php-webserver inot the main playbook
# Filename: test-handler.yml
---
 - hosts: web
   user: root
   become: yes
   roles:
     - php-webserver  

Execution of the test-handler will be like this:
ansible-playbook test-handler.yml


Sunday, November 27, 2022

Ansible real-time project - Installing and configure Tomcat 10

 Hey DevOps or DevSecOps or SRE Guys!!

What's up? in the automation journey one more wonderful learning here! 


In this post we will be implementing all our Ansible modules one after other to build a complete solution for Java based Application server installation and running using Ansible playbook.

At present Tomcat latest version is 10.0.27 so I've used same 

Pre-requisites: 

  • To install Apache Tomcat there is separate JDK/JRE compatibility we need to validate before we proceed
  • Create a dedicated user account as 'tomcat' with shell as bash to manage Tomcat application server
  • Create a separate directory for tomcat server to be installed
Execution of multiple tasks in the Playbook will be as follows:
  • Download the Tomcat software from Apache Tomcat 10.0.27.tar.gz
  • Uncompressing the tomcat tar.gz file
  • Change the file permissions and ownership
  • Cleanup after unarchive the tar.gz file
  • Start the Tomcat server
  • Have a task to stop the Tomcat server

---
- name: Installation and setup Apache Tomcat 10
  hosts: "{{ targets | default('localhost') }}"
  become: yes
  gather_facts: no
  tasks:
  
    - name: Install openjdk
      yum:
        name: java-1.8.0-openjdk
        state: present
      tags: install_openjdk

    - name: Create user as tomcat
      user:
        name: tomcat
        state: present
        home: /home/tomcat
        shell: /bin/bash
      tags: pre-install

    - name: Create a directory - /opt/tomcat
      file:
        path: /opt/tomcat
        state: directory
        mode: 0755
        owner: tomcat
        group: tomcat
      tags: pre-install

    - name: Download tomcat - apache-tomcat-10.0.27.tar.gz
      get_url:
        url:  https://dlcdn.apache.org/tomcat/tomcat-10/v10.0.27/bin/apache-tomcat-10.0.27.tar.gz
        dest: /opt/tomcat
      tags: pre-install 

    - name: Extract tomcat inside directory and set ownership, permissions
      unarchive:
        src: /opt/tomcat/apache-tomcat-10.0.27.tar.gz
        dest: /opt/tomcat
        extra_opts: [--strip-components=1]
        remote_src: yes
        owner: tomcat
        group: tomcat
        mode: "u+rwx,g+rx,o=rx"
      tags: tomcat-install

    - name: Remove gz file apache-tomcat-10.0.27.tar.gz
      file:
        path: /opt/tomcat/apache-tomcat-10.0.27.tar.gz
        state: absent
      tags: post-install

    - name: Start the Tomcat server
      become_user: tomcat
      shell:
        cmd: nohup ./startup.sh
        chdir: /opt/tomcat/bin
      tags: start-tomcat

    - name: Stop the Tomcat server
      become_user: tomcat
      shell:
        cmd: nohup ./shutdown.sh
        chdir: /opt/tomcat/bin
      tags: stop-tomcat, never
      
You can run the playbook in multiple ways
1. Use the target as webserver group to install Tomcat only on them.   
ansible-playbook tomcat-solutoin.yaml -e targets=webservers
2. Use the tags to stop the Tomcat servers.   
ansible-playbook tomcat-solutoin.yaml -t stop-tomcat -e targets=webservers

3. Use the tags to start the Tomcat server.   
ansible-playbook tomcat-solutoin.yaml -e targets=webservers

Finding & Terminating a process on remote VM

The play can be having two tasks where you need to find the running process by process name or command used to run it. If there is any error ignore them. Try to catch the result into a variable to pass it to next task.
Example - find process which is started with java
Second task is to terminating a process which is identified in the first task. Here we can use 'shell' module where we can use 'kill' running process.
---
 - name: Find Java process and Terminate
   hosts: "{{ targets | default ('localhost') }}"
   gather_facts: false

   tasks:
     - name: Get the running Java process
       shell: "ps -ef|grep tomcat |grep -v grep | awk {'print $2'}"
       register: JavaProcessID

     - name: Print Java Process
       debug:
         msg: "{{ JavaProcessID.stdout }}"

     - name: Terminating Java Process
       become: yes
       become_user: tomcat
       shell: "kill -9 {{ JavaProcessID.stdout }}"

Execute the playbook as follows:
ansible-playbook find_killtomcat.yaml -e targets=webservers
The output Image:
Using shell module to find and kill tomcat process


Saturday, November 19, 2022

Ansible Tags - Controls Tasks

 Ansible playbook can be a construct of multiple plays or each play may contains multiple tasks. This is where we may have situation where you need to add new task to the existing play or playbook, and we need to test many times that newly added task. 

While testing multiple times we many don't want to execute certain tasks such as a task 'Send email notification' when you preparing a 'Reboot of server' or 'Restart of Service' or 'Deployment of a service'. During the testing time you may want to exclude these notification tasks. 

There are situations where we might want to run a particular task as per the input at the run time of a playbook. This may be from AWX/Tower UI select them.

Ansible tags - to control the tasks of a Playbook


I will be explaining in this post, How to run or not to run a particular task in given  playbook. 

Important concepts about Ansible tags

  • Ansible tags are keys to identify and control the tasks for execution or exclude from the playbook that could have multiple tasks
  • Ansible tags are references or aliases to a task inside a play selection can be done with -t or --tags options in the command line 
  • Selecting a tag for exclude can be defined with --skip-tags option
  • A task may have multiple tags such as sending email task could have tags as email_notify, notifications
  • There can be same tag that can be associated with multiple tasks such as notifications  can be associated with sending email and sending slack notices as well

Prerequisites

I've Ansible Controller machine and wanted to install the 'Apache2' webserver on the managed nodes. I've a sample playbook for it. 

How to be specific during the execution of Ansible Playbook?

Now let me create a playbook for install and control a Apache webserver. All my managed nodes are with CentOS so I'm using yum package module in this.

The logic for the below playbook is build with two modules: yum, service

staate attribute of yum package module

service module parameter state and values

You can see the YAML using tags which is our main objective of this post:

---
 - name: Install and control Apache Webservers 
   hosts: "{{ targets | default('localhost') }}" 
   become: yes
   tasks: 
     - name: Install httpd server
       yum:
         name: httpd
         state: present 
       tags: install_httpd, boot_web

     - name: start httpd server
       service:
         name: httpd
         state: started 
       tags: start_httpd, boot_web

     - name: stop httpd server
       service: 
         name: httpd
         state: stopped
       tags: stop_httpd, destroy_web

     - name: uninstall httpd server
       yum:
         name: httpd 
         state: absent
       tags: uninstall_httpd, destroy_web
The Package state – parameter values can be found from the ansible documentation The execution can be specific to start the webserver, that means there should be Apache webserver must be installed and then start the service. To install webserver on two nodes.

ansible-playbook httpd-tags.yml -t install_httpd -e targets=ansible-node-1,ansible-nodes-2
To start the webserver on two remote hosts
ansible-playbook httpd-tags.yml -t start_httpd -e targets=ansible-node-1,ansible-nodes-2
Ansible tags passed in the command line with -t option


To install and start webserver if no targets mentioned means it will be localhost where Ansible controller running there this webserver will be installed and started with the following command
ansible-playbook httpd-tags.yml --tags boot_web 
To stop the webserver on two remote hosts
ansible-playbook httpd-tags.yml -t stop_httpd -e targets=ansible-node-1,ansible-nodes-2
To uninstall the webserver on two remote hosts
ansible-playbook httpd-tags.yml -t uninstall_httpd -e targets=ansible-node-1,ansible-nodes-2
We can also select multiple tags to run the playbook. To stop the webserver on two remote hosts
ansible-playbook httpd-tags.yml -t stop_httpd,uninstall_httpd -e targets=ansible-node-1,ansible-nodes-2
Ansible tags using multiple tags


Same thing can be executed with excluding tasks which we can tell by using --skip-tags options for the install_httpd, start_httd means remaining tasks need to be executed.
ansible-playbook httpd-tags.yml --skip-tag install_httpd,start_httpd -e targets=ansible-node-1,ansible-nodes-2
We can also use common tag instead of using two tags used for stop and uninstall the webserver as destroy_web single tag.
ansible-playbook httpd-tags.yml --tags destroy_web 
Hey is there any other alternative way without tags can I say from here onwards execute the playbook?


Yes, We can also use task-name as an input for a special option –start-at-task for the ansible-playbook command. See this example that tells 'stop httpd server' onwards means two tasks will be executed that is stop_httpd, uninstall_httpd tasks.

ansible-playbooks httpd_tags.yml --start-at-task "stop httpd server"
There are two newly introduced from Ansible 2.5 version onwards they are important and very special tags in Ansible playbooks are always and never.

Always: If you assign the always to tag to a task or play then Ansible Controller will always run that task or play unless you specify that need to be skip using --skip--tags
Never: If you assign the never tag to a task or play then Ansible controller will skip that particular task or play unless you specify with '--tags never' it looks odd! But it works as it meant to do in that way.


---
- name: Understanding always, never tags
  hosts: localhost
  become: true
  tasks:
    - name: Tasks execute always 
      command: echo "this is from always tag"
      tags:
        - always

    - name: Install nginx server
      apt:
        name: "nginx"
        state: "present"
      tags:
        - install
        - never

    - name: Deploy webpage to website
      copy:
        src: index.html
        dest: /var/www/html/
      tags:
        - deploy
  
When you run this playbook it will always task will be executed always! The install task will be never executed. What is the command to list all tags present in a Playbook?
ansible-playbook mytags.yml --list-tags
  
Terminology: AWX is free open-source project that enables us to manage Ansible from a web interface.

All the examples executed thanks to Krishna
Courtesy by   Krishna Tatipally

Document References:

Monday, November 14, 2022

Ansible Facts - Customizations

Hey DevOps Team, In this post I would like to give you the knowledge on the special feature about Ansible Facts and we can also customize these facts as global variables to use in multiple playbooks.

What is ansible facts? 

Ansible facts are just simple variables that are automatically discovered by ansible on a managed nodes. such as system information disk info, os info, package info IP Network and many more ...

Why we manage facts?

Default these facts will be automatically collected exclusively we need to disable some times. - multiple play in a playbook

How can we use facts?

we want to run only when enough memory is available on the target machine then install the package. That is the smartest way to do the automation!
---
# File : hello.yaml
- name: Facts example 
  hosts: "{{targets|default('localhost')}}"
  tasks:
    - name: prints details
      debug:
        msg: "Hello this machine have {{ ansible_memory_mb['real'] }}"

when you run the above playbook it will automatically do this "Gathering Facts". This is done by a special built-in module called 'setup' module. What is this setup module does? Let's examine by executing the following ad-hoc command:
ansible node1 -m setup # To know about node1
ansible localhost -m setup # To know about Ansible controller machine
the above will be printing lot of information in the JSON format thrown on to your monitor, look this is all under "ansible_facts"

To collect all these and displaying on the stdout will be time consuming process. We can skip this by saying I don't want to see! To control this, disable collecting facts process you can inform in the playbook by saying 'gather_facts: false' this will not do automatic collection so that playbook will be executed faster.
Facts are like ansible_distribution ansible_hostname ansible_default_ipv4['address']
---
# File : facts_ex.yaml
- name: Facts example   
  hosts: nodes
  gather_facts: false
  tasks:
    - name: collect facts
	  setup:
    - name: prints details
	  debug:
	    msg: 
		- "{{ ansible_distribution }}" 
		- "{{ ansible_hostname }}"
		- "{{ ansible_default_ipv4['address'] }}"

Custom Facts

Let's go to the node1 and set the facts manually. ofcourse we can also set this with ansible file operation as well.
sudo mkdir -p /etc/ansible/facts.d 
cd /etc/ansible/facts.d
Let's create our facts file under the above created directory structure where ansible controller can look for and fetch the data1 `sudo vi local.fact`
[db_server]
db_installer= Oracle 21c
db_port= 1521

[bu]
project=Banking
Now let's run the fact collection from the ansible controller machine following command:
ansible node1 -m setup -a 'filter=ansible_local'
Use Case 2: Accessing the local facts from the playbook as follows:
---
# File : localfacts_ex.yaml
- name: Custom Facts example   
  hosts: node1
  tasks:
    - name: prints local facts details
	  debug:
	    msg: 
		- "{{ ansible_local }}" 
execute the above example observe the output.
ansible-playbook localfacts_ex.yaml
Now let's try to fetch those internal elements from custom facts, which are defined in the remote managed node 'node1' as dictionary of dictionaries. 
---
# File : localfacts_ex1.yaml
- name: Custom Facts in details example   
  hosts: node1
  tasks:
    - name: prints local facts details
	  debug:
	    msg: 
		- "{{ ansible_facts['ansible_local']['local']['db_server'] }}" 
        - "{{ ansible_facts['ansible_local']['local']['db_server']['db_installer'] }}" 
        
        
Run the above customized facts and retrieving is little complex as it requires little knowledge on the JSON form of data accessing method, but it's okay this is simple example used in the playbook.
ansible-playbook localfacts_ex1.yaml
Now we can control the custom facts collection based on the availability as we know these facts are defined in node1 manage server only, when we pass hosts value as nodes it will be getting failed for node1 or localhost to suppress such cases we have option to use 'when' conditional check as shown below:
---
# File : localfacts_ex2.yaml
- name: Custom Facts example   
  hosts: nodes
  tasks:
    - name: prints local facts details
	  debug:
	    msg: 
		- "{{ ansible_facts['ansible_local']['local']['db_server']['db_installer'] }}" 
	  when: ansible_local.local.db_server.db_installer is defined
The execution will be takes place as follows:
ansible-playbook localfacts_ex2.yaml
Keep smiling 🤣 with rocking automation ideas you are learning with me!!
References:
Official Document

Sunday, January 16, 2022

Ansible Error Handling and Fail Handling

Hello everyone!! In this post I would like to experiment with the failure handling with block-rescue-always block in a Ansible tasks in playbook. 

Prerequisites

* Ansible installed and their must be Target nodes
* Basic understanding of any programming language that uses try- catch blocks

Ansible stops playbook execution on a task failure and we can choose to ignore that using 'ignore_errors' to continue with remaining tasks. (in Python we have 'pass' similar to that).

If you have couple of tasks in a playbook, when first task fails Ansible stops there. But if you want to execute the next tasks even though your first task failed.


---
# File name: ignore_err.yml
 - name: check ignore errors
   hosts: localhost
   gather_facts: false
   tasks:
    - block:
        - command: "ls ~/"
        - command: "ls ~/bin"
        - command: "ls /etc/hosts"
          become_user: root
          become: yes
      ignore_errors: yes

Now you can try to execute with 13 line and with out that line observe the output.
ansible-playbook ignore_err.yml
Execution of ignore_error play.

block concept

Common tasks 1. Install Apache httpd, memcached packages 2. We can use templates/src 3. We can start the services
tasks:
  - block:
    - yum: name={{ item }} state=installed
	  with_items:
	    - httpd
		- memcached
	- template: src=templates/src.j2 dest=/etc/mytest.conf
	
	- service: name=httpd state=started enabled=True 
  when: ansible_distribution == 'CentOS'
  become: true
  become_user: root

Nested blocks

Block of blocks
---
 - name: Block of blocks
	tasks:
	  - name: install web server
	  - block:
		  - block:
			  - name: Install apache2
				apt: name=apache2 state=present
			when: ansible_os_family == "Debian"
		  - block:
			  - name: Install HTTPd
				yum: name=httpd state=present
			when: ansible_os_family == "RedHat"
		tags: package

Block-level variable scope

We can have different scope for the variables defined at global playbook level and here we can also experiance the block level variables they can be only accessable with in the block, outside the block it will be 'UNDEFINED VARIABLE'.
 - hosts: localhost
   vars:
     mystate: Happy
   tasks:
     - block:
             - debug: var=mystate
             - debug: var=mynextstate
       vars:
         mynextstate: Learning
     - debug: var=mynextstate
Execution:
ansible-playbook block_vars.yml
Screenshot of execution:

block-rescue

Ansible allows us to define the scope for do the code has errors under the block directive. When fatal error encountered Ansible control will jump out to the rescue directive section. Where you can perform some tasks that can be like sending failure notifications to the team on slack or email or pager.
- name: Testing block-rescue directives
  hosts: localhost
  tasks:
    - name: Handling the error tasks status
      block:
          - debug:
                  msg: 'This task is successful'
          - name: This will force failure
            command: /bin/false
          - debug:
                  msg: 'This task will not be executed'
      rescue:
          - name: Sleep for 30 seconds and continue with play
            wait_for:
              timeout: 30
            delegate_to: localhost

          - debug:
                  msg: 'As there was a failure in block section, rescue section will run'
Execution
ansible-playbook block-rescue.yml
Screenshot:

block-rescue-always in Ansible

The error point can be by running /usr/bin/false command

Error handling with three blocks 
1. block which contains tasks there could be some possible errors 
2. rescue part will be executed when there is error occurred in the upper block
3. To ensure some task that should executed always even when you are using the block having errors or not. 


---
- name: save file as block-rescue-always.yml
  hosts: localhost
  connection: local

  tasks:
    - block:
            - debug:
                msg: "I execute here..."
            - command: /usr/bin/false
            - debug:
                msg: "I never touched :("
      rescue:
            - debug:
                msg: "I caught Error here..."

            - command: /usr/bin/false
            - debug:
                msg: "I also never touched..."
      always:
            - debug:
                msg: "I am always there like God!"

Execution output
ansible-playbook block_rescue_always.yml
screenshot:

Using fail module in Ansible play

In most of the automation projects, Focus on the failure with handling tasks is major requirement
---
 - name: testing fail
   gather_facts: no
   hosts: localhost
   tasks:
     - name: check home bin folder
       command: ls ~/bin
       register: error_msg
       ignore_errors: yes

     - name: debug bin
       debug:
         msg: "{{ error_msg }}"

     - name: failing blok
       fail:
         msg: "FAILED exiting now..."
       when: error_msg.rc != 0

     - name: check home bin folder
       command: ls ~/
       register: home_msg

     - name: debug home
       debug:
         msg: "{{ error_msg }}"
         
Execution of the fail module
ansible-playbook fail_test.yml
Screenshot:

Ansible fail module error handling ignore error

Hope you like this post write your experience with error handling in Ansible playbooks.

References:


Wednesday, December 22, 2021

Ansible variables, Lists, Dictionaries

 There are many boring tasks in your daily job which can be automated easily if you know some of the tools like here, Ansible. Let's explore more on how to use the variables in the playbooks.

In this post we will be covering :

  1. Basic datatypes
  2. List variables and using them
  3. Dictionary variable and accessing them

Variables and Datatypes in Ansible

In Ansible variables can be defined under global tasks or they can be defined at local to a task level. support all the Python supported datatypes.
---
# Filename: varibles_datatypes.yml
 - name: varibles in ansible
   hosts: localhost
   gather_facts: false
   vars:
     a: "Vybhava Technologies"
     b: yes
     n: 100
     m: 500.99
   tasks:
     - debug:
         msg:
           - "a= {{ a }} a type: {{ a |type_debug }}"
           - "b= {{ b }} b type: {{ b |type_debug }}"
           - "n= {{ n }} n type: {{ n |type_debug }}"
           - "m= {{ m }} m type: {{ m |type_debug }}"
The execution output is :
ansible-playbook varibles_datatypes.yml
 
Screenshot


Ansible Lists

In Ansible List object is similar to the Python list. Which can be assigned alist variable within a single line or lease it can be represented in the column which will start by using "-" for each element. Here I've experimented with two options.
# File: hello.yml
 - name: List variables from ansible playbook
   hosts: localhost
   gather_facts: no
   vars:
     mylearning_list: ['Linux','git','Jenkins','Docker','Kubernetes','Ansible']
   tasks:
     - name: printing list
       debug:
         msg:
         - "mylearning_list:"
         - "{{  mylearning_list  }}"

     - name: Concatenate a list to string
       set_fact:
         my_string: "{{ mylearning_list | join(',') }}"
     - name: Print the String
       debug:
         msg: "{{ my_string }}"

     - name: printing list element
       debug:
         msg: "mylearning_list: {{  mylearning_list[1] }}"
     - name: printing list range of elements
       debug:
         msg:
         - "mylearning_list[3:5]:"
         - "{{  myle
Ansible list of element usage 
Ansible  list example 02

 hosts: localhost
  gather_facts: no
  vars:
    devops_team:
      - srinu
      - rajshekhar
      - arun
      - charan
      - suresh
      - elavarsi

  tasks:
  - name: Display all elements of List
    debug:
      msg: "{{ devops_team }}"

  - name: Display a elements of List
    debug:
        msg: "{{ devops_team[3] }}"

  - name: Display rage of elements from List
    debug:
        msg: "{{ devops_team[3:6] }}"
~


Ansible Dictionaries


The python dictionaries can be used in the Ansible plays. The representation is within {} when we have few key:value
The data item will be stored with key and value

We can dfine a dictionary variable as two forms : 1. single line
osfam_web: {"el": "httpd", "ubuntu": "apache2"}

2. multiline form
osfam_web:
  el: httpd 
  ubuntu: apache2
Example Execution
[ansible@master qa]$ cat mydict.yml
---
# Filename: mydict.yml
 - name: Dictionaries in ansible
   hosts: localhost
   gather_facts: false
   vars:
     osfam: {"el":"httpd","ubuntu":"apache2"}
   tasks:
     - debug:
         msg:
           - "osfam.keys {{ osfam.keys() }}"
           - "osfam {{ osfam }}"
           - "osfam type {{ osfam |type_debug }}"
           - "osfam[el] {{ osfam['el'] }}"
Execution output
ansible-playbook mydict.yml

More variable stories on Ansible Automations are share:

Monday, December 20, 2021

Ansible packages and service modules

Ansible packages and service modules In this post I would like to take you to the most important Linux administration tasks which can be used regularly in their daily activities that can be automated with Ansible. 

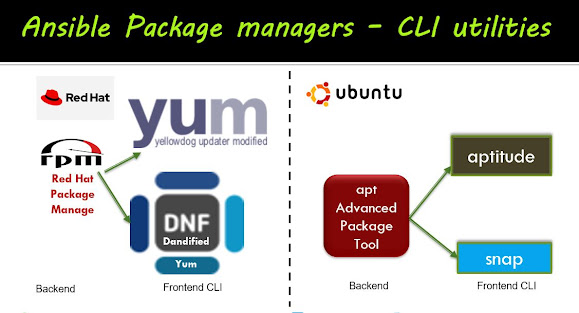
How do Linux Package Managers works?

Every Linux Operating system allow us to install any software using package managers such as yum, dnf, apt, deb or apk any other option. 

Here I've explored more details about this package mangers how they are working. If we take RedHat flavor Linux systems such as CentOS, SuSe, RHEL uses actually RPM as package manager. But the CLI clients are available such as yum(Yellowdog updater modified) and in the latest versions using improved yum that is dnf command utility which is known as "Dandified Yum". 

The service or systemctl commands

After installation we need to start, stop or restart or check status that service using systemctl or service command as per the System availability.

Ansible package manager modules connection with front-backend utilities


First we will experiment with package managers dnf usage in Ansible. We can target simple two playbooks where you should have inventory groups defined for webserver, database.

Prerequisite:

The inventory file content with the webserver and database groups as following
[ansible@master qa]$ cat hostqa.yml

all:
  children:
    qa:
      children:
        qawebserver:
          hosts:
            node[1:2]-vt:
        qadbserver:
          hosts:
            node3-vt:
        qalb:
          hosts:
            node4-vt:


How to install packages using ansible yum module?

The Ansible yum module is allow us to install the packages on the target hosts. where you can tell the action using state.


---
# File: nginx_yum_installation.yml

- name: install and start nginx
  hosts: "{{ targets | default ('webserver') }}"
  become: yes
  tasks:
    - name: install nginx
      yum:
        name: nginx
        state: present
        update_cache: true

    - name: start nginx
      service:
        name: nginx
        state: started

  
The execution of the above playbook output as:
ansible-playbook nginx_yum_installation.yml
  

Ansible yum module for install nginx and start the service

How to uninstall package using ansible yum module?

The following ansible playbook code will stop the service and remove the package from the target box.
  ---
# Filename: nginx_stop_yumremove.yml
- name: stop and remove nginx
  hosts: "{{ targets | default('localhost') }}"
  become: yes
  gather_facts: no
  tasks:
    - name: stop nginx server
      service:
        name: nginx
        state: stopped

    - name: remove nginix
      yum:
        name: nginx
        state: absent

  
Execution outcome
   ansible-playbook -e targets=qawebserver nginx_stop_yumremove.yml --check
   ansible-playbook -e targets=qawebserver nginx_stop_yumremove.yml 
  
Ansible yum module to remove nginx package


How to install packages using ansible apt module?

The Ansible apt module is allow us to install the packages on the target hosts. where you can tell the action using state.


  ---
# Filename: nginx_apt_installation.yml

- name: install and start nginx
  hosts: "{{ targets | default ('loadbalancer') }}"
  become: yes
  tasks:
    - name: install nginx
      apt:
        name: nginx
        state: present
        update_cache: false

    - name: start nginx
      service:
        name: nginx
        state: started
  
The execution of the above playbook output as:
ansible-playbook nginx_apt_installation.yml
  

How to install a package with ansible dnf module?

If you are working on CentOs8 or Oracle Linux 8 or RHEL 8 then you can use dnf module. The web group target to install nginx webserver, and database target to install with mysql database.
---
- hosts: webserver
  tasks:
    - name: install nginx
      dnf: name=nginx state=present update_cache=true
  
Package manager module can be executed on the target machine with ansible user generally, but it requires sudo access so we need to use become parameter value as 'yes'. In adhoc command execution we can use -b or --become option.
ansible webserver -m yum -a "name=httpd state=latest" -b

How to list out the package is installed?

The yum module can be used to determine if a package is available and installed on the managed node (e.g. the target VM). This ansible module execution is similar to the `yum info` command in CLI. Let's examine "nginx" installed on the web boxes with the followng playbook.
- name: List out the yum installed packages
  hosts: "{{ targets | default ('loadbalancer') }}"
  gather_facts: false
  #remote_user: root
  become: yes
  tasks:
    - name: determine if a package is installed
      yum:
        list: "{{ package }}"
      register: out

    - debug:
        msg:
          - "package: {{ package }}"
          - "yumstate: {{ out.results[0].yumstate }}"
          - "yumstate: {{ out.results[1].yumstate }}"
          - "version: {{ out.results[1].version }}"

		
Executed with the following command :
ansible-playbook -e targets=node1-vt -e package=nginx yum_list.yml
The screen screen will look like this:
Ansible yum module listing out about a package


  To check already httpd is installed on a machine:
rpm -qa|grep httpd 

Important Note:

The name very first you defined used hyphen, here hyphen is only used when you want general information for the playbook reader to indicate about the task. when we use module attribute with name should not with hyphen.

References Ansible documentation:

1. Package manger - dnf  

Categories

Kubernetes (25) Docker (20) git (15) Jenkins (12) AWS (7) Jenkins CI (5) Vagrant (5) K8s (4) VirtualBox (4) CentOS7 (3) docker registry (3) docker-ee (3) ucp (3) Jenkins Automation (2) Jenkins Master Slave (2) Jenkins Project (2) containers (2) create deployment (2) docker EE (2) docker private registry (2) dockers (2) dtr (2) kubeadm (2) kubectl (2) kubelet (2) openssl (2) Alert Manager CLI (1) AlertManager (1) Apache Maven (1) Best DevOps interview questions (1) CentOS (1) Container as a Service (1) DevOps Interview Questions (1) Docker 19 CE on Ubuntu 19.04 (1) Docker Tutorial (1) Docker UCP (1) Docker installation on Ubunutu (1) Docker interview questions (1) Docker on PowerShell (1) Docker on Windows (1) Docker version (1) Docker-ee installation on CentOS (1) DockerHub (1) Features of DTR (1) Fedora (1) Freestyle Project (1) Git Install on CentOS (1) Git Install on Oracle Linux (1) Git Install on RHEL (1) Git Source based installation (1) Git line ending setup (1) Git migration (1) Grafana on Windows (1) Install DTR (1) Install Docker on Windows Server (1) Install Maven on CentOS (1) Issues (1) Jenkins CI server on AWS instance (1) Jenkins First Job (1) Jenkins Installation on CentOS7 (1) Jenkins Master (1) Jenkins automatic build (1) Jenkins installation on Ubuntu 18.04 (1) Jenkins integration with GitHub server (1) Jenkins on AWS Ubuntu (1) Kubernetes Cluster provisioning (1) Kubernetes interview questions (1) Kuberntes Installation (1) Maven (1) Maven installation on Unix (1) Operations interview Questions (1) Oracle Linux (1) Personal access tokens on GitHub (1) Problem in Docker (1) Prometheus (1) Prometheus CLI (1) RHEL (1) SCM (1) SCM Poll (1) SRE interview questions (1) Troubleshooting (1) Uninstall Git (1) Uninstall Git on CentOS7 (1) Universal Control Plane (1) Vagrantfile (1) amtool (1) aws IAM Role (1) aws policy (1) caas (1) chef installation (1) create organization on UCP (1) create team on UCP (1) docker CE (1) docker UCP console (1) docker command line (1) docker commands (1) docker community edition (1) docker container (1) docker editions (1) docker enterprise edition (1) docker enterprise edition deep dive (1) docker for windows (1) docker hub (1) docker installation (1) docker node (1) docker releases (1) docker secure registry (1) docker service (1) docker swarm init (1) docker swarm join (1) docker trusted registry (1) elasticBeanStalk (1) global configurations (1) helm installation issue (1) mvn (1) namespaces (1) promtool (1) service creation (1) slack (1)