Wednesday, June 29, 2022

Jenkins Seed Job using DSL Script to Generate Job

 Hey Guys!! How are you? In this learning post I would like to share with you awesome Jenkins feature experiment -  Infrastructure as a Code (IaC). The entire Jenkins Job or Project can be configured manually step-by-step in the regular fashion, when you click on the "new item" on the Jenkins Dashboard to create a project. But here story is different - with DSL script you could do the same thing that is dynamically creating a Job with a single flexible scalable durable way with Groovy script. 

Jenkins DSL Groovy script generating dynamic Job

Groovy is more like Shell scripting but totally executable on Java Virtual Machine. Those who know Java it will be easy to understand the Groovy syntax and its blocks. If you don't then no worries we will be coming up with easy to use DSL script in the following sections.

Prerequisite for DSL Job creation

  • Jenkins master-slave installed up and running. SCM installed/github Up and running
  • Jenkins must have plugins installed such as Copy to Archive, Archive Artifacts etc
  • Jenkins "Global Tool Configuration" should have "Maven" , "JDK" specially needed for Java Build process

On the Docker Play with Docker (PWD) you can run the following commands
docker run --name jenkinsmaster -u root \
--rm -d -p 8081:8080 \
-v jenkins-data:/var/jenkins_home \
 jenkins/jenkins
You can check the docket hosting machine port open for Jenkins containers:
netstat -tupln|grep 8081
#To get the password from the logs 
docker logs jenkinsmaster

What Jenkins plugin need to be installed? Job DSL plugin

We need to install the 'Job DSL' plugin. This will enable you to write Groovy scripts. As regular plugin installation procedure - Navigate to Manage Jenkins -> Manage Plugins ->Go to the  availability tab search for "Job DSL'. Once found select it and click on the 'Install without Restart' Button. 

How to write a Jenkins DSL groovy script? 

This is very simple! Go to your Jenkins Dashboard and select "New Item" select "Free Style Project".  In the Build section - select  “Process Job DSL” as Build step this will be visible only when you install the Job DSL plugin.

Developing a Seed Job Logic : 

    Parameters in DSL

    The following is the example where you can use the parameterised project in DSL, we can use the following snippet in 'Build' step Groovy script can be used as following 'Job DSL'
      job('parameterized_dsl_job'){
    	description("This project is seeded with parameters")
    	
    	parameters{
    		stringParam('user_name',defaultValue = 'Vybhava", description = 'Please enter user_name')
    	}
    		
    	setps {
    		shell("echo Hello $user_name")
    	}
    }
      
  1. To use the Job DSL plugin, you first need to create a seed job. The seed job is a Jenkins job which runs newly created a DSL scripts, and then generates a new job name as "Maven-Project-DSL". 
  2. In that job we can have a "Source Code Management" section with a git repo URL as given in the DSL script scm block.
  3. This dynamically created job can be chosen to trigger every 2 mins this can be modified as per your Project needs. This block is like in the Build Trigger section having Poll SCM
  4. In Build Step/section we use to select "Invoke Top level Maven Targets" option similar to it we can use steps block and mention it "clean package" targets and also provide where is your pom.xml that will create a war file. Note: look into the pom.xml file packaging line according use the artifact option
  5. Like our Post Build action  here in the DSL script we can have a publisher block that calls archiveArtifacts with a parameter, here I've choose for **/*.war because same will be used in the deployment in the Tomcat server.
job('Maven-Project-DSL') {
    description("Maven job generated by the DSL on ${new Date()}, the project is a small Maven project hosted on github")
    // Source Code Management section equivalent block
scm { git("https://github.com/Bhavanishekhar/Jenkins_integrations.git", 'master') } // Build Trigger section equivalent triggers { scm('H/2 * * * *') // every 2 minutes SCM Polling is scheduled here } // Like Build having Invoke top-level Maven targets steps { maven('clean package', 'maven-samples/single-module/pom.xml') } publishers { //archive the jar/war/ear file generated archiveArtifacts '**/*.war' } }
Here the publishers is like 'Post Build Actions' on the Jenkins configuration page.

6. Save the Seed Job and click on the "Build Now" and then Job will be in Failed state. Check the Console Output. 

Jenkins Seed Job FAILURE - script not set approval

7. Go to the Manage Jenkins and select the "In-process Script Approval" this will allows us to review proposed DSL script inside the Jenkins process and generate a new Job. In the "ScriptApproval" page you could see choice as shown:


Jenkins Seed Job ScriptApproval action


8. You need to click on the "Approve", and then go back to the Seed Job and build again.
9. After seed job execution completes you will be getting a new Job with name "Maven-Project-DSL"


Thanks for your time if you like this post please share it with your friends and colleagues.


Reference: 

  1. Job DSL
  2. DSL Help on groovy syntax

Wednesday, June 22, 2022

Jenkins Continuous Delivery

👋 Warm Welcome 🤗 to my dear DevOps DevSecOps /SRE engineers here in this post we will exploring about Jenkins configured to run a full fledged CI/CD flow.

Preparation for CI/CD

The full length end-to-end automation can be done with the Jenkins Jobs. We need to identify how the dependencies forms the Job chain, what job become upstream and what all jobs can be downstream to which job also you need to plan as per your project needs. Here I'm taking the scenario where Java based web application package and deployment to different environments such as QA, Staging and for Production with approval to run the Build.

The sequence of steps involved in this process are:
  • Install Tomcat server 
  • Using Jenkins CICD job deploy 

Install Tomcat Server on a VM/Cloud instance

Here the VM/Cloud instance assuming as Ubuntu Linux machine. d


Step 1: Install JRE/Java

To install Tomcat on any Platform there should be JRE available. To have JRE we do install JDK which is suitable to the Tomcat. As an example I'm installing JDK8 with the following command.

sudo apt-get install openjdk8 -y; java -version
Step 2: Installing the latest version of Tomcat
The following are not exact commands you need to visit Tomcat Office site to download mirror link.
 
sudo apt install -y unzip wget
wget mirrorlink to download the latest version of tomcat.zip file 
sudo mkdir -p /opt/tomcat 
sudo unzip -d /opt/tomcat tomcat.zip 
ls -l /opt/tomcat  #confirm the extraction
Step 3: Change Tomcat server port, if your Tomcat is installed on the same machine where Jenkins runs. This is to avoid port conflict. Port value change by searching 'Connector' inside the /opt/tomcat/conf/server.xml file. 

Step 4: Change file permission of scripts in the 'bin' folder, that is
cd /opt/tomcat/bin 
sudo chmod +x *
Step 5: start tomcat server from the bin directory run the following
./startup.sh
less -f ../logs/catalina.out # output show Tomcat server started log message.

 Jenkins Setup for Continuous Deployment(CD)

Jenkins automations makes lord of windows in DevOps world. If you want to enjoy that automations in your project please follow this post, here we are going to have the objective as Jenkins continuous integration and continuous deployment to a target environment. The target environment could be built based on the Tomcat server.  Usually the environment can be for development, QA staging and production. if the automation flow begin from the development  environment test success to QA and then staging we can do job chain or a pipeline automatic deployment stages including steps usage in a DSL file that is Jenkinsfile.

Install Jenkins plugins

On the Jenkins console in the dashboard navigate to the Manage Jenkins, then Manage plugins, go to the availability tab and search for the following plugins install them without restart 

 1. Copy Artifact 

 2. Deploy to Containers 

Create Jenkins Jobs

In the first phase of this experiment you will Create Job to produce a Tomcat Deployable Artifacts. Meaning a servlet or JSP containing Java Web applications inside the deployable file. And it's extension can be w a r (web archive) file.

In the view page click on the plus + and  Create a list View and name it as "QA Deploy".

 1. Project name: package_app (Maven build)

a. Please enter in the DescriptionGenerate artifacts to deploy on Java tomcat server 

 b. Under SCM  section enter your own git URL : https://github.com/BhavaniShekhar/Jenkins_Integrations.git

c. Build Environment section - Please Check "Delete workspace before build starts" and "Add timestamps to the Console Output".

 d. Build section - select "Invoke top-level Maven targets" from the dropdown options.

 Choose Maven Version value as you configured it earlier in the Global tool configure name (in my example maven3 used)

 Goals value can be choosen as - clean package

 If pom.xml is not in the project start directory then go for "Advanced" option then provide the POM value as file path : java-tomcat-sample/pom.xml 

e.  In the Post-Build actions Add "Archive the artifacts"

 Files to archive  **/*.war

Now all the settings are done for the package_app job so now Save it, and run it by using "Build Now". Go to the Console Output which shows the full log build execution after confirming that "Build Successful". 

Navigate to last build number for me it is first build so Build #1 there we can see the "Build Artifacts" shows the war file downloadable link.

Automated Deployment

2. Create Deploy application job in the same "QA deploy" view.

Select a Freestyle project.

Project Name: deploy_app

Description: This job will be used to deploy the artifact to QA Tomcat server.

Build logs settings to Max as : 3 

Build Environment section 

Check the "Delete workspace before build starts" and "Add timestamps to the Console Output".

Build Section

Select from the dropdown of Add build Step as "Copy Artifacts from another project"

a. Project Name: Package_app

b. Which build : Latest successful build and also select "Stable build only 

c. Artifacts to copy : **/*war 

Post build Actions section 

Select "Deploy war/ear to a container" from the "Add post-build action.

a. WAR/EAR Files: 

b. context path: /

c. Add container: Tomcat 10 [if that is not available you can use Tomcat 9.x also fine]

  i. Add Jenkins credentials: tomcat/tomcat_password which was configured on Tomcat server.

  ii. Tomcat URL: http://PUBLICIP:8080 

Now everything configured for this job. Save the "deploy_app" project configuration. 


Now you can go to the dashboard and see the "QA Deploy" view where we added two Jobs that is package_app, deploy_app.

Trigger the "Build Now" for each Job for now do it for "deploy_app" job to test it to confirm it is working as expected.


Setup for Continuous Deployment

We can create upstream and downstream when they have dependency. 


Go to the package_app project and 

1. Poll SCM in the Build Trigger 

Schedule : * * * * *


in the Post-build Actions section Add post-build action as "Build other projects"

a. Projects to build "Deploy_app" 

b. Tick the choice - Trigger only if build is stable 

You can observe the Downstream job to the "package_app" as "deploy_app" job.

Developer code push simulation - Do some line change in the GitHub repo then Continuous Integration and Continuous deployment will happen automatically. This is the complete solution we can provide to a Java based web application project.

Troubleshoot points

When you run the 'deploy_app' job you can observe that there are some issues where Tomcat don't allow you to deploy the application with strange error messages. Read the Error messages first understand there could be tomcat server text help link. Do the changes as suggested in that text link.

1. Tomcat user file access denied 

cd TOMCAT_HOME/conf; vi tomcat-users.xml 


change mange-gui if it is admin-gui.

after configuration changes you need to restart tomcat (stop and start).


2. text based tomcat error

Inside the TOMCAT_HOME/webapps/manger/META-INF/ there is a file context.xml comment out the 2 lines which have manger value.


 After this action, restart the Tomcat (sudo /opt/tomcat/bin/shutdown.sh; sleep 3; sudo /opt/tomcat/bin/startup.sh)


Sunday, June 19, 2022

JFrog Artifactory setup integration with Jenkins

 Hello Dear DevOps/DevSecOps engineers and automation team members. Today we will experiment on JFrog Artifactory integration with Jenkins. To do this we need to break down the task into two phases in the first phase we will do JFrog Artifactory setup. after that next phase we will do integrate it in Jenkins.

Pre-requisites:

    1. Virtual Boxes or VM instance on the Cloud  is the basic requirements

On the AWS Cloud: An AWS t2.small EC2 instance (Linux) if other cloud please select at least 2GB RAM providing instance. Open port 8081 and 8082 in the Security Group or on the firewall allow ports.

Vagrant boxes for Jenkins and jfrog artifactory

On premises setup using Vagrant
# Ubuntu boxes for Jenkins and Jfrog
Vagrant.configure("2") do |config|
    config.vm.provider "virtualbox" do |vb|
        vb.memory = "4096"
    end
    
    config.vm.define "master" do |master|
        master.vm.box = "ubuntu/focal64"
        master.vm.network "private_network", ip: "192.168.33.100"
        master.vm.hostname = "master.vybhava.com"
    end
    
    config.vm.define "jfrog" do |jfrog|
        jfrog.vm.box = "ubuntu/focal64"
        jfrog.vm.network "private_network", ip: "192.168.33.110"
        jfrog.vm.hostname = "jfrog.vybhava.com"
    end
end

2. The 'master' box intended to have installed with latest Jenkins on it.

3. The other box jfrog instance we need to install the JFrog Artifactory.(Below section dedicated for installation of JFrog Artifactory)

4. You must have GitHub account setup ready for this experiment

5. Jenkins Plugins we must install -- deploy artifacts, Artifactory

JFrog Artifactory integration with Jenkins CI/CD


What is JFrog Artifactory all about?

JFrog Artifactory is the single solution for housing and managing all the artifacts, binaries, packages, files, containers, and components for use throughout your software supply chain.

Why JFrog?

  • It's Frictionless
  • unified management of your software supply chain artifacts

Benefits of JFrog

  • Binary lifecycle management
  • Global scale availability
  • Package proxying
  • Secured Binaries
  • Repository optimization and flexibility
  • artifacts delivery to the edge (CDN, PDN)

How to install JFrog Artifactory 7 on Ubuntu?

In the following we do step-by-step installation on and configure JFrog.

Step 1: Install Java

Login to EC2 Ubuntu instance and switch user as a root user and check for Java if it is not exists then install Java as mentioned below

java -version #Check JDK availability
# If not install JDK 
# for RHEL/CentOS
yum install java-1.8* -y 
# for Ubuntu
apt install -y openjdk11 
# confirm it
java -version 


Step 2: Create jfrog user

Best practice to have a dedicated user as 'jfrog' for security purpose isolating with other users data should not have any issues during their clean up process.
sudo useradd -m -d /opt/jfrog -U -s /bin/false jfrog
id jfrog


Step 3: Download and Extract JFrog Artifactory


There are two optionw we have for Download  the JFrog Artifactory packages onto /tmp/ directory.
For Latest version of  JFrog Artifactory OSS download it from here [I've selected this choice]
For Older  Stable versions of  JFrog Artifactory OSS are available for download it from here

  cd /tmp; wget tar.gz option download the file.
  
extract artifactory tar.gz file if we go for older version then we need to use unzip utility. 
apt install -y unzip #Generally on AWS Ubuntu you need to install unzip utility

# JFrog 6.x
sudo unzip jfrog*.zip "artifactory-oss-6.23.3" -d "/opt/jfrog"
sudo chown -R jfrog:jfrog /opt/jfrog/
sudo chmod -R u+x /opt/jfrog/bin

# JFrog 7.x
sudo tar xzvf jfrog*tar.gz -C /opt/jfrog --strip-components=1
sudo chown -R jfrog:jfrog /opt/jfrog/
sudo chmod -R u+x /opt/jfrog/app/bin

Go inside JFrog installed path then go to the bin directory and start the services
cd /opt/jfrog/bin
./artifactory.sh start
JFrog Artifactory 6.x running on the Ubuntu as normal Tomcat embedded server start command as shown below.

Jfrog Artifactory 6 start command execution

On the JFrog Artifactory 7.x directory structure changed you can see : 
JFrog after extraction of the installer file


Below given will be required for Production environment [OPTIONAL] Creating a systemd service for artifactory You can create sudo nano /etc/systemd/system/artifactory.service file content
[Unit]
Description=Setup Systemd script for Artifactory in Tomcat Servlet Engine
After=network.target

[Service]
Type=forking
GuessMainPID=yes
Restart=always
RestartSec=5
PIDFile=/var/opt/jfrog/run/artifactory.pid
ExecStart=/opt/jfrog/artifactory/bin/artifactoryManage.sh start
ExecStop=/opt/jfrog/artifactory/bin/artifactoryManage.sh stop
User=artifactory
Group=artifactory
LimitNOFILE=32000

[Install]
WantedBy=multi-user.target
Alias=artifactory.service

Reload the systemd daemon so that it becomes aware of the new service:
sudo systemctl daemon-reload

You can then start the artifactory service by typing:
sudo systemctl start artifactory
Check the status using :
sudo systemctl status artifactory

To enable artifactory at the time of starting up box with the systemd, run the following command:
sudo systemctl enable artifactory  

Step 4: Access JFrog Artifactory URL 

Now all set to access the JFrog artifactory from the browser with 8081 default port.
http://JFROGPUBLICIP:8081

JFrog Artifactory Welcome Screen


To load the Artifactory page it might take few seconds. After that there will be a Welcome screen, and next Set Admin Password where you need to provide new password, confirm password retype.

Reset the Artifactory Credentials


Skip the proxy server configuration for this experiment. But for Organizations require to use that option as well. 

Next, Create Repository select "Maven" option. Once it is done, it will create 5 default repositories. Two of them will be local and two for remote access and one will be the virtual repository. Click on Finish.

Now we all set for the Artifactory use in the Jenkins. In the left side select Artifact Repository browser choose the build info.

Friday, June 10, 2022

Jenkins installation on Windows

 Hello DevOps Guys, We will install the Jenkins Controller on the Windows machine. 

How to install Jenkins on Windows machine?

Here in this post we will explore Step-by-Step installation instructions for Jenkins on Windows platform.

Jenkins installation on Windows


Step 1: Install and set Java

Please visit the Oracle Java SE download page:  http://www.oracle.com/technetwork/java/javase/downloads/index.html .

Oracle providing the new option on the download page, that is "JDK Script Friendly URLs" page. Choose the JDK for your operating system (Windows 10 or 11) 64bit to download. Double click downloaded file launches installer wizard, proceed with the agree and set up the installation location as per your disk/drive availability.

Verification of Java installation 

Open a CMD prompt run "java -version" if Java installed correctly in the PATH you will get the installed version as output. if not set the PATH from the type ENVIRONMENT VARAIABLES search ->EDIT ENVIRONMENT VARAIABLES in the USER VARIABLES section add new variable as JAVA_HOME -> C:\Program Files\Java. and then set PATH with %JAVA_HOME%\bin;%PATH% and launch a fresh CMD prompt and re-test.

java -version
Setting JAVA_HOME path manually on your CMD
SET JAVA_HOME="C:\Program Files\Java\jdk-11.0.14"
SET PATH= %JAVA_HOME%\bin;%PATH%
java -version
should return Java version as jdk-11.0.14.
Checking Java version on Windows Command Prompt

Once Java all set then next we are good to go for Jenkins download.

Step 2: Download and install Jenkins

I believe that a Picture tells 1000 words of worth!  visit jenkins download page link, you may be on Windows 10 or 11(At the time of this blog post Windows versions). 

Jenkins download for Windows

2.1 Welcome Screen

 
2.2 Provide the destination folder where Jenkins need to install


2.3 Choose the user credentials option

2.4 Choose a port for Jenkins service to run and click on "Test Port" will check the availability for the port


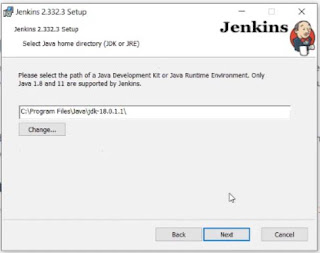
2.5. Select the Java installed path [JDK 1.8 or 11 supported choose accordingly]


Note: Please choose JDK 11, This step leads me to run into errors which I've explained in the troubleshoot section. 

2.6 Custom Setup, Next

2.7 Ready to install Jenkins 2.x.x. Click on Install button.

2.8 Completed Jenkins setup, Click on Finish button.

Jenkins completed setup 


Step 3: How to run Jenkins server on Windows?

To start the Jenkins using jankins.war file you have to navigate to the Jenkins installed path then run the following
cd "C:\Program Files\Jenkins"
java -jar jenkins.war
usually in Windows defender will pop-up the security concern. You can select "Allow access".

Jenkins start using java jar command defender firewall protection


If you wish to use different port for your Jenkins server
java -jar jenkins.war --httpPort=9090

Step 4: Launch the Jenkins Controller on Browser

To access on the browser this Jenkins Master console on the Windows machine you can use the URL as either localhost:8080 or 127.0.0.1:8080 or YOURCOMPUTERNAME:8080

Jenkins console access on Windows machine

Please enter the file content as shown the path for initialAdminPassword and click on the continue button,  which will prompt for plugin installation screen then proceed for Admin User setting. Ser the user and password and remember credentials.

Wednesday, June 1, 2022

Git Stashing

Hello DevOps/DevSecOps team Guys!! As you know we are learners always shine with 'Learning by doing'. In this post exploring the git stashing it's nice to know how you can keep code in safer for reuse after sometime or after some other code commits getting back.


What is Git Stash means?

Stashing takes the dirty state of your working directory — that is, your modified tracked files and staged changes — and saves it on a stack of unfinished changes that you can reapply at any time (even on a different branch).
To demonstrate stashing, you should go into your project and start working on a couple of file(s) and possibly stage one of the changes.

Power of git stash

Why do we need git stashing?
We have already git commit command right then why stashing? You can commit your code and switch to another branch. Your actual work is in a "messy state" and there are still more new feature changes need to be done on the projects coming up and don't want to commit your current changes.

For this problem, a simple solution is that you can use the command git stash.

You are working on a feature branch let's say feature1. But there is a burning issues in live needs higph priority on the hotfix, you are the only person can fix it. In such situations stashing the current changes and working highly urgent task once it is commited then we can get back to last changes. Stashing is temporary store in git repository without disturbing index, stage, work areas. 

Preparation to test the git stash commands : 
1. Create a directory name as 'git-stashtest'
2. initialize the git initial repo
clear
mkdir git-stashtest; cd git-stashtest; ls -lrt
# Do the changes like create/modify a file
You got the eligibility to play with git stash command

How to use the git stash command?

The "git stash" command can help you to (temporarily but safely) store your uncommitted local changes - and leave you with a clean working copy. Stash changes in a dirty working directory

Example: Enter the data in the 'index.html file and stash the changes.
vi index.html  # working with edit
git stash 
cat index.html

example of git stash 


Git push

Introduces the option of stashing selected pathspecs. git stash save : The changes can be saved with or without message.
git stash list : To check the stored stashes. You can list the stashes by using this command.
git stash show : We can track the stashes and their changes. To see the changes in the file before stash and after stash operation.


Git stash apply

Example for git stash apply


Git stash with list


Git stash pop


Git stash pop with index

Git stash drop with index number
You can clear specific stashed index as shown below:
git stash list
git stash drop 2
git stash list

How to clear up the stashed dirty?

Git stash Clear
git stash list
git stash clear # clears here
git stash list # to check the clear done
remove all stashed entries

Example : git stash clear


Happy to share new learnings on GitOps. If you find this useful please share it to your technical communities.

Categories

Kubernetes (24) Docker (20) git (13) Jenkins (12) AWS (7) Jenkins CI (5) Vagrant (5) K8s (4) VirtualBox (4) CentOS7 (3) docker registry (3) docker-ee (3) ucp (3) Jenkins Automation (2) Jenkins Master Slave (2) Jenkins Project (2) containers (2) docker EE (2) docker private registry (2) dockers (2) dtr (2) kubeadm (2) kubectl (2) kubelet (2) openssl (2) Alert Manager CLI (1) AlertManager (1) Apache Maven (1) Best DevOps interview questions (1) CentOS (1) Container as a Service (1) DevOps Interview Questions (1) Docker 19 CE on Ubuntu 19.04 (1) Docker Tutorial (1) Docker UCP (1) Docker installation on Ubunutu (1) Docker interview questions (1) Docker on PowerShell (1) Docker on Windows (1) Docker version (1) Docker-ee installation on CentOS (1) DockerHub (1) Features of DTR (1) Fedora (1) Freestyle Project (1) Git Install on CentOS (1) Git Install on Oracle Linux (1) Git Install on RHEL (1) Git Source based installation (1) Git line ending setup (1) Git migration (1) Grafana on Windows (1) Install DTR (1) Install Docker on Windows Server (1) Install Maven on CentOS (1) Issues (1) Jenkins CI server on AWS instance (1) Jenkins First Job (1) Jenkins Installation on CentOS7 (1) Jenkins Master (1) Jenkins automatic build (1) Jenkins installation on Ubuntu 18.04 (1) Jenkins integration with GitHub server (1) Jenkins on AWS Ubuntu (1) Kubernetes Cluster provisioning (1) Kubernetes interview questions (1) Kuberntes Installation (1) Maven (1) Maven installation on Unix (1) Operations interview Questions (1) Oracle Linux (1) Personal access tokens on GitHub (1) Problem in Docker (1) Prometheus (1) Prometheus CLI (1) RHEL (1) SCM (1) SCM Poll (1) SRE interview questions (1) Troubleshooting (1) Uninstall Git (1) Uninstall Git on CentOS7 (1) Universal Control Plane (1) Vagrantfile (1) amtool (1) aws IAM Role (1) aws policy (1) caas (1) chef installation (1) create deployment (1) create organization on UCP (1) create team on UCP (1) docker CE (1) docker UCP console (1) docker command line (1) docker commands (1) docker community edition (1) docker container (1) docker editions (1) docker enterprise edition (1) docker enterprise edition deep dive (1) docker for windows (1) docker hub (1) docker installation (1) docker node (1) docker releases (1) docker secure registry (1) docker service (1) docker swarm init (1) docker swarm join (1) docker trusted registry (1) elasticBeanStalk (1) global configurations (1) helm installation issue (1) mvn (1) namespaces (1) promtool (1) service creation (1) slack (1)