K8s Storage NFS Server on AWS EC2 Instance
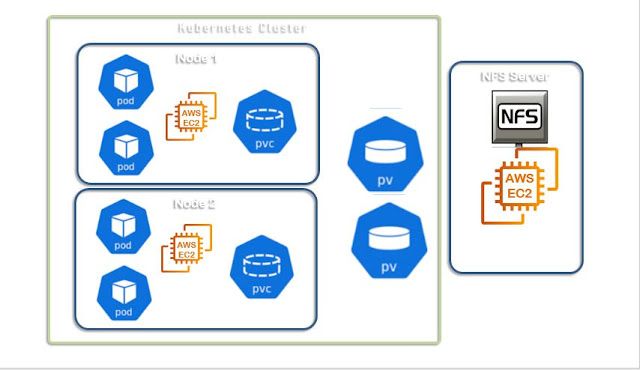
Hello DevOps enthuiast, In this psot we would like to explore the options available on Kubernetes Storage and Volume configurations. Especially in AWS environment if we have provisioned the Kubernetes Cluster then how we can use the storage effectively, need to know all the options. In the sequence of learning on 'Kubernetes Storage' experimenting on the NFS server on AWS EC2 instance creation and using it as Persistent Volume. In the later part, we would use the PVC to claim the required space from the available PV. That in turn used inside the Pod as specifying a Volume.
Assumptions
- Assuming that you have AWS Console access to create EC2 instances.
- Basic awareness of the Docker Container Volumes
- Understand the need for Persistency requirements
Login to your aws
console
Go to EC2 Dashboard, click on the Launch instance button
Step 1: Choose an AMI: "CentOS 7 (x86_64) - with updates HVM" Continue from Marketplace
Go to EC2 Dashboard, click on the Launch instance button
Step 1: Choose an AMI: "CentOS 7 (x86_64) - with updates HVM" Continue from Marketplace
Step 2: Choose instance type:
Step 3: Add storage: Go with default 1 vCPU, 2.5GHz and Intel Xeon Family, meory 1GB EBS, click 'Next'
Step 5: Add Tags: Enter key as 'Name' and Value as 'NFS_Server'
Step 6: Configure Security Group: select existing security group
Step 7: Review instance Launch: click on 'Launch' button
Select the existing key pair or create new key pair as per your need
yum install nfs-utils -y
systemctl enable nfs-server
systemctl start nfs-server
 mkdir /export/volume -p
chmod 777 /export/volume
vi /etc/exports
write the following
/export/volume *(no_root_squash,rw,sync)Now save and quit from vi editor and run the following command to update the Filesystem.
exportfs -rConfirm the folder name by turning it to green colored by listing the folder.
ls -ld /export/
Here the NFS volume creation steps completed! ready to use. # Kuernetes PersistentVolume, PersistentVolumeClaim
Create 'nfs-pv.yaml' file as:
apiVersion: v1
kind: PersistentVolume
metadata:
  name: nfs-pv
spec:
  capacity:
    storage: 5Gi
  volumeMode: Filesystem
  accessModes:
    - ReadWriteOnce
  mountOptions:
    - hard
    - nfsvers=4.1
  nfs:
    path: /export/volume
    server: 172.31.8.247
Let's create the PersistentVolume with NFS mounted on separate EC2 instance.
kubectl create -f nfs-pv.yamlCheck the pv creation successful by kubectl command
kubectl get pv
Create PersistenceVolumeClaim
Now create a pvc PersistentVolumeClaim with:apiVersion: v1
kind: PersistentVolumeClaim
metadata:
name: my-nfs-claim
spec:
accessModes:
- ReadWriteOnce
volumeMode: Filesystem
resources:
requests:
storage: 5Gi
Now use the create subcommand:
kubectl create -f my-nfs-claim.yamlLet's validate that PVC created
kubectl get pvcNow all set to use a Database deployment inside a pod, let's choose MySQL.
proceed with creating a file with name as mysql-deployment.yaml manifestation file:
apiVersion: apps/v1 # for versions before 1.9.0 use apps/v1beta2
kind: Deployment
metadata:
  name: wordpress-mysql
  labels:
    app: wordpress
spec:
  selector:
    matchLabels:
      app: wordpress
      tier: mysql
  strategy:
    type: Recreate
  template:
    metadata:
      labels:
        app: wordpress
        tier: mysql
    spec:
      containers:
      - image: mysql:5.6
        name: mysql
        env:
        - name: MYSQL_ROOT_PASSWORD
          value: welcome1
        ports:
        - containerPort: 3306
          name: mysql
        volumeMounts:
        - name: mysql-persistent-storage
          mountPath: /var/lib/mysql
      volumes:
      - name: mysql-persistent-storage
        persistentVolumeClaim:
          claimName: my-nfs-claim
Let's create the mysql deployment which will include the pod definitions as well.
kubectl create -f mysql-deployment.yaml
# Check the pod list
kubectl get po -o wide -w
>> Trouble in ContainerCreating take the name of the pod from the previous command.
kubectl logs wordpress-mysql-xxcheck nfs mount point shared On the nfs-server ec2 instance
exportfs -r
exportfs -v
Validation of nfs-mount: Using the nfs-server IP mount it on the master node and worker nodes.
mount -t nfs 172.31.8.247:/export/volume /mntExample execution:
root@ip-172-31-35-204:/test
# mount -t nfs 172.31.8.247:/export/volume /mnt
mount: /mnt: bad option; for several filesystems (e.g. nfs, cifs) you might need a /sbin/mount.type helper program.
The issue is with nfs on master and cluster verified with:
ls -l /sbin/mount.nfsExample check it...
root@ip-172-31-35-204:/test# ls -l /sbin/mount.nfs
ls: cannot access '/sbin/mount.nfs': No such file or directory
This confirms that nfs-common not installed on the master node. same thing required on worker nodes aswell. Fix: The client needs nfs-common:
sudo apt-get install nfs-common -yNow you need th check that mount command works as expected.After confirming mount is working then unmount it.
umount /mntCheck pod list, where the pod STATUS will be 'Running'.
kubectl get poSUCCESSFUL!!! As Volume Storage is mounted we can proceed! Let's do the validation NFS volume Enter into the pod and see there is a volume created as per the deployment manifestation.
kubectl exec -it wordpress-mysql-newpod-xy /bin/bash

root@wordpress-mysql-886ff5dfc-qxmvh:/# mysql -u root -p
Enter password:
Welcome to the MySQL monitor.  Commands end with ; or \g.
Your MySQL connection id is 2
Server version: 5.6.48 MySQL Community Server (GPL)

Copyright (c) 2000, 2020, Oracle and/or its affiliates. All rights reserved.

Oracle is a registered trademark of Oracle Corporation and/or its
affiliates. Other names may be trademarks of their respective
owners.

Type 'help;' or '\h' for help. Type '\c' to clear the current input statement.

create database test_vol;


mysql> create database test_vol;
Query OK, 1 row affected (0.01 sec)

show databases
Test that persistant volume by deleting the pod
kubectl get po
kubectl delete po wordpress-mysql-886ff5dfc-qxmvh
kubectl get po
As it is auto healing applied and new pod will be created, inside the new pod expected to view the volume with
kubectl exec -it wordpress-mysql-886ff5dfc-tn284 -- /bin/bashInside the container now
mysql -u root -p
enter the password
Surely you could see that "test_vol" database accessible and available from this newly created pod.
show databases;Hence it is proved that the volume used by pod can be reusable even when pod destroyed and recreated.
Go and check the nfs-server mounted path /export/volume you can see the databases created by the mysql database will be visible.
Reference: https://unix.stackexchange.com/questions/65376/nfs-does-not-work-mount-wrong-fs-type-bad-option-bad-superblockx


Comments