Saturday, July 24, 2021

Ansible 4: Reboot remote servers

Hello DevOps enthusiasts! Here I came up with new learning on the automations with Ansible reboot module on a VM/Linux server. This is a most common requirement for most DevOps projects having the dev, test, stage, production environments, when there is Operating System patching happens on a VM, there could be a need for the reboot of that VM


Ansible reboot module and its parameters


There are reboot strategy is most important in how you handle the box before reboot and after reboot.
  1. You must aware of all the manual processes that will be required to start after reboot.
  2. During the reboot select the proper timeout in seconds.
  3. If "systemd" started as a service you can check the major/important service status to show it as 'active'

Pre-requisites

To execute the following experiment you must have the following setup:
  • Ansible Controller
  • Managed nodes (multiple) defined in the inventory and accessible for running playbooks

Ansible playbook for reboot VM

In this example playbook, I've used CentOS 7 VM for testing the reboot module. 
---
- name: Linux Reboot Demo
  hosts: web
  gather_facts: no
  become: true

  tasks:
    - name: Reboot the machine (Wait for a minute)
      reboot:
        reboot_timeout: 60

    - name: Check the Uptime of the servers
      shell: "uptime"
      register: Uptime

    - debug:
        msg: "{{ Uptime.stdout }}"

There are multiple parameters for reboot modules in the above I've used reboot_timeout as 60 sec. In some of the environments, it might not sufficient, you need to give more time depends on what processes are running on the box.

Post reboot - once the reboot is completed there will be a couple of services that will be automatically launched, For that we can do validation for the specific process with a task in the playbook.

In some cases, you may need to validate the application sanity health check for the web URL. which I"ve experimented and posted separately using URI module. 

Execution of the above playbook for the reboot of web VMs snap Image here
Official Documentation link for reboot module

Ansible 2: Ad-hoc commands and Getting start Writing a Playbook

Overview of Ansible PLAYBOOK 

An Ansible playbook is a single YAML file that contains multiple plays. 
Each Play will be defined with a set of activities that are treated as tasks, and these tasks can be executed at the remote host that is the Ansible client.

The task can be a single action that can be one of:
  •   Execute a command 
  •   Run a script 
  •   install patch or package
  •   Reboot VM/box 
  •   Restart services

Simple ansible play can be 
  • check the timestamp
  • reboot server
  • wait for connect back
  • check the uptime 
  • check timestamp 

Complex ansible play
  • Take a backup of files on 20 DB VMs
  • Deploy application on 100 App boxes
  • 100 servers patch apply
  • 100 VM reboot after patch 
  • Mail and slack notifications on patch process 

Ansible ad-hoc command

When you plan to write a playbook first you need to test the ad-hoc commands as trial and error will gives more confidence to run in a play
 
  # Ansible ad-hoc command syntax
ansible [-i inventry_file] server[group1:group2] -m module [-a argument]
  
Here is some, "Hello World" program from Ansible ad-hoc command and playbook
 
cd qa; ls 
# Using qa servers as targets 
ansible qa -m debug -a "Welcome To VybhavaTechnologies from remote"
ansible -i localhost -m debug -a "Welcome To VybhavaTechnologies from localhost"
We can also the ping to the specific host alias that is defined in the "/etc/ansible/hosts" file as shown below
[servers]
host1 ansible_ssh_host=192.168.33.200
host2 ansible_ssh_host=192.168.33.210
host3 ansible_ssh_host=192.168.33.220

Why do we run ad-hoc commands in Ansible Controller?

  • To use setup tasks to quickly bring a managed node to a desired state
  • To perform a quick test to verify that  a playbook has executed successfuly
  • To run a discovery task to verify that a node meets certain criteria

Sample ad-hoc commands with Ansible Shell Module

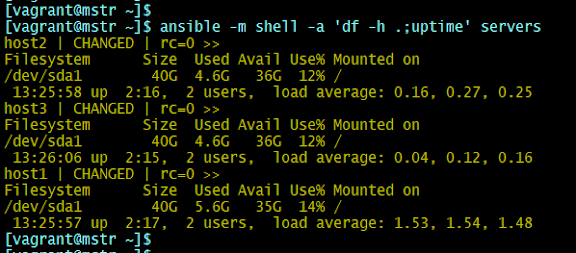
Let's experiment with 'shell' module send a terminal command to the remote host and retrieve the results. For instance, to find out the disk-space and uptime usage on our host2 machine, we could use:

 ansible -m shell -a 'df -h .;uptime' server 
Ansible shell module execution example.

You can run the ansible commands on the selective hosts here host2 and host3.

ansible -m shell -a 'uptime' host2:host3 

Converting the above ad-hoc command execution into a playbook as hello.yml file. You can use your favourite editor, vi hello.yml # File name: hello.yml
 
--- 
 - name: Hello from ansible playbook
   hosts: localhost
   
   tasks:
   - name: Prints message
     debug:
       msg: "Welcome To VybhavaTechnologies from remote"
Execute the playbook using ansible-playbook command with playbook yaml file as :
 
ansible-playbook hello.yml   
More Examples to practice different automation needs:
 
     ansible -i prod_inv prod -m shell -a "uptime"
     ansible -i prod_inv prod:web:db -m shell -a "uptime" # multiple group
     ansible web -m shell -a "free -m" # get the RAM size of web group
    
Execution of the above commands are 
Ansible shell module ad-hoc command execution


How to converting the ad-hoc commands to playbook?

Here I've tried to get converted simple uptime, free commands to run in playbook 
 
# File: fun-play.yaml

---
 - name: Monitor CPU and Mem
   hosts: all
   tasks:
   - name: Find CPU load
     shell: uptime
     register: up_time
   - debug:
       var: up_time.stdout_lines
       
   - name: Find RAM Size
     shell: free -m
     register: free_ram
   - debug:
       var: free_ram.stdout_lines
Execution of the above play book as follows:
ansible-playbook fun-play.yaml
   
You can add df command to this one more play into the playbook and give try.

How a PLAYBOOK structure can be?

A playbook can have multiple play sections.

Multiple play sections in a Ansible Playbook


Creating your first Playbook

Here is a simple play book with very simple tasks
---
 -  name: First playbook
    hosts: db
    tasks:
      - name: test command
        command: hostname
        register: output

      - debug: var=output

      - name: test a script
        script: remoterun.sh
        register: scriptout

      - debug:
          msg: "{{ scriptout.stdout }}"

 - name: another play
   hosts: db
   tasks:
     - name: Install webserver
       become: yes
       become_user: root
       yum:
         name: httpd
         state: present

     - name: Start webserver
       become: yes
       become_user: root
       service:
          name: httpd
          state: started
  
Create a script File remoterun.sh
 
  echo "Welcome from shell script"
  
It's execution output is as shown below:

First playbook execution
continue...

Apache web server started


How does Ansible built-in Debug works?


A debug module block can be added to any of the tasks, which will help us to understand the Ansible execution flow.

Sample example where debug uses ansible facts to retrieve the remote host IP addresses.
---
- name: Testing
  hosts: all
  gather_facts: yes

  tasks:
    - debug: var=hostvars[inventory_hostname]['ansible_env'].SSH_CONNECTION.split(' ')[2]

The execution output is image


_/\_
    Hope you enjoyed this post, Keep learning, Keep smiling Keep sharing ...  :) 


References

Friday, July 16, 2021

Ansible 3 Exploring on the files, copy, fetch modules

Hello Guys this is another post on the Ansible learning experiments, well in this post,  I've explored about files and directories which can be created and copied and downloaded and uploaded. We could also do file permission changes how we do in Linux 'chmod' and 'chown' commands.

Let's begin with effectively doing automation management with configurations and deploy the challenges related to files and directories.

We can compare ansible modules copy and fetch both are related to file moment and they work in opposite directions as shown below:

Ansible modules copy vs fetch

We have many files related modules available in the Ansible. 

  • acl archive unarchive iso_extract read_csv synchronize
  • assemble tempfile template xattr xml
  • blockinfile lineinfile patch 
  • copy fetch file find stat replace

In this post we will have three modules to experiment here.

  1. file
  2. copy
  3. fetch

Prerequisites 

  1. Ansible installed controller node
  2. SSH password less connectivity established

Here is a sample inventory file which I have used for this experiment:

inventory file
[db]
192.168.33.210
192.168.33.220
Following is the Syntax for all ad-hoc command line will be used 
ansible[-i inventory] server1:server2[group1:group2] -m file -a "arguments such as path status-action-value" [-b]

Exploring 'file' module

This section we will experiment with the file module and the following file related operations using Ansible Ad-hoc commands
  • Create a file
  • Create a directory
  • modify the file permissions
  • Delete a file or directory
Ansible Mastering

Creating a file using the 'file' module

Creating a file (just like touch command in Linux) first we can tryout with ad-hoc command, later we can use this inside a playbook.
ansible db -m file -a "path=/tmp/hello.txt state=touch"
Ansible file module creating file


Change file permission mode


We can change any file attribute value while creating it, Example change the file mode to 0777
ansible db -m file -a "path=/tmp/newfile.txt state=touch mode=0777"
Above steps we can include as a task inside the playbook.

Remove a file on remote host


To delete a file using the file module we need to use the argument values dif
ansible db -m file -a "path=/tmp/newdir.txt state=absent"
To delete use 'absent' state
Ansible file delete optin


Creating Directory

We can create directories on the remote hosts as :
ansible db -m file -a "path=/tmp/newdir state=directory"
Ansible direcoty creation


Troubleshooting point : When you pass the wrong argument value for status then Ansible Engine will suggest message with state must be one of the : absent, directory, file, hard, link, touch.

Superuser access for file operations  
To write files where root owns the directory, example create file text.txt under /etc foldeer permission deny. If your user have sudo access you can do. Similar to it we can do with Ansible CLI
ansible db -m file -a "path=/etc/test.txt state=touch" -b
Here -b or --become option will allow as prefixing as sudo to a command. note that this will only works for the sudoer users.
 

2. The copy module

A small change in the current folder to use as custom ansible configuration folder where it has two files ansible.cfg and hosts inventory as 'prod_inv' file same thing is mentioned in the ansible.cfg file. As Ansible will take the prority to current directory containing ansible.cfg event though the default exists :
[defaults]

inventory      = ./prod_inv
host_key_checking = False
let's see the copy module now, the copy module will help you to transfer the files from the source(Ansible engine) to the destination (Ansible nodes).

Simple example test for copy module, from Ansible Engine hello.txt from /tmp location copied to the remote web servers into /tmp location.
  ansible web -m copy -a "src=/tmp/hello.txt dest=/tmp/hello.txt"
  

How to copy a directory to remote box in Ansible?

This is little tricky idea we can do Copying directories using copy module just like scp command in Linux. Let's try this with the playbook
---
 - name: Ansible copy module test
   hosts: web
   tasks:
   - name: copy dir
     copy:
       src: /tmp/testdir
       dest: /tmp
    
Execution of the Playbook will be as follows:
    ansible-playbook copydir.yaml
    
Ansible playbook execution for copy module
Note: if you have/ at the end of src it will consider as files of that dir instead of selecting directory.

How to copy multiple files or directories to remote box in Ansible?


Copying multiple files/directories selecting 'witth_item'

Let's re-use the YAML file and name it  as copy-mutliple.yaml follows:

---
 - name: Ansible copy module test 2
   hosts: web
   tasks:
   - name: copy multiple files
     copy:
       src: /tmp/testdir/{{ item }}
       dest: /tmp
       mode: 0774
     with_items:
       ['hello2.txt', 'hello4.txt', 'sub1/hello5.txt']
Execution of the Playbook will be as follows:
    ansible-playbook copy-multiple.yaml
    

Multi-copy image
Multiple files and sub directories copy to remote node using 'with_items'

Can I create text content when I use copy module?


Yes, this is possible the copy module allows us to create the content into a file using a special attribute 'content' which takes text line to insert into the file. This is like Linux echo command to create single line entry to a file [ echo "Hello World!" > /tmp/test_01.txt ]

When content used instead of `src', sets the contents of a file directly to the specified value. Works only when `dest' is a file. And also it reates the file if it does not exist.
---
# Filename: copy_content.yml
 - name: Ansible copy content test
   hosts: localhost
   tasks:
   - name: create a file with content
     copy:
       dest: /tmp/test_content.yml
       content: "hello world!\n"
     
The execution of the copy content example as:
ansible-playbook copy-content.yaml
copy module with content to a file in Ansible

Observe that you can run this copy_content task only once next time onwards no changes!

3. The fetch module

Guys here we will explore the file 'fetch' module, this module will like a wget in Linux, it is used for download the files or directories from remote box.

Default fetch[important logic need to understand]
By default fetch module will fetches the whole folder structure as-is from the remote host to the local that is Ansible Engine running 'dest' location which is specified in the arguments.


ansible -i prod_inv web \
    -m fetch -a "src=/tmp/hello.txt dest=./downloaded"

Ansible default fetch operation


File flattening
 
Downloaded to a single file from multiple source hosts. Flatten folder structure
 ansible -i prod_inv web -m fetch -a "src=/tmp/hello.txt dest=./download flat=true"
 
When you execute the above ansible ad-hoc command it will download from host1 but fails when host2 

 ansible -i prod_inv web -m fetch -a "src=/tmp/hello.txt dest=./downloads/ flat=true"
 
Downloads from host1, host2 but will be downloads to the same destination location, as a solution to this, separates the destination filename with inventory hostname should be added.


To separate the file destinations use ansible facts {{ inventory_hostname }} with special notations where it should be enclosed within {{}} braces. 
ansible -i prod_inv web -m fetch \
-a "src=/tmp/hello.txt dest=./{{ inventory_hostname }}_download/ flat=true"
Ansible ad-hoc fetch command that includes variables in download

To use the fetch module in ansible to retrieve the file /tmp/p1-sample.txt from my-src.host, you can use the following playbook:
  ---
- hosts: my-src.host
  tasks:
  - name: fetch file from my-src.host
    fetch:
      src: /tmp/p1-sample.txt
      dest: /tmp/p1-sample.txt
      flat: true
Here, You can also specify a different destination path by modifying the dest parameter. The 'flat' parameter is set to true indicates fetch operation on a flat file. For example, to store the file in the /tmp directory on the localhost with a different file-name, we can use the following dest value:
 dest: /tmp/p1-sample-fetched.txt

Can I fetch multiple files from remote host to local host?

You can also specify a list of src files to fetch multiple files at once. For example:
---
- hosts: my-src.host
  tasks:
  - name: fetch files from my-src.host
    fetch:
      src:
      - /tmp/p1-sample.txt
      - /tmp/p2-sample.txt
      dest: /tmp/

This playbook will retrieve the files /tmp/p1-sample.txt and /tmp/p2-sample.txt from the host my-src.host and store them in the /tmp directory on the local host where Ansible runs.

Observation of Ansible Idempotency

Repeat the same above command again then due to Ansible idempotency, nothing changed at source and destination no action will be performed.
 
Important Note: We cannot copy a file between remote servers using copy, fetch module. But combination of these two fetch the file from source server and copy to target server is possible that means we can do this with two tasks, in between the Ansible controller node/AWX Tower will be storing the file temporarily.

Official Reference:


Tuesday, July 13, 2021

Installation of Ansible on CentOS 7 | RHEL | OpenSuse | Ubuntu

 Hello Guys!! 

In this post let's explore the installation options for Ansible Core. We can get the detailed Documentation provided by Ansible in the Installation Guide. I've also gone through the Amazing Book : Ansible for DevOps  Here he explained that beginners can start with playing in Laptop by setting up the Virtual Boxes for Ansible learnings. 

Today I have started experimenting with Ansible installation on the CentOS 7 Vagrant box, As you know Ansible is from the RedHat.

Ansible having 3300+ modules freely available. At the end of the installation, we can test the connectivity with the 'ping' and 'shell' module which will be referred to the inventory hosts which is present in the "/etc/ansible/hosts" location.

Prerequisites for Ansible installation

  • Create Vagrant Boxes where Ansible engine runs on the master node and SSH-Agents will run on two different nodes.
  • PasswordAuthentication enable for sshd_config
  • SSH Connectivity with ssh-keygen
Ansible ready to use on Vagrant boxes

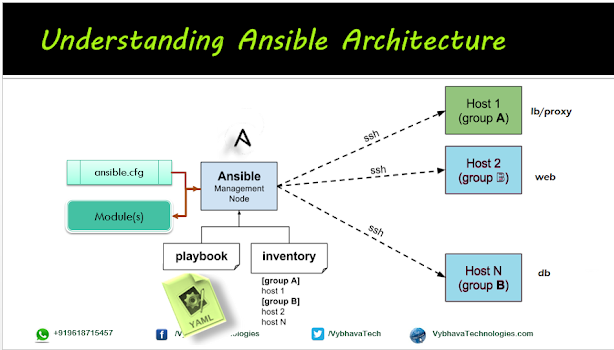
My understanding review about Ansible Architecture

Ansible Architecture
Ansible Architecture 


Steps for Installing and Configuration of Ansible on CentOS 7


Step 1. Installation of yum repo and Ansible
To install the Ansible using yum package manager we must get update the repo

Alternative Vagrant optons as
Vagrant.configure(2) do |config|
    #config.vm.box = "centos/8"
    config.vm.boot_timeout=600
    config.landrush.enabled = true
  
    config.vm.define "mstr" do |mstr|
      mstr.vm.host_name = "mstr.devopshunter.com"
      mstr.vm.box= "ansible/tower"
      mstr.vm.network "private_network", ip: "192.168.33.100"
      mstr.vm.provider "virtualbox" do |vb|
        vb.cpus = "2"
        vb.memory = "2048"
      end
    end
    config.vm.box = "centos/8"  
    config.vm.define "node1" do |node1|
      node1.vm.network "private_network", ip: "192.168.33.110"
      node1.vm.hostname = "node1.devopshunter.com"
      node1.vm.provider "virtualbox" do |vb|
        vb.cpus = "2"
        vb.memory = "1024"
      end
    end
   
    config.vm.define "node2" do |node2|
      node2.vm.network "private_network", ip: "192.168.33.120"
      node2.vm.hostname = "node2.devopshunter.com"
      node2.vm.provider "virtualbox" do |vb|
        vb.cpus = "2"
        vb.memory = "1024"
      end
    end  
  end
  
You can run `vagrant up' to bring up the 3 boxes as defined in the
sudo yum install -y epel-release
sudo yum install -y ansible

# To get the latest version of ansible use the following 

# Remove ansible older version
sudo yum remove -y ansible

# Install python3 includes pip3
sudo yum install -y python3

wget https://bootstrap.pypa.io/get-pip.py
python3 get-pip.py
python3 -m pip install --upgrade pip
pip3 install ansible==4.6.0 --user
ansible --version # this will show warning older version 
python3 -c 'from ansible_collections.ansible_release import ansible_version; print(ansible_version)'

Step 2: Change sshd_config file on Vagrant based CentOS box

Better to edit with root user the /etc/ssh/sshd_config cotaining PasswordAuthentication no to PasswordAuthentication yes and restart the sshd services.

vi /etc/ssh/sshd_config
# Search and comment 
#PasswordAuthentication no
# Search uncomment for yes value
PasswordAuthentication yes
Save the file and restart the sshd services on all the CentOS boxes.
systemctl restart sshd # Restart sshd service
systemctl status  sshd #Check the status

Confirmation on the sshd_config changes as shown below:


ssh_config modified and restart service in CentOS 7

same step 2 ssh_config changes can be repeated on the all target boxes as well.

ssh service restart on remote nodes


Step 3: Ansible inventory creation on Controller

Update the hostname and IP address correctly mapped on VMs. There are many ways to add the machines on your Ansible Engine running VM. Same IP or VM can be part of multiple groups also allowed. Example host2 is member in appservers and also dbserver due to its capabilities we can assign.


[nodes]
192.168.33.210
192.168.33.220

Step 4: SSH Key Generation with RSA algorithm.

We can use any algorithm

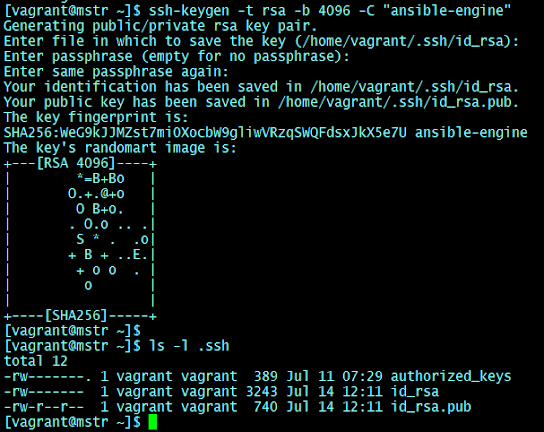
ssh-keygen -t rsa -b 4096 -C "ansible-engine"
 ls -rlta ~/.ssh 
 ssh-copy-id -i ~/.ssh/id_rsa.pub vagrant@192.168.33.210
 # Say 'yes' to add to known_hosts
 # Enter the password to connect remote host 
 # Validate
 ssh vagrant@192.168.33.210
 exit # exit from remote host
 # Repeat above steps for remaining hosts
 ssh-copy-id -i ~/.ssh/id_rsa.pub vagrant@192.168.33.220
 ssh vagrant@192.168.33.220
 exit 

SSH Key generation for Ansible
ssh-keygen for ansible 


Observe that two rsa files created in the ~/.ssh folder one is key and other one with .pub extentiona is public key

Step 5: Adding SSH Key to Authorized keys of remote hosts


ssh-copy-id -i ~/.ssh/id_rsa.pub vagrant@192.168.33.210
ssh-copy-id -i ~/.ssh/id_rsa.pub vagrant@192.168.33.220

SSH copy id

Regular test-case after Ansible installation we have multiple options test with the ping module:
ansible -m ping all
ansible -m ping nodes

Ansible installation on Ubuntu

As we have multiple ways to install the Ansible Core on any Linux platform, Here we will see the option to install it on Ubuntu 20.04.  Specialty of this is we will be getting the latest installation because the repository will be update on your Ubuntu System. 

You can see the video session for Ansible installation on Ubuntu with latest repository updated : 

 sudo apt update
 sudo apt install software-properties-common
 sudo add-apt-repository --yes --update ppa:ansible/ansible
 sudo apt install ansible


Please write your feedback on this post, and also your experiment problems if in case you followed my steps.

Monday, July 12, 2021

Kubernetes Storage Volumes Part -2 HostPath

 Hello DevOps Guys!!

This post is about Kubernetes Volume type hostPath type. In this post, I've tried multiple options with Volume with hostPath type association with Pods.

Volume type - hostPath 

  • it posts the persistent data to a specific file or directory on the Host machine's file-system
  • Pods running on same node and using the same path in their volume 
  • this hostPath volume is not deleted when Pod crashed or brought down intentionally
  • Specialty of the hostPath Volume is retained, if a new Pod is started as replacement, the files in the hostPath volume will be reused and re-attached to new Pod.
If we compare with emptyDir if the pod dies the Volume will be reclaimed by the Kubernetes Control Plane. whereas in hostPath it remains on the host path.

Pre-requisites

  • Docker Engine installed  
  • Kubernetes Cluster Up and Running (You can do a test on MiniKube as well)
  • Enough disk space to define in the PV manifestation

In this post we will do two experiments
  1. Bare pod using hostPath Volume
  2. Pod Deployment using hostPath Volume (PV, PVC)


# Manifestation of HostPath Volume type
# File: barepod-vol.yaml
apiVersion: v1
kind: Pod
metadata:
  name: nginx-hostpath
spec: containers: - name: nginx-container image: nginx volumeMounts: - mountPath: /test-data name: test-vol volumes: - name: test-vol hostPath: path: /vagrant/data
To create the manifestation for Bare Pod
kubectl create -f barepod-vol.yaml
image here


kubectl create -f barepod-vol.yaml

Categories

Kubernetes (24) Docker (20) git (13) Jenkins (12) AWS (7) Jenkins CI (5) Vagrant (5) K8s (4) VirtualBox (4) CentOS7 (3) docker registry (3) docker-ee (3) ucp (3) Jenkins Automation (2) Jenkins Master Slave (2) Jenkins Project (2) containers (2) docker EE (2) docker private registry (2) dockers (2) dtr (2) kubeadm (2) kubectl (2) kubelet (2) openssl (2) Alert Manager CLI (1) AlertManager (1) Apache Maven (1) Best DevOps interview questions (1) CentOS (1) Container as a Service (1) DevOps Interview Questions (1) Docker 19 CE on Ubuntu 19.04 (1) Docker Tutorial (1) Docker UCP (1) Docker installation on Ubunutu (1) Docker interview questions (1) Docker on PowerShell (1) Docker on Windows (1) Docker version (1) Docker-ee installation on CentOS (1) DockerHub (1) Features of DTR (1) Fedora (1) Freestyle Project (1) Git Install on CentOS (1) Git Install on Oracle Linux (1) Git Install on RHEL (1) Git Source based installation (1) Git line ending setup (1) Git migration (1) Grafana on Windows (1) Install DTR (1) Install Docker on Windows Server (1) Install Maven on CentOS (1) Issues (1) Jenkins CI server on AWS instance (1) Jenkins First Job (1) Jenkins Installation on CentOS7 (1) Jenkins Master (1) Jenkins automatic build (1) Jenkins installation on Ubuntu 18.04 (1) Jenkins integration with GitHub server (1) Jenkins on AWS Ubuntu (1) Kubernetes Cluster provisioning (1) Kubernetes interview questions (1) Kuberntes Installation (1) Maven (1) Maven installation on Unix (1) Operations interview Questions (1) Oracle Linux (1) Personal access tokens on GitHub (1) Problem in Docker (1) Prometheus (1) Prometheus CLI (1) RHEL (1) SCM (1) SCM Poll (1) SRE interview questions (1) Troubleshooting (1) Uninstall Git (1) Uninstall Git on CentOS7 (1) Universal Control Plane (1) Vagrantfile (1) amtool (1) aws IAM Role (1) aws policy (1) caas (1) chef installation (1) create deployment (1) create organization on UCP (1) create team on UCP (1) docker CE (1) docker UCP console (1) docker command line (1) docker commands (1) docker community edition (1) docker container (1) docker editions (1) docker enterprise edition (1) docker enterprise edition deep dive (1) docker for windows (1) docker hub (1) docker installation (1) docker node (1) docker releases (1) docker secure registry (1) docker service (1) docker swarm init (1) docker swarm join (1) docker trusted registry (1) elasticBeanStalk (1) global configurations (1) helm installation issue (1) mvn (1) namespaces (1) promtool (1) service creation (1) slack (1)