Showing posts with label git. Show all posts

Monday, March 10, 2025

Handling Git Large repositories

Hey, hello, dear DevOps, DevSecOps, and SRE team heroes!! Here I came across a new challenge to solve the common problem on Git. You may be using GitHub or GitLab or even Bitbucket for source code management. Now, a few projects, websites, or mobile apps require storing images, audio files, or video files that are larger in size. During the transfer to the client systems, they are facing the following issues:
  1. Slowness in git clone and fetch operations: files taking too long to upload or download, leading to delays in deployment and user experience
  2. Sluggish commits and status checks: some clients are encountering errors related to file size limitations, causing frustration and hindering workflow efficiency
  3. Repository size bloat
  4. Complexity in managing multiple branches
It's crucial for us to explore solutions that can streamline this process and ensure smooth handling of large media files.

Git LFS installation

apt install -y git-lfs
Git LFS (Large File Storage) is used to handle large files in a Git repository efficiently by replacing them with lightweight pointers while storing the actual files in a separate location. Here are various examples of using Git LFS, including tracking, untracking, checking status, and more: ---

1. Initialize Git LFS

Before using Git LFS in a repository, initialize it:
git lfs install
This sets up Git LFS for the repository. ---

2. Track Large Files

To track specific file types, use:
git lfs track "*.psd"
or track a specific file:
git lfs track "bigfile.zip"
This updates the `.gitattributes` file to include:
***.psd filter=lfs diff=lfs merge=lfs -text
After tracking, commit the `.gitattributes` file:
git add .gitattributes
git commit -m "Track large files with Git LFS"
---

3. Check Tracked Files

To see which files are being tracked by Git LFS:
git lfs track
---

4. Check LFS Status

To check which large files are modified or committed:
git lfs status
---

5. Untrack a File

If you no longer want a file to be tracked by Git LFS:
git lfs untrack "bigfile.zip"
This removes it from `.gitattributes`. Then commit the change:
git add .gitattributes
git commit -m "Untrack bigfile.zip from Git LFS"
Important: This does not remove files from previous commits. ---

6. List LFS Objects

To see which LFS files exist in your repository:
git lfs ls-files
---

7. Migrate Large Files (if added before tracking)

If you accidentally committed a large file before tracking it with Git LFS, migrate it:
git lfs migrate import --include="*.zip"
---

8. Push and Fetch LFS Files

After committing, push LFS files to the remote:
git push origin main
To pull and fetch LFS files:
git pull
git lfs fetch
---

9. Removing LFS Files From History (if needed)

If a large file was added before tracking and you want to remove it:
git lfs migrate import --include="bigfile.zip" --everything
Then, force push the cleaned history:
git push origin --force --all
---

10. Verify LFS Files in Remote Repository

To check which LFS files exist on the remote:
git lfs ls-files --long

Common mistakes working with Git LFS

  • Not Tracking Files Properly: Forgetting to use git lfs track for large files can lead to them being stored in the repository instead of being managed by Git LFS.
  • Ignoring the .gitattributes File: The .gitattributes file is crucial for Git LFS to function correctly. Failing to commit this file can cause issues for collaborators.
  • Pushing Without Installing Git LFS: If Git LFS isn't installed on your system, pushing large files will fail or result in errors.
  • Exceeding Storage Limits: Platforms like GitHub have storage limits for Git LFS. Exceeding these limits can block further uploads.
  • Cloning Without Git LFS: If you clone a repository without Git LFS installed, you might end up with pointer files instead of the actual large files.
  • Using Git LFS for Small Files: Git LFS is designed for large files. Using it for small files can unnecessarily complicate your workflow.
  • Not Cleaning Up Old Files: Over time, unused large files can accumulate in the LFS storage, increasing costs or storage usage.
Please let me know your experiances with Large files on Git server, write your learnings in the comments.

Saturday, March 8, 2025

Git installation on Ubuntu 24.04

Git installation on Ubuntu is pretty simple. If you are looking for git instatlling on the RHEL or Rocky or Oracle Linux you can use this link.
Now most of the software projects are using Git. So let's do installation on Ubuntu wit the following steps:
  1. Check for Git exists
  2. Install Git
  3. Confirm Git Installation
Pre-requisites:

Pick an instance on Cloud or online terminal of Ubuntu 20+ version to this experiment. Here I'm using the KillerCoda provided Ubuntu.

Check for Git exists

This is a common requirement when you join a new project and on the Linux machine you would like to know git installed or not. We have couple of options to check it. Let's do it here:

dpkg -l git

#or

dpkg --list git
In the output first 'ii' in the list means (if there are packages installed, you should see this mark) that the package is correctly installed and available. alternatively you can also try other option to check git installation on Ubuntu.
apt list git

#or

apt list git -a
Or else you can simply use `git` it will works and provides git command help when git already installed.
git
We can see that it is not the latest version as of now, So I wish to get installed the latest Git version on Ubuntu 24.04.

Install Git from source

1. we will download our desired verison of Git tarball, untar it, enter into the extracted directory. 2. Build git from the source code using 'make' tool 3. Run the installation using 'make install'

# install pre-requisite libraries 
sudo apt update
sudo apt install make libssl-dev libghc-zlib-dev libcurl4-gnutls-dev libexpat1-dev gettext unzip

# Download your desired version
wget https://mirrors.edge.kernel.org/pub/software/scm/git/git-2.48.1.tar.gz
tar -zxf git-*.tar.gz 

cd git-2.48.1
make prefix=/usr/local all
sudo make prefix=/usr/local install
Now Build steps

Confirmation of Git Installation

You know already know multiple ways to check git existing version on your Ubuntu. Let's quickly validate it git command with `--version` opton.

git --version

Auomation in mind: Git desired version on Ubuntu

Power of your brain should work smart when you look at this instructions any AI tool can gives these but we have God's given our own brain to use :)

#!/bin/bash

#Measurable automation - this will calculate duration of this script execution
SECONDS=0

# This can be passed as command line arugument
GIT_VERSION="2.48.1"

if ! sudo apt update; then
    echo "Failed to update package list"
    exit 1
fi

rm -rf git*

# Install the dependency libraries
sudo apt install -y make libssl-dev libghc-zlib-dev libcurl4-gnutls-dev libexpat1-dev gettext unzip
# Download the desired git tarball
wget https://mirrors.edge.kernel.org/pub/software/scm/git/git-$GIT_VERSION.tar.gz

tar -zxf git-*.tar.gz 
cd git-$GIT_VERSION
pwd
# compile the source code and install
make prefix=/usr/local all
sudo make prefix=/usr/local install

# Validate git installed version
  
git --version | grep ${GIT_VERSION}
[ $? -eq 0 ] && echo "Git installed latest version successfully!"
echo "Execution time: $SECONDS seconds"

Magical way of Git installation

The beatiful output of the above bash script is here:

If you encounter any issues during the installation, you may want to check your internet connection or ensure that your package manager is up to date. Additionally, it’s helpful to refer to the official Git documentation for troubleshooting tips and further configuration options.
Please Write your valuable comments with your git installation experiments and any issues that you faced. Happy learning!!

Tuesday, June 13, 2023

Bitbucket Server installation on Linux

Bitbucket installation 

Bitbucket is most widely used in the IT industry to provide team collaborative work for short size of teams. Its greater ability is to have integration with Jira and other DevOps tools. Bitbucket encourages private repository creation by default. So they are mostly not available for search engines to discover these projects! So startup projects will do better here.

Prerequisites

JRE/JDK: To run the web UI Java is required, Your system must have the JRE/JDK, we can go with the Open JDK as you know that Oracle JDK is now not open to everyone to download!
Git: To run the Bitbucket we need Git as a source-code management tool.

Ensure the default port 7990 is available on the system. If you are running on the Cloud ensure the TCP port /7990 allows inbound traffic. On the AWS you need to update the Security Group that associated with the EC2 instance.

Option of Vagrant box 
 
Vagrant.configure(2) do |config|
    config.vm.box = "centos/8"
    config.vm.boot_timeout=600
    #config.landrush.enabled = true

    config.vm.define "mstr" do |mstr|
    mstr.vm.host_name = "mstr.devopshunter.com"
    mstr.vm.network "private_network", ip: "192.168.33.100"
     mstr.vm.provider "virtualbox" do |vb|
     vb.cpus = "4"
     vb.memory = "4096"
     end  
    end
      config.vm.define "node1" do |node1|
      node1.vm.network "private_network", ip: "192.168.33.110"
      node1.vm.hostname = "node1.devopshunter.com"
        node1.vm.provider "virtualbox" do |vb|
         vb.cpus = "2"
         vb.memory = "1024"
         end
     end
    
    config.vm.define "node2" do |node2|
    node2.vm.network "private_network", ip: "192.168.33.120"
    node2.vm.hostname = "node2.devopshunter.com"
        node2.vm.provider "virtualbox" do |vb|
        vb.cpus = "2"
        vb.memory = "1024"
        end
    end
 
  end
  

1) Bitbucket supports git version 2.31 to 2.39 currently 
2) Minimum ram required is 3GB. So need to modify the below line in vagrant file
vb.memory = "4096" then run vagrant reload mstr to get working.

If you want to install on CentOS/8

 
sudo yum remove git* -y

 sudo yum install java wget -y
 sudo yum groupinstall -y 'Development Tools';
 sudo yum install -y autoconf curl-devel expat-devel gettext-devel openssl-devel perl-CPAN zlib-devel gcc make perl-ExtUtils-MakeMaker cpio perl-CPAN vim
 
 wget https://mirrors.edge.kernel.org/pub/software/scm/git/git-2.39.3.tar.gz
 tar zxvf git-2.39.3.tar.gz
 cd git-2.39.3/
 ./configure
 make
 sudo make install prefix=/usr install
	

 wget https://product-downloads.atlassian.com/software/stash/downloads/atlassian-bitbucket-8.11.0-x64.bin
 sudo chmod +x atlassian-bitbucket-8.11.0-x64.bin
 ./atlassian-bitbucket-8.11.0-x64.bin
  

Bitbucket Setup configuration

Product: Bitbucket
License type: Bitbucket (server)
Organization: vybhavatechnologies
your instance is up and running
server-id: BDFG-ZKCQ-RWTR-YOXP [changes for you!]

click on the "Generate License" Button
pop-up confirmation please confirm it so that you can see the evaluation 90 days license key will be shown in the gray text box.

come to set up 
next Administrator account setup 
Username: admin
full name pavan devarakonda
email address pavan.dev@devopshunter.com
Please enter the strong password, enter same in the confirm password 

Goto bitbucket 


Login with a newly created admin account. Enjoy your Project creation and each Project can have multiple repositories. The repository which you create on the Bitbucket Web-UI is an empty bare repository. 


For Windows
- GitBash
- BitBucket 

How to add a project to git repo to the remote server.

On your local have a project directory and have some code.

Create a repo on the bitbucket say 'demo-repo1'
On your client VM or from your Personal Laptop Gitbash navigate to the folder and run the following command sequence to push the code to remote repository :
cd demo-local
git init 

git remote add origin https://url-demo-repo1.git  
git add .
git commit -m "update"
git push -u origin master
all the files in the demo-local will be added to remote repo.
Check the changes on the browser on the remote repo.

Friday, November 25, 2022

Undoing changes - git reset

Hello Guys!!


HEAD pointer movement

HEAD points to specific commit in the local repo-branch as new commits are made, the pointer changes

HEAD always points to the "tip" of the currently checked-out branch in the repo (not the working directory or staging index)

last state of repo (what was checkout initially HEAD points to parent of next commit(where writing next commit takes place)


HEAD Movement in Git branches

Git Reset movements

This is most common need of every DevOps team development phase need. There are three options we have but of course two of them are mostly used.

Git reset movements at three tree levels


  1. soft
  2. mixed
  3. hard

Using --soft reset

The soft reset command is to combine many commits into a single one.


git reset --soft HEAD       (going back to HEAD)
git reset --soft HEAD^    (going back to the commit before HEAD)
git reset --soft HEAD~1     (equivalent to "^")
git reset --soft HEAD~2     (going back to 2 commits before HEAD)

Using hard reset

move the HEAD pointer update the Staging Area (with the content that the HEAD is pointing to) update the Working Directory to match the Staging Area
git reset --hard HEAD       (going back to HEAD)
git reset --hard HEAD^      (going back to the commit before HEAD)
git reset --hard HEAD~1     (equivalent to "^")
git reset --hard HEAD~2     (going back two commits before
Backing out changes to commit ids. So refer to the git show, git log commands in between to identify that change which you wish to reset to.

 
Observe the git reset with soft and hard example


Sunday, November 20, 2022

GitHub Personal Access Token (PAT) for Linux Users

Hey Greetings of the day!!

GitHub providing Personal Access Token instead of using username, password for git repository that is on the GitHub. where git subcommands such as git pull, git push, fetch and any remote operations will be depends on this PAT. 

 There are two choices for PAT 
1. fine grain Personal Access Token(PAT) 
2. Personal Access Token (Classic) 

I understood that it is easy to change permissions, authentication token that use only specific target repositories. 

If you want to know 'How PAT works? Where to start PAT' then this post is absolutely for you! Welcome to this 2 mins read!


  • Fine grained PAT newly introduced in Oct 2022 on the GitHub still at the time this post it is mentioned as [Beta] versioned.
  • Personal Access Token PATS are going to work with commonly defined API on GitHub. Any integration made simplified with this method.

How to create PAT on GitHub? 

  1. Login to your GitHub account. Click on the profile picture upper-right corner, from there select the 'Settings' menu item. 
  2. The left bottom, PAT will be defined under the 'Developer Settings' there you will get new page with 'Personal Access Tokens' into the work area select your choice. There are many actions related to each row tells about a granular choices that GitHub could provide. 
  3. Go to right side 'Generate Token' will be a button to hit. Then it will prompt you for login credentials to be entered. Then New personal access token parameters will need to be filled up. 1. Note - alias a authentication methods let's enter the note as "vt_demo_token
  4. Select the scope - 'repo' is enough, where it will be containing repo:status, repo_deployment, public_repo, repo:invite, security_events.
  5. Click on the "Generate Token" button new page will have the token. Make sure to copy your new personal access token now. Remember that you won't be able to see it again eventhough you have created it. As soon as click away of this page you will not get the value any more.
Preserving the TOKEN on your Linux system Create an environment variable store it inside .bash_profile.
MY_GITHUB_TOKEN=GENERATED-TOKEN-VALUE-COPIED FROM GitHub PAT page.
How do I access remote GitHub repository?
Use the following command to set the remote repository:
git remote origin https://github-remote-repo-url 
Use the following command to check the remote repository
git remote -v 
Here -v option indicates that verbose of the remote url and fetch and pull commands could connect with the URLS shown as above command output. push the changes to remote GitHub repository.
git push -u origin https://git-url 
It will prompt for the Password then enter the TOKEN value which is already copied that you can paste here. To store the password you don't want to see the prompting every push, pull activities. To avoice that you can set the remote url as follows:
git remote set-url https://api:$MY_GITHUB_TOKEN@github.com/REMOTE-USER/REMOTE-REPO.git 
Example:
git remote set-url https://api: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@github.com/SanjayDevOps2022/football.git

After setting this all remote operations push, pull are no user access prompted.
If you find this post is useful please share this to your technical communities :)

Sunday, July 10, 2022

Git Config different scopes

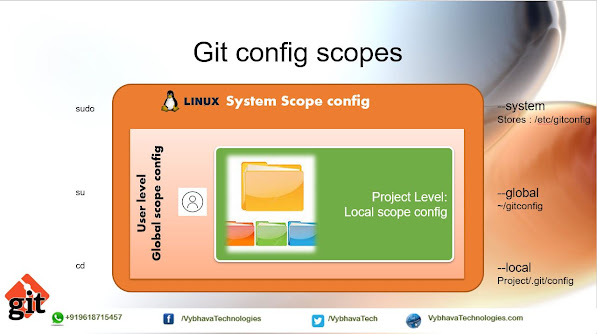
Hello DevOps or DevSecOps team here in this post I would like to expose more details about how the Git configurations can be done and viewed and where it is going to stored as file.

Git Basic Configurations and scopes

Let's see what are options we have for "git config" command in a Linux system, here I've used Ubuntu Linux to execute all 'git config' commands. 

git config command
git config scopes

There are three different levels : local, global, system-level configuration values attributes defined in Git. 

  1. System
  2. Global
  3. Local

System level config

Git allows us to define System wide configuration that means the configured values will be available for all users in the system and for every project repository as well.

# System level configurations will be stored in /etc/gitconfig file
git config --system core.editor "vim"
git config --system merge.tool "vimdiff"
The execution of the commands 

git config --global command example


Global level config

Git configure values are defined at user level you can work on multiple repositories within the same user scope. If you define same values defined as in the system then user level values will be overrides.

 git config --global alias.co checkout
 git config --global alias.graph log --oneline --all --graph --decorate
 git config --global alias.graph "log --oneline --all --graph --decorate"
 git config --global alias.st status
 git config --global alias.ci commit
 git config --global alias.br branch
 git config --global --list
 cat .gitconfig
Defining Global level configuration and where it stores on hands-on:

git config --global scope

Local (Repository) level config

The configurations made at the local level are more overridden capacity than other two scopes. This will be useful project wise repository uses these definitions.

Now we configure global level user settings are as follows:

mkdir gitdemo-project
cd gitdemo-project/
git init
git config --local user.name "BhavaniShekhar"
git config --local user.email  "bhavanishekhar@vybhava.com"
git config --local --list
git st
cat .git/config
Le'ts execute this above commands for local repository wise config 

git config --local example
git config --local scope example


Troubleshooting: Learn from the Mistakes

I've proceeded here and created a file named 'mytest.py' and entered the sample code:

# This is first testing python program

print("Hello Git Learners!")

First file adding to index

git add mytest.py

warning: LF will be replaced by CRLF in mytest.py.
The file will have its original line endings in your working directory


Note We will discuss about CRLF issue in the 'Setting end line'.

At the time of committing the code found that mistake in the mail-id that 'devopshunger' given instead of  'devopshunter'. Learn from mistakes! 

How to edit my git configuration value for user.email? 

It will be the same command it will override to reset the value.

git config --global user.email 'gladiator@devopshunter.com'

Now new problem configuration is changed but my git log shows that old mailid! how to update that? We have option '--amend', where this option will help us to amend previous commit.

git commit --amend --reset-author
[master 4ec5de9] initial commit for the git learn project
 1 file changed, 3 insertions(+)
 create mode 100644 mytest.py


Unless you don't setup the global user config values you will be warned and automatically takes the operating system user and hostname as git user details. If you setup your customized user.name and user.email that will be used to commit the changes in the local and remote repo. When everyone go for look into "git log" it will show tracking history about who did the code changes and what and when it was done that change.

Verify the Configurations that you made to the global level.

 git config --list |grep user
user.name=devops.warrior
user.email=gladiator@devopshunter.com


How to Setup line ending preferences  in Windows?

This will be trick that you need to use for the GitOps to work better outputs.

For Mac/Unix/Linux platform users

git config --global core.autocrlf input
git config --global core.safecrlf true


For Windows platform user

git config --global core.autocrlf true
git config --global core.safecrlf true


Try this trick on your git bash.

Relevant References: 

  1. Git Alias
  2. Git on PowerShell
  3. Git config setting up repo

Wednesday, June 1, 2022

Git Stashing

Hello DevOps/DevSecOps team Guys!! As you know we are learners always shine with 'Learning by doing'. In this post exploring the git stashing it's nice to know how you can keep code in safer for reuse after sometime or after some other code commits getting back.


What is Git Stash means?

Stashing takes the dirty state of your working directory — that is, your modified tracked files and staged changes — and saves it on a stack of unfinished changes that you can reapply at any time (even on a different branch).
To demonstrate stashing, you should go into your project and start working on a couple of file(s) and possibly stage one of the changes.

Power of git stash

Why do we need git stashing?
We have already git commit command right then why stashing? You can commit your code and switch to another branch. Your actual work is in a "messy state" and there are still more new feature changes need to be done on the projects coming up and don't want to commit your current changes.

For this problem, a simple solution is that you can use the command git stash.

You are working on a feature branch let's say feature1. But there is a burning issues in live needs higph priority on the hotfix, you are the only person can fix it. In such situations stashing the current changes and working highly urgent task once it is commited then we can get back to last changes. Stashing is temporary store in git repository without disturbing index, stage, work areas. 

Preparation to test the git stash commands : 
1. Create a directory name as 'git-stashtest'
2. initialize the git initial repo
clear
mkdir git-stashtest; cd git-stashtest; ls -lrt
# Do the changes like create/modify a file
You got the eligibility to play with git stash command

How to use the git stash command?

The "git stash" command can help you to (temporarily but safely) store your uncommitted local changes - and leave you with a clean working copy. Stash changes in a dirty working directory

Example: Enter the data in the 'index.html file and stash the changes.
vi index.html  # working with edit
git stash 
cat index.html

example of git stash 


Git push

Introduces the option of stashing selected pathspecs. git stash save : The changes can be saved with or without message.
git stash list : To check the stored stashes. You can list the stashes by using this command.
git stash show : We can track the stashes and their changes. To see the changes in the file before stash and after stash operation.


Git stash apply

Example for git stash apply


Git stash with list


Git stash pop


Git stash pop with index

Git stash drop with index number
You can clear specific stashed index as shown below:
git stash list
git stash drop 2
git stash list

How to clear up the stashed dirty?

Git stash Clear
git stash list
git stash clear # clears here
git stash list # to check the clear done
remove all stashed entries

Example : git stash clear


Happy to share new learnings on GitOps. If you find this useful please share it to your technical communities.

Sunday, May 29, 2022

Git File Lifecycle

In this post, we will explore, experiment and see git basic files and folder-related commands if you are familiar with the Linux file system this will be easy for you! But, again no need to worry about that we will see every command execution with experiments.


Every software product/server Lifecycle can be visible with their STATUS output, where they are currently if you know then you can move to different Lifecycle state. Let's understand how this navigation happens on the Git repository.

Git File lifecycle status changes with commands


Git Status

Git Status will always compare the files and folders with the indexed with untracked files and display their status. 

Syntax:

git status [options]

This command will check the status of the current branch by comparing it with the master branch
Example:
git status -s 

This `git status` command will show the working tree status. and it is having multiple useful options.
When you use the -s or --short option it will display the concisely where status will be represented with single alphabet 
  1. ' ' = unmodified
  2. M = modified
  3. A = added
  4. D = deleted
  5. R = renamed
  6. C = copied
  7. U = updated but unmerged
In the help page you can find more details about different format output meanings in three different tables.
 

Adding files and folders to the Stage area

We can add files from the work area to the stage area using the `git add` command. 

git add command


Here we can add TEXT files because all program codes will be ASCII text format only.

Syntax:
git add [file-name]
this files can be recently modified shell or python program using some editor.

Add a file to the staging/index area

Example:
 git status # shows nothing
 vi public/product.html # create a file and edit then save it.
 git status # observer it shows red color output.
 git add public/product.html
 git status # shows the changes in green     
   
Adding file to Git repository (local)

Adding entire folder 

You are working on a website project you need to add all the images files (.jpg) required for your website are need to place into a folder called 'images'.  To send from Untracked state files to tracked level or you can say this as work-copy to index area entire folder you can send by providing foldername as argument to git add command.

clear
cd source_code
mkdir images css publish
cd images
#copy some images to images directory here for learning used touch filename.jpg used
cd ..
git add images 
Git add entire folder example

When you observer the the staged files now the two image files will be in green colored that indicates that they are moved to index area of Git repo.

After adding folder status

Adding Current folder content

Similar to Unix/Linux  uses dot to indicate current folder content it may contain

Git add with current directly


Syntax:
git add -A

Adding all folders all files -A

add all new and changed files to the staging area

Git add All Folder


Example:
git add -A


Removing files and directories from repository

Now this can be in three use cases. 
Use case 1: let's see how to remove a file or directory from local repository and also from the filesystem
git rm testcode.file [code-dir] -f
git- rm -f
Remove files from git repository

  git rm publish/product.html # Errors out
git rm -f publish/product.html 
git status 
cd publish; ls # file removed from the filesystem as well
  
Use case 2: removing a file or directory from local repo and not from filesystem
git rm testcode.file [code-dir] --cached
Use case 3: removing a file or directory display a trail run, not really deletes anything from the repository.
git rm testcode.file [code-dir] –dry-run

Check the list of files changed

There are lots of options to check this with git and subcommands Here we will see with ls-files option so that you can see the list of files or folders recently changed
 git ls-files 
List of files in single line space separated
 git ls-files –z 
This is another wonder option with -d , where Git will lists the files or folders which are last delated from the existing repository.
git ls-files -d

Renaming file using git mv

Similar to LInux mv command we can rename a file or folder using git mv command. Here we can have existing file or folder and renamed to new file name or folder. After this if we check the status in short it will shows 'R' that means Renamed.
git mv publish/index.html publish/sanjay.html
git status -s -b
Hope you enjoyed this post of learning love on GitOps!!! Yom be interested in the next git learning post on git branching.

Wednesday, May 25, 2022

Git branching - local and remote

Hello all, in this post specially dedicated to all DevOps/DevSecOps Engineers.  Where their daily routine will have this commands if we know these we can play with them easily if you don't then it will be horrifies you! 

Git Branching explained in detailed

Prerequisites to this you should be aware git basics and to experiment with these command examples should have git installed on your Mac/Linux or git bash on Windows system.

What is the Branch in Git?

A Git branch is a separate line of work, where your work will not disturb other DevOps team members work.
Branch is a simply a movable  pointer to commit, this we can observe using git branch command output wherever you see that '*' prefixed there the pointer pointing. Default branch is master or main (new trend) but it is optional we can name anything when we initiate the git repository.

Main branch is the FIRST branch of your project that means once you run the 'git init' then 'git branch' you can observe this.
On the branch we can have many changes until find the solution and accordingly you need to do multiple commits.

Each branch created for different purpose for example new feature development we name them as 'feature'. similarly we can also have planned releases where we name them as 'release1.0' or 'dev-release'. Again it is flexible to the SCM manager decision.

Why we need to create branch in Git?

The Major reasons for Git branching are:

  • Any new features development could BREAK the code, to save this.
  • No disturbance between two developer codes that means this git branching simplify the collaboration work which gives more agility to the project

Gitting Start Branching

Here I'm with an interesting story about SCM Git branching that helps to work in collaborative environments where DevOps is a culture.

Let me share with you guys about the steps that I've executed in this are realtime requirements.

Top 10 Examples on git branch sub-command 


1. How to create a branch and check using git sub-commands?

To create a new branch from the existing branch. Here you should be on one of the branch. Generally we start from main or master branch.
git branch newbranch
git branch

2. How to jump onto the new branch directly when it is created?

Create a branch and switch to it in single command
git checkout -b feature
git branch

3. How to switch between the git branches?

Switch to branch We have two command options for switching between branches. 
a. Regular subcommand for switching to a branch
git checkout newbranch
git branch
b. New way to switch between the branch
git switch master
git branch

5. How can I view all local repo branches? 

To view all branches which are created in the local repository no option will do or else we can use status with -b to see in single-line output
git branch 
git status -b -s #alternative option

6. How can I see remote branches on my local laptop/local repo?

To view all the remote branches only you need to use -r or --remote as options

This is command will help you to get more info about all the branches are available in the remote git server such as GitHub or BitBucket etc.
 
git branch -r 
git branch --remote 
git branch remote to view your github or bitbucket branches


7. How can I see all local and remote repositories together?

To view all branches including remote branches use -a or --all options 
git branch -a 
git branch --all 
Observe the different colors for each repos.
  1. The green color indicates current working tree(branch)
  2. The red indicates remote repo branches
  3. The white color indicate local branches
git branch all command example


8. Is there any way to delete a git branch in local repo? 

Delete a branch can be allowed when we use the -d or --delete options on a target branch.

Note : You cannot delete the branch on which you are working. Switch to anyother branch then run this.
git branch -d newbranch
git branch --delete newbranch
Removing a branch


[This is best option to delete because it preserves the recent changes made on the local branch] 9. Deleting the remote branch This is delicated operation, double check before you run this command.
git branch -D myremote-branch 
Compare -d and -D example for git branch removal


9. How to delete a remote branch in git command line ?

Better option is to use delete option with push command
git push origin --delete myremote-branch

10. How to rename a branch on git?

Move a branch/Rename 
a. Linux move command used to rename same way here a branch can be renamed and its reflog
git branch -m newbranch dev
git branch --move newbranch dev 
Git branch move or renaming


b. Rename forcefully 
Even though your target branch exist the git move will happen forcefully when we use -M option.
git branch -M newbranch dev


Hope you enjoy this story. Connect with our earlier technical articles might give some new tricks or tips for your project growth and more productive.

Cheers!!

Saturday, November 20, 2021

Comparing file changes with git diff command

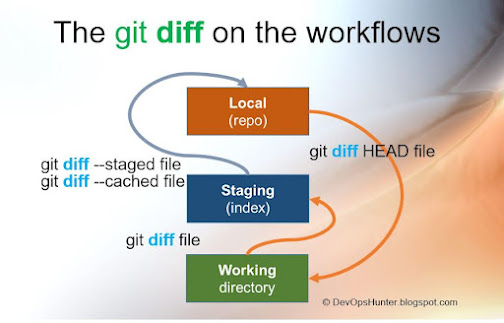
Hello Guys, in this post we will explore about git diff command options when to use what option etc. Git basic work flow is going happen initially starts at work area. When you add the files then it will be in the stage area. Once you feel everything is good then we will commit those changes then it will goes to local repository area. In simple words we can say work area -> stage area -> repo area.
 
The pictorial representation of my understanding about the git workflow:

Work flow for git diff command exeuction


How to Compare files in git to get the last changes?

In git we have this nice feature to compare a file what has been changed who did the changes we can track them with the inputs we can pass as options to the 'git diff' command.
Syntax: git diff [code-file]
Examples: You can compare and see all the files which are changed with the last commit.
git diff
You can compare and see specific file, for example we consider index.html file recently modified and then git add executed. That means changes are in the staged area.
git diff index.html
Hint: This will compare after git add


How can I compare a file of work area with local repo

We can do compare a file that has changes from local repo, when you run the following command the git with a pointer HEAD node
Syntax: git diff HEAD [codefile]
Examples: When we use HEAD pointer, git will show the changes comparing with the work area file(s) with local repository containing file(s)
git diff HEAD
Specific file changes comparing with the work area file with local repository
 
git diff HEAD ./mist.yml
Hint: This will compare after git commit

Comparing of work area and local repo
git diff with HEAD


Compare between stage area and repo area

Git diff with –stage or –cached options between stage area file with last committed file
 
Syntax: 
git diff [--staged] [code.file]
git diff [--cached] [code.file]
Here is the execution of --stage flag where it will be displaying the changes were made between stage area and repo area. Examples
 
git diff --staged
One more example when we choose a specific file:
 
git diff --staged myweb.html
Hint: This will compare git commit file with git add

Compare between stage area and repo area
git diff with staged flag

How to get the comparison between two commits?

We can compare a file at two different commit levels, where we need to provide the input as two different commit IDs. Comparing two different commits
 
Syntax: git diff [commit-SHA-ID] [commit-SHA-ID] [code-file]
Examples: Here I'm using short form of the commit ID, considering min 5 char of SHAcode
 
git diff e220bb005 e5aa90d79
Now focusing on my specific file here it is mist.yml file that changed between given two commit IDs.
 
git diff e220bb005 e5aa90d79 mist.yml 
Hint: This will compare after multiple git commits use git log –pretty=oneliner
IMAGE: git-diff-commit-IDs

The git diff command with commit IDs
git diff with commit IDs


How to find the list of files that changed between last two commits?

Here we want to get only the name of the files which were modified between last two commits which can be pointed with the HEAD and last but-one using HEAD^.
 
  git diff --name-only HEAD HEAD^
  

Can I compare two branches?

Yes, it is possible. Now beyond the single branch now, we can compare two branches together this is generally done when a merge request comes and you need to observe the changes.
 
Syntax: git diff branch1..branch2 [codefile]
Examples: Here I've created two branches and have different levels of changes in each. Let's see first compare master branch with the vt-dev development branch.
 
git diff vt-dev..master
Where it shows many changes on the output. Now lets filter to specific file by providing the file name.
 
 git diff vt-dev vt-test mist.yml
IMAGE: The git-diff-branches

The git diff with branches
There is specific file 
git diff option branches on a file


Git diff Output Simplified with flags

Simplifying output format with options Stats for the file it is special option which will tells us the file changed were happen to a file and how many changes were made to the file count with a plus symbol. The flag options we have here:
  1. stat
  2. name-only
  3. name-status
 
 
git diff --stat master...vt-dev mist.yml

To show filter out those file name-only will be helpful when you need more concern about the file names:
 
 git diff --name-only vt-dev...feature
 
We can also get the the file is in which Status is it modified or just Added or Updated an existing committed file with the first letter as indicator. Example M - Modified
 
git diff  --name-status vt-dev...feature
>

The git diff command with special flags

Sunday, February 28, 2021

Git log - commit history

Here is the GitOps story! we started learning more depth of every GIT commit history using git CLI. In this post, we have touched some rea-time scenario-based question and answers with practical examples which are useful for other DevOps team members. 

The best question to help release management - who worked on the critical program/script which is in the release process? This can be found using the git log command. 

git log


The most interesting story if someone left the company and need to know what he did in his last commit. Tracking changes all of them done by that particular user. 

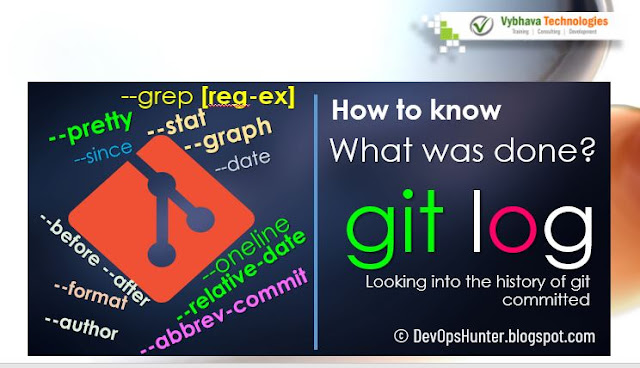
The git log having many options:
  1. sorting
  2. filtering
  3. output formatting

Let's see in detail by with experimenting each with an example.

How to get the git log in a "Sorting order"?

Here we have a couple of sorted commit history commands. 

Using the --pretty value with Oneline to going to give you the log output in simplify format.
git log --pretty=oneline
  
The output combination of COMMIT_ID COMMIT_MESSAGE | Branch level changes

How to do Filtering while getting the git-log output?

To filter out we can use different options
  1. author - User name of the commit made by
  2. date ranges - We have date options with --before and --after where date can be given in "YYYY-MM-DD" format
  3. regular-expressions - Linux grep like option --grep that takes any text patter to filter 
  4. path - file or directory path can be used to narrow down your log filtering


Find the commit history of a user

Here we have an option to get all changes made by a person/author. If you want to see all commits made by yourself then you can replace the "AUTHOR NAME" with your git user. name what you have configured. 
git log --author="AUTHOR NAME"

For example: Find all code changes done by user "Rajasekhar"

Find History in range of dates

You have a choice of selecting range of date before and after dates.
git log --before="date1" --after="date2"

For example: Find all commits between 19th Feb to 26th Feb 2021

Date range logs


Commit History with a regular expression

Git commit history can be extracted with the regular expression that matches to the word or pattern that matches the existing commit messages.
git log --grep="PATTERN"
For example, find all the 'commit's having an "adding" pattern.

git log with grep


Commit history of a given path

We can use the current work-tree contained in any one of the folders as the path to check the history of that particular directory.
git log -- [PATH]
Example for finding the git log history of file of folder as shown below:

git log -- . # current folder
git log -- WebLogic/samples # specific directory history
git log -- README.md # specific file history  
git commit history of givven path
what is happening in this directory?


Knowing about a particular code file we can use -- then the filename.
For example; 

git history of a file
Commit History of a file

What happened since the date?


Changes from a particular "date" onwards we can get using --since option.


git log --since="YEAR-MM-DD"

For example, find all change that happen since 22-Feb-2021

git commit changes from date
Since date onwards commit changes

In most of the real scenarios we need to know the files which are changed recently. This git-log command with the oneline option and abbreviated commit id helps us to have a simple view

git log --pretty=oneline --abbrev-commit  

git log command with --abbrev-commit to short commit-id output


You can use this for more combinations as per your project requirements To get all oneliner logs with short commit id and filtered with specific author changes:
git log --pretty=oneline --abbrev-commit --author "Bhavani" 
To get all oneline logs with short commit id for all changes made for "WebLogic" pattern matched in the commit messages.
git log --pretty=oneline --abbrev-commit --grep "WebLogic" 
Further learning post:

Please write your comments we will workout accordingly and respond to each message within 3 days.


Categories

Kubernetes (25) Docker (20) git (15) Jenkins (12) AWS (7) Jenkins CI (5) Vagrant (5) K8s (4) VirtualBox (4) CentOS7 (3) docker registry (3) docker-ee (3) ucp (3) Jenkins Automation (2) Jenkins Master Slave (2) Jenkins Project (2) containers (2) create deployment (2) docker EE (2) docker private registry (2) dockers (2) dtr (2) kubeadm (2) kubectl (2) kubelet (2) openssl (2) Alert Manager CLI (1) AlertManager (1) Apache Maven (1) Best DevOps interview questions (1) CentOS (1) Container as a Service (1) DevOps Interview Questions (1) Docker 19 CE on Ubuntu 19.04 (1) Docker Tutorial (1) Docker UCP (1) Docker installation on Ubunutu (1) Docker interview questions (1) Docker on PowerShell (1) Docker on Windows (1) Docker version (1) Docker-ee installation on CentOS (1) DockerHub (1) Features of DTR (1) Fedora (1) Freestyle Project (1) Git Install on CentOS (1) Git Install on Oracle Linux (1) Git Install on RHEL (1) Git Source based installation (1) Git line ending setup (1) Git migration (1) Grafana on Windows (1) Install DTR (1) Install Docker on Windows Server (1) Install Maven on CentOS (1) Issues (1) Jenkins CI server on AWS instance (1) Jenkins First Job (1) Jenkins Installation on CentOS7 (1) Jenkins Master (1) Jenkins automatic build (1) Jenkins installation on Ubuntu 18.04 (1) Jenkins integration with GitHub server (1) Jenkins on AWS Ubuntu (1) Kubernetes Cluster provisioning (1) Kubernetes interview questions (1) Kuberntes Installation (1) Maven (1) Maven installation on Unix (1) Operations interview Questions (1) Oracle Linux (1) Personal access tokens on GitHub (1) Problem in Docker (1) Prometheus (1) Prometheus CLI (1) RHEL (1) SCM (1) SCM Poll (1) SRE interview questions (1) Troubleshooting (1) Uninstall Git (1) Uninstall Git on CentOS7 (1) Universal Control Plane (1) Vagrantfile (1) amtool (1) aws IAM Role (1) aws policy (1) caas (1) chef installation (1) create organization on UCP (1) create team on UCP (1) docker CE (1) docker UCP console (1) docker command line (1) docker commands (1) docker community edition (1) docker container (1) docker editions (1) docker enterprise edition (1) docker enterprise edition deep dive (1) docker for windows (1) docker hub (1) docker installation (1) docker node (1) docker releases (1) docker secure registry (1) docker service (1) docker swarm init (1) docker swarm join (1) docker trusted registry (1) elasticBeanStalk (1) global configurations (1) helm installation issue (1) mvn (1) namespaces (1) promtool (1) service creation (1) slack (1)