Showing posts with label CentOS7. Show all posts

Tuesday, March 1, 2022

Kubernetes installation on CentOS7 Vagrant boxes Manually

This page is updated in 2022 with new instructions which works for Rocky LInux as well!
As we have seen and had a setup that Docker EE installation on CentOS7. A year ago when I have worked on Kubernetes setup on the Ubuntu Linux that virtualization included all the steps involved in Docker installation to Kubernetes cluster configuration everything automated within Vagrantfile.


Kubernetes Cluster on your Desktop or Laptop or Mac book


In this post, I would like to share the manual steps that work to build a Kubernetes Cluster on CentOS7. We will be using the Docker EE installed nodes to install Kubernetes. So bringing up vagrant boxes the same thing that we had discussed earlier post proceed further.

Step 1: Check the System requirements

We have three nodes: master, node1, node2.

On ALL Nodes:
CPU Cores  2,
RAM size- 2GB Minimum 4GB good
Otherwise, Master node make it 3GB, Slave nodes with 1.5GB also a wise plan if you have limited resources.
Preparing the host mappings for master and worker nodes, Here I'm using sample names you can change as per your project needs.
   
hostnamectl set-hostname master-node
cat << EOF >> /etc/hosts
	10.128.0.27 master-node
	10.128.0.29 node-1 worker-node-1
	10.128.0.30 node-2 worker-node-2
EOF
Setup the firewall rules
 
  # master box run this
  sudo firewall-cmd --zone=public --permanent --add-port={6443,2379,2380,10250,10251,10252}/tcp
  
  # worker box firewall settings 
  sudo firewall-cmd --zone=public --permanent --add-port={10250,10251}/tcp
  
  #for both boxes
  firewall-cmd –reload
  modprobe br_netfilter
  echo '1' > /proc/sys/net/bridge/bridge-nf-call-iptables
  

Step 2: Why do we need to do swap disable?

All Kubernetes masters and nodes are expected to have swap disabled. This is recommended by Kubernetes community for deployments. If swap is not disabled, kubelet service will not start on the masters and nodes,

 
# check swap available 
free -m
# if exists then run the following commands
swapoff -a # must for gcloud and aws instances
# permanent swap off from fstab
vi /etc/fstab --> comment swap entry
(OR) 
sed -i '/ swap / s/^\(.*\)$/#\1/g' /etc/fstab

 
yum update -y
systemctl disable firewalld
systemctl stop firewalld
vi /etc/selinux/config ---> disabled

Restart all of the boxes
 
init 6

Now install Docker if you have not installed yet! this following will installs Docker-CE.
 
yum install docker -y
systemctl status docker #if it is inactive do the following
systemctl enable docker
systemctl start docker
systemctl start docker # make sure it is active state

Step 4: Add Kubernetes Repo 

This repo setting for CentOS boxes on ANY cloud env will works and same will work on vagrant box as well.
 
vi /etc/yum.repos.d/kubernetes.repo

Enter the following content into the file
 
[kubernetes]
name=Kubernetes
baseurl=https://packages.cloud.google.com/yum/repos/kubernetes-el7-x86_64
enabled=1
gpgcheck=1
repo_gpgcheck=1
gpgkey=https://packages.cloud.google.com/yum/doc/yum-key.gpg
        https://packages.cloud.google.com/yum/doc/rpm-package-key.gpg

Step 5: Install kubeadm, kubelet, kubectl and start

Now run the following yum installation commands on every node.
 
yum install kubeadm -y #This will includes kubectl, kubelet part of kubeadmin installation

systemctl enable kubelet
systemctl start kubelet
systemctl status kubelet # ensure kubelet is in active state

After starting kubeadm you will get the following:
Kubernetes Installation


output

Let's configure bridge network for Kubernetes
 
vi /etc/sysctl.d/k8s.conf
Enter the following lines
 
net.bridge.bridge-nf-call-ip6tables = 1
net.bridge.bridge-nf-call-iptables = 1

After file saving run the following command in the command shell.
 
sysctl --system

In the Master node execute the following command for Kubernetes Cluster initialization:

 
# NOTE: Please use your host IP address here
# This will do
kubeadm init

#alternatively try
kubeadm init --pod-network-cidr=192.148.0.0/16 --apiserver-advertise-address=192.168.33.100

(OR)

#To ignore preflight checks
kubeadm init --pod-network-cidr=192.148.0.0/16 --apiserver-advertise-address=192.168.33.100 --ignore-preflight-errors=Hostname,SystemVerification,NumCPU


On the Worker / Slave nodes:
 
kubeadm join 192.168.33.100:6443 --token h1ufen.hvs0nr49ua0my7u8 \
    --discovery-token-ca-cert-hash sha256:0bc179854b5c759333360737ff53ca2c4246b61823b033ecbac50593a9c334f6

Kubernetes Worker joining

On the master node do the following:
 
vi /etc/profile
export KUBECONFIG=/etc/kubernetes/admin.conf
Run the following: source /etc/profile
(OR)
 
 mkdir -p $HOME/.kube
 cp -i /etc/kubernetes/admin.conf $HOME/.kube/config
 chown $(id -u):$(id -g) $HOME/.kube/config

Now
flannel network
 
kubectl get nodes # all nodes NotReady state
kubectl get pods --all-namespaces
kubectl apply -f https://raw.githubusercontent.com/coreos/flannel/master/Documentation/kube-flannel.yml
kubectl get pods --all-namespaces
kubectl get nodes

Get the status of the node in the Kubernetes cluster, after all pods Running

Validate with Deployment 

Let us validate the Kubernetes Cluster Ready for deploy web application

Step 1 Let's take nginx image for deployment creation on the Kubernetes cluster
 
 kubectl create deployment mynginx --image=nginx

First Kubernetes deployment : create deployment

Now let's see the description of the above 'mynginx' deployment.

Describe Kubernetes deployment

Scale the 'mynginx' application deployment upto 3
 
 kubectl scale --replicas=3 deployment/mynginx

Scale deployment on Kubernetes Cluster

List of all pods in the Kubernetes cluster
 
 kubectl get po
 kubectl get po -o wide

get the list of pods in Kubernetes

Next step is Create service using 'mynginx' deployment.
 
kubectl create service nodeport mynginx --tcp=8080:80
kubectl get services

Service creation in Kubernetes Cluster
all set to go for checking in the browser
http://192.168.33.110:32286/


As our slave node running on 192.168.33.110 and the node port exposed as 32286.

Here I conclude our Kubernetes cluster working as expected! Please post your comments or suggestions to improve our learnings more useful to many other starters.

Tuesday, July 13, 2021

Installation of Ansible on CentOS 7 | RHEL | OpenSuse | Ubuntu

 Hello Guys!! 

In this post let's explore the installation options for Ansible Core. We can get the detailed Documentation provided by Ansible in the Installation Guide. I've also gone through the Amazing Book : Ansible for DevOps  Here he explained that beginners can start with playing in Laptop by setting up the Virtual Boxes for Ansible learnings. 

Today I have started experimenting with Ansible installation on the CentOS 7 Vagrant box, As you know Ansible is from the RedHat.

Ansible having 3300+ modules freely available. At the end of the installation, we can test the connectivity with the 'ping' and 'shell' module which will be referred to the inventory hosts which is present in the "/etc/ansible/hosts" location.

Prerequisites for Ansible installation

  • Create Vagrant Boxes where Ansible engine runs on the master node and SSH-Agents will run on two different nodes.
  • PasswordAuthentication enable for sshd_config
  • SSH Connectivity with ssh-keygen
Ansible ready to use on Vagrant boxes

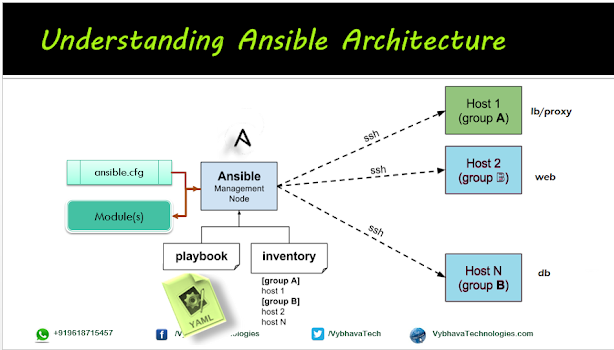
My understanding review about Ansible Architecture

Ansible Architecture
Ansible Architecture 


Steps for Installing and Configuration of Ansible on CentOS 7


Step 1. Installation of yum repo and Ansible
To install the Ansible using yum package manager we must get update the repo

Alternative Vagrant optons as
Vagrant.configure(2) do |config|
    #config.vm.box = "centos/8"
    config.vm.boot_timeout=600
    config.landrush.enabled = true
  
    config.vm.define "mstr" do |mstr|
      mstr.vm.host_name = "mstr.devopshunter.com"
      mstr.vm.box= "ansible/tower"
      mstr.vm.network "private_network", ip: "192.168.33.100"
      mstr.vm.provider "virtualbox" do |vb|
        vb.cpus = "2"
        vb.memory = "2048"
      end
    end
    config.vm.box = "centos/8"  
    config.vm.define "node1" do |node1|
      node1.vm.network "private_network", ip: "192.168.33.110"
      node1.vm.hostname = "node1.devopshunter.com"
      node1.vm.provider "virtualbox" do |vb|
        vb.cpus = "2"
        vb.memory = "1024"
      end
    end
   
    config.vm.define "node2" do |node2|
      node2.vm.network "private_network", ip: "192.168.33.120"
      node2.vm.hostname = "node2.devopshunter.com"
      node2.vm.provider "virtualbox" do |vb|
        vb.cpus = "2"
        vb.memory = "1024"
      end
    end  
  end
  
You can run `vagrant up' to bring up the 3 boxes as defined in the
sudo yum install -y epel-release
sudo yum install -y ansible

# To get the latest version of ansible use the following 

# Remove ansible older version
sudo yum remove -y ansible

# Install python3 includes pip3
sudo yum install -y python3

wget https://bootstrap.pypa.io/get-pip.py
python3 get-pip.py
python3 -m pip install --upgrade pip
pip3 install ansible==4.6.0 --user
ansible --version # this will show warning older version 
python3 -c 'from ansible_collections.ansible_release import ansible_version; print(ansible_version)'

Step 2: Change sshd_config file on Vagrant based CentOS box

Better to edit with root user the /etc/ssh/sshd_config cotaining PasswordAuthentication no to PasswordAuthentication yes and restart the sshd services.

vi /etc/ssh/sshd_config
# Search and comment 
#PasswordAuthentication no
# Search uncomment for yes value
PasswordAuthentication yes
Save the file and restart the sshd services on all the CentOS boxes.
systemctl restart sshd # Restart sshd service
systemctl status  sshd #Check the status

Confirmation on the sshd_config changes as shown below:


ssh_config modified and restart service in CentOS 7

same step 2 ssh_config changes can be repeated on the all target boxes as well.

ssh service restart on remote nodes


Step 3: Ansible inventory creation on Controller

Update the hostname and IP address correctly mapped on VMs. There are many ways to add the machines on your Ansible Engine running VM. Same IP or VM can be part of multiple groups also allowed. Example host2 is member in appservers and also dbserver due to its capabilities we can assign.


[nodes]
192.168.33.210
192.168.33.220

Step 4: SSH Key Generation with RSA algorithm.

We can use any algorithm

ssh-keygen -t rsa -b 4096 -C "ansible-engine"
 ls -rlta ~/.ssh 
 ssh-copy-id -i ~/.ssh/id_rsa.pub vagrant@192.168.33.210
 # Say 'yes' to add to known_hosts
 # Enter the password to connect remote host 
 # Validate
 ssh vagrant@192.168.33.210
 exit # exit from remote host
 # Repeat above steps for remaining hosts
 ssh-copy-id -i ~/.ssh/id_rsa.pub vagrant@192.168.33.220
 ssh vagrant@192.168.33.220
 exit 

SSH Key generation for Ansible
ssh-keygen for ansible 


Observe that two rsa files created in the ~/.ssh folder one is key and other one with .pub extentiona is public key

Step 5: Adding SSH Key to Authorized keys of remote hosts


ssh-copy-id -i ~/.ssh/id_rsa.pub vagrant@192.168.33.210
ssh-copy-id -i ~/.ssh/id_rsa.pub vagrant@192.168.33.220

SSH copy id

Regular test-case after Ansible installation we have multiple options test with the ping module:
ansible -m ping all
ansible -m ping nodes

Ansible installation on Ubuntu

As we have multiple ways to install the Ansible Core on any Linux platform, Here we will see the option to install it on Ubuntu 20.04.  Specialty of this is we will be getting the latest installation because the repository will be update on your Ubuntu System. 

You can see the video session for Ansible installation on Ubuntu with latest repository updated : 

 sudo apt update
 sudo apt install software-properties-common
 sudo add-apt-repository --yes --update ppa:ansible/ansible
 sudo apt install ansible


Please write your feedback on this post, and also your experiment problems if in case you followed my steps.

Wednesday, August 28, 2019

Jenkins Installation on CentOS7/RHEL/Fedora and Ubuntu

Hello DevOps enthusiast, I'm here with another interesting article on one more DevOps automation tool that is Jenkins CI, where I've explored all possible new learnings which will be used by DevOps.

Jenkins installation on CentOS or RHEL or Fedora

Simple instructions I've made for reference, which I've used.

What are the Pre-requisites for the Jenkins installation

  • Good speed of Internet
  • Either of the platforms will be working:
    • Vagrant installed VirtualBox installed to pull CentOS7 box
    • AWS RHEL instance up and running 

Bring up the CentOS/7 box (optional)

Note: Ignore this section if you have a Cloud instance ready.

Step 1: Create your own CentOS7 vagrant box with the following DSL Vagrantfile:

Vagrant.configure(2) do |config|
  config.vm.box = "centos/7"
  config.vm.boot_timeout=600
  config.vm.host_name = "mydev.devopshunter.com"
  config.vm.network "private_network", ip: "192.168.33.100"
  config.vm.synced_folder "C:/Softwares", "/u01/app/software"
  config.vm.provider "virtualbox" do |vb|
    vb.cpus = "2"
    vb.memory = "2048"
  end
end

Now based on the above Vagrantfile, bring up the vagrant CentOS box:

vagrant up

Now all set to go, Connect to the vagrant box using PuTTY, SSH-> Auth -> centos.ppk file. Create an aws instance and connect it with the putty or git bash client.

Step 2: Switch to root user, download the Jenkins installer using wget, you can find the stable and latest version of Jenkins RPM File here you can see the latest at the bottom of the page. and the installation with rpm command as:
sudo -s
#install wget if not installed on cloud instances
yum install wget epel-release daemonize -y

# Latest version of Jenkins requires daemonize package dependency
wget https://pkg.jenkins.io/redhat/jenkins-2.192-1.1.noarch.rpm
rpm -ivh jenkins-2*.rpm
Jenkins installation using rpm option

Jenkins installation on Ubuntu

Note: This section added in the year July 2022.
Recent changes in the Ubuntu publick key authentication on the debain package manager.
sudo apt update
sudo apt install default-jre
curl -fsSL https://pkg.jenkins.io/debian/jenkins.io.key | sudo tee   /usr/share/keyrings/jenkins-keyring.asc > /dev/null
echo deb [signed-by=/usr/share/keyrings/jenkins-keyring.asc]   https://pkg.jenkins.io/debian binary/ | sudo tee   /etc/apt/sources.list.d/jenkins.list > /dev/null
sudo apt-get update
sudo apt-get install jenkins
systemctl status jenkins

How to install Open JDK on CentOS?


Once the Jenkins installation completed we need to run with JRE, We have two choices - Open JRE, or Oracle JRE to run Jenkins CI. JRE is part of JDK so let's install Open JDK. Using `yum` repo we can install the OpenJDK which also includes Open JRE.

yum install -y java 
#Check Java installation successful
java -version

Now we are done with the installation part move to bring up the Jenkins CI service.

Starting your Jenkins CI master on CentOS7

Every RHEL flavor Linux versions support service command to run the service in the background and will be executed when a software added to the system, systemctl will help us to control it for start or stop or restart and to check the status of the service.

service jenkins start
chkconfig jenkins on


Let's check the status of the Jenkins service:

service jenkins status -l

Check the Jenkins service status

How to accessing your Jenkins CI URL?


By default Jenkins runs on the 8080 port combination with the IP address as shown:

http://<jenkins ip> :8080/

On my Vagrant box I can access the Jenkins URL as an example:
http://192.168.33.100:8080/


Jenkins first-time UI
Wow!! Lovely, We are ready to operate on Jenkins now you can set the value present Password in the given path and copy it and reset the user profile and password values which will be overrides the default/one time password.

How to create First Admin user on Jenkins?

Here is the sample user profile setting details:

  • User name: ci_admin
  • Password : welcome1 [you can provide much stronger one for your CI project]
  • Confirm Password : welcome1
  • Full name : Continuous Integration admin
  • Email:  ignore [optional]
Create First Admin User sample


Click on the '   Save and Continue  ' button then it navigates to 'Instance Configuration' page, shows Jenkins URL.

How to configure Remote Agent using WebSocket?

1. Please enter the "Name" that uniquely identifies an agent in the Jenkins domain.
2. Enter Remote root directory such as /workspace
3. Enter the "Label" value this is the hook to run remotely any build.
4. Under Launching method 
Launch agent by connecting it to the controller

choose -> Use WebSocket tic the checkbox.

Jenkins Slave WebSocket Configuration


Save the configuration by hitting "save" button.

Slave configuration you can use the following shell script:
#!/bin/bash

# Ensure JDK installed on the agent box
AGENT_CMD='java -jar agent.jar -jnlpUrl http://mstr:8080/computer/node1/jenkins-agent.jnlp -secret 5650304d6aae3ebf424479e20978a7cd1408e3f539e243cbd309abbccd88a3 -workDir "/tmp/jenkins"'
nohup $AGENT_CMD > node1-vt-agent.out 2>&1 &

# print the log output
tailf node1-vt-agent.out
  

Executed on node1 example screenshot
Enjoy the Continuous integration fun with Jenkins!!

Categories

Kubernetes (25) Docker (20) git (15) Jenkins (12) AWS (7) Jenkins CI (5) Vagrant (5) K8s (4) VirtualBox (4) CentOS7 (3) docker registry (3) docker-ee (3) ucp (3) Jenkins Automation (2) Jenkins Master Slave (2) Jenkins Project (2) containers (2) create deployment (2) docker EE (2) docker private registry (2) dockers (2) dtr (2) kubeadm (2) kubectl (2) kubelet (2) openssl (2) Alert Manager CLI (1) AlertManager (1) Apache Maven (1) Best DevOps interview questions (1) CentOS (1) Container as a Service (1) DevOps Interview Questions (1) Docker 19 CE on Ubuntu 19.04 (1) Docker Tutorial (1) Docker UCP (1) Docker installation on Ubunutu (1) Docker interview questions (1) Docker on PowerShell (1) Docker on Windows (1) Docker version (1) Docker-ee installation on CentOS (1) DockerHub (1) Features of DTR (1) Fedora (1) Freestyle Project (1) Git Install on CentOS (1) Git Install on Oracle Linux (1) Git Install on RHEL (1) Git Source based installation (1) Git line ending setup (1) Git migration (1) Grafana on Windows (1) Install DTR (1) Install Docker on Windows Server (1) Install Maven on CentOS (1) Issues (1) Jenkins CI server on AWS instance (1) Jenkins First Job (1) Jenkins Installation on CentOS7 (1) Jenkins Master (1) Jenkins automatic build (1) Jenkins installation on Ubuntu 18.04 (1) Jenkins integration with GitHub server (1) Jenkins on AWS Ubuntu (1) Kubernetes Cluster provisioning (1) Kubernetes interview questions (1) Kuberntes Installation (1) Maven (1) Maven installation on Unix (1) Operations interview Questions (1) Oracle Linux (1) Personal access tokens on GitHub (1) Problem in Docker (1) Prometheus (1) Prometheus CLI (1) RHEL (1) SCM (1) SCM Poll (1) SRE interview questions (1) Troubleshooting (1) Uninstall Git (1) Uninstall Git on CentOS7 (1) Universal Control Plane (1) Vagrantfile (1) amtool (1) aws IAM Role (1) aws policy (1) caas (1) chef installation (1) create organization on UCP (1) create team on UCP (1) docker CE (1) docker UCP console (1) docker command line (1) docker commands (1) docker community edition (1) docker container (1) docker editions (1) docker enterprise edition (1) docker enterprise edition deep dive (1) docker for windows (1) docker hub (1) docker installation (1) docker node (1) docker releases (1) docker secure registry (1) docker service (1) docker swarm init (1) docker swarm join (1) docker trusted registry (1) elasticBeanStalk (1) global configurations (1) helm installation issue (1) mvn (1) namespaces (1) promtool (1) service creation (1) slack (1)