Showing posts with label VirtualBox. Show all posts

Sunday, May 2, 2021

Docker SSHFS plugin external storage as Docker Volume
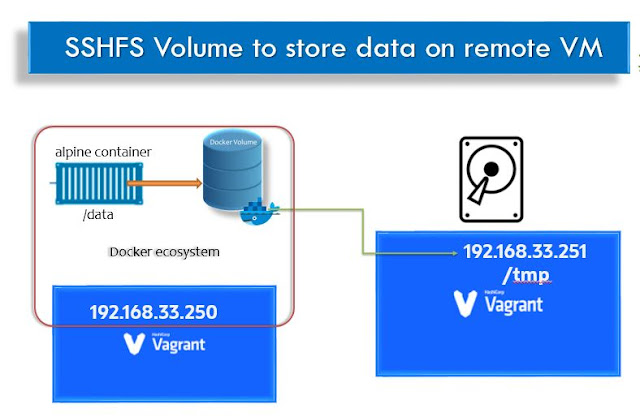
 Namaste, In this exciting Docker storage volume story, this experiment is going to use two Vagrant VirtualBox. You can also use any two Cloud instances (may be GCP, AWS, Azure etc.,). Where DockerHost is going to run the docker containers and DockerClient box is going to run the SSH daemon. 

SSHFS Volume in docker


Docker Volume with External Storage using SSHFS

Docker allows us to use external storage with constraints. These constraints will be imposed on cloud platforms as well. The external or Remote volume sharing is possible using NFS. 

How to install SSHFS volume?


Step-by-step procedure for using external storage as given below :
  1. Install docker plugin for SSHFS with all permission is recommended:
    docker plugin install \
    --grant-all-permissions vieux/sshfs
    
  2. Create a Docker Volume
      docker volume create -d vieux/sshfs \
    -o sshcmd=vagrant@192.168.33.251:/tmp \
    -o password=vagrant -o allow_other sshvolume3
    
  3. Mount the shared folder on the remote host:
    mkdir /opt/remote-volume # In real-time project you must have a shared volume accross ECS instances
    
  4. The remote box in my example, it is a 192.168.33.251 box. check the PasswordAuthentication value, the default value will be no, but if your volume using this remote box communication happen when you provide the ssh login password vagrant@dockerclient1:/tmp$ sudo cat /etc/ssh/sshd_config |grep Pass PasswordAuthentication yes
  5. Check the sshvolume what is its configuration and which remote VM it is connected:
         docker volume inspect sshvolume3
      

    docker inspect sshfs volume
    Docker Volume inspect sshfs 

  6. Now Create an alpine container using the above-created sshvolume3
  7.   docker container run --rm -it -v sshvolume3:/data alpine sh
      
  8. Validate now the data created in side the container will be attached volume that is mapped to remote virtualbox
  9. Enter the following commands to create a file and store a line of text using echo command.
    sshfs using container
    Docker container using sshfs volume
  10. On the remote box check that the file which is created inside the container will be available on the remote box 192.168.33.251 box
Remote box /tmp containers file


    You can use this remote volume inside docker-compose and also stack deployment YAML files.
  1. Create a service that uses external storage
    docker service create -d \
     --name nfs-service \
     --mount 'type=volume,source=nfsvolume,target=/app,volume-driver=local,volume-opt=type=nfs,volume-opt=device=:/,"volume-opt=o=10.0.0.10,rw,nfsvers=4,async"' \
     nginx:latest
    
  2. List the service and validate it by accessing it.
    docker service ls
        

Hope you enjoyed this post of learning. please share this with your friends and colleagues.

Tuesday, November 5, 2019

Docker Enterprise Edition installation on CentOS 7 plus UCP Installation

Hello, dear DevOps Enquist, in this post I would like to discuss with you how to install Docker Enterprise Edition on CentOS 7 and plus Universal Control Plane (UCP) running to control the master and workers on three nodes(Virtualboxes). Amazed with the great features that incorporated into the UCP. You could do lot of things from your browser itself. In the last post I've explored about the swarm cluster that time I'd executed everything on CLI, but this time UCP Web UI.

Why we need a Docker Universal Control Plane(UCP)?

To make more production-ready setup we would do this experiment with three CentOS7 nodes. The following picture tells us how powerful UCP in Docker Enterprise Edition is. You can manage services, multiple deployments using stacks, summary and manage docker containers and their images. you can also add/remove nodes and get their status, category. Docker network full control on it. Storage volumes also you can manage from the UCP admin console.

  • Ease of use with GUI based management
  • High Availability(HA) made simple
  • Access Control - organization, team, users manageable
  • Monitoring - Overall system can be viewed in a single page
  • docker native integration - network capabilities are handled
  • Swarm Managed - Swarm master, worker nodes configured
  • 3rd party plugins - DTR connects as plugin


Universal Control Plane running on Docker-ee with Swarm cluster


Prerequisites for Docker EE installation

Infrastructure designing will be a crucial part of any environment that you build on the Cloud or on-premises Docker ecosystem. First, let's consider what all goes into the master node.

  • Docker-EE installation (docker-ee) requires hub.docker.com signup and download the license 
  • Ports 80 and 443 are required to expose for UCP Containers to run.
  • Docker Trusted Registry (DTR) only can run other than UCP running node because it also requires same reserved ports 80 and 443
  • Download Vagrant as per your system
  • Download VirtualBox
Here most importantly think about - what you run on a machine defines how much resources required.

How to install Docker-EE on CentOS 7?

It is a very interesting story, Docker EE installation on CentOS 7 Vagrant boxes
1. Create three centos7 machines master - mstr, node1, node
2 for slaves. 2. Go to the hub.docker.com login with your credentials
The Vagrantfile content is as follows
 
Vagrant.configure(2) do |config|
  config.vm.box = "centos/7"
  config.vm.boot_timeout=600
  config.landrush.enabled = true

  config.vm.define "mstr" do |mstr|
    mstr.vm.host_name = "mstr.devopshunter.com"
    mstr.vm.network "private_network", ip: "192.168.33.100"
    mstr.vm.provider "virtualbox" do |vb|
      vb.cpus = "2"
      vb.memory = "3070"
    end
  end

  config.vm.define "node1" do |node1|
    node1.vm.network "private_network", ip: "192.168.33.110"
    node1.vm.hostname = "node1.devopshunter.com"
    node1.vm.provider "virtualbox" do |vb|
      vb.cpus = "2"
      vb.memory = "1500"
    end
  end
 
  config.vm.define "node2" do |node2|
    node2.vm.network "private_network", ip: "192.168.33.120"
    node2.vm.hostname = "node2.devopshunter.com"
    node2.vm.provider "virtualbox" do |vb|
      vb.cpus = "2"
      vb.memory = "1500"
    end
  end  
end

 
vagrant up
vagrant status
vagrant status for docker-ee installation on CentOS7

 
vagrant ssh-config

Use the PuTTYgen tool to convert the private_key to corresponding .ppk files. In my experiment, mstr.ppk, node1.ppk, node2.ppk files are generated in respective folders where private_key exists.

Now all set to go for connecting the each VM with corresponding IPs that assigned.
In each node you need to run the following commands:

1. Setup the repo for docker-ee
 
export DOCKERURL="https://storebits.docker.com/ee/centos/sub-eb111810-d6d8-4168-ac96-6e553a77381f"
sudo -E sh -c 'echo "$DOCKERURL/centos" > /etc/yum/vars/dockerurl'
cat /etc/yum/vars/dockerurl

2. Install docker dependdencies storage drivers sudo yum install -y yum-utils device-mapper-persistent-data lvm2 3. Add the repo and tell that available at where (i.e., Path)
 
sudo -E yum-config-manager \
    --add-repo \
    "$DOCKERURL/centos/docker-ee.repo"
yum repo update for docker-ee

4. Now all set to install the Docker  enterprise edition

 
sudo yum -y install docker-ee
sudo systemctl start docker

docker-ee installation on CentOS7 completed!

Now lets confirming by running hello-world container.
 
docker -v
sudo docker run hello-world

docker-ee installation confirmation with hello-world
If we check the docker info on any node it looks like this.
docker info for the docker-ee

Universal Control Plane (UCP) installation

 
docker container run --rm -it --name ucp \
  -v /var/run/docker.sock:/var/run/docker.sock \
  docker/ucp:2.2.5 install \
  --host-address 192.168.33.100 \
  --interactive

Enter username and password when it prompts.
admin
# welcome1
We detected the following hostnames/IP addresses for this system [mstr.devopshunter.com 127.0.0.1 172.17.0.1 192.168.33.100]

You may enter additional aliases (SANs) now or press enter to proceed with the above list.
Additional aliases:
INFO[0000] Initializing a new swarm at 192.168.33.100
INFO[0004] Establishing mutual Cluster Root CA with Swarm

This will automatically activate the swarm cluster master.

Login to UCP at https://192.168.33.100:443
UCP Login page
Universal Control Plane login page

After clicking on Signin we will be prompted to use the 'upload license'. It will be available on your docker hub page from where you have got the docker-ee installation url. You can request for new trail license or else you can also go for skip for now option.

Here, I am loading that docker_subscription.lic file, which was already downloaded.

UCP Manager console

Create a Swarm Node and join

Click on the Nodes, which will shows the a manager node already existing. Click on the 'Add Node' button.
UCP Configuring Nodes joining Swarm cluster
The add node wizard page gives us choice to select node type 'Windows/Linux' and Node role as 'Manager' or 'Worker'. here we go with Linux node type and role as 'worker'


The highlighted bottom given docker swarm join command snippet copy the line, paster and run in the node1 and node2. This will take some time to join the swarm cluster. wait for a while and check the Cluster by refreshing.

Added nodes to Swarm cluster
Initially when the nodes joined they have the status as 'Pending' and 'Awaiting', After join completed it looks 'Healthy UCP worker' status in the Details column.
Healthy UCP nodes


I hope you enjoyed this post keep writing your valuable comments. Keep sharing with your techie friends who can appreciate you!

Wednesday, August 28, 2019

Jenkins Installation on CentOS7/RHEL/Fedora and Ubuntu

Hello DevOps enthusiast, I'm here with another interesting article on one more DevOps automation tool that is Jenkins CI, where I've explored all possible new learnings which will be used by DevOps.

Jenkins installation on CentOS or RHEL or Fedora

Simple instructions I've made for reference, which I've used.

What are the Pre-requisites for the Jenkins installation

  • Good speed of Internet
  • Either of the platforms will be working:
    • Vagrant installed VirtualBox installed to pull CentOS7 box
    • AWS RHEL instance up and running 

Bring up the CentOS/7 box (optional)

Note: Ignore this section if you have a Cloud instance ready.

Step 1: Create your own CentOS7 vagrant box with the following DSL Vagrantfile:

Vagrant.configure(2) do |config|
  config.vm.box = "centos/7"
  config.vm.boot_timeout=600
  config.vm.host_name = "mydev.devopshunter.com"
  config.vm.network "private_network", ip: "192.168.33.100"
  config.vm.synced_folder "C:/Softwares", "/u01/app/software"
  config.vm.provider "virtualbox" do |vb|
    vb.cpus = "2"
    vb.memory = "2048"
  end
end

Now based on the above Vagrantfile, bring up the vagrant CentOS box:

vagrant up

Now all set to go, Connect to the vagrant box using PuTTY, SSH-> Auth -> centos.ppk file. Create an aws instance and connect it with the putty or git bash client.

Step 2: Switch to root user, download the Jenkins installer using wget, you can find the stable and latest version of Jenkins RPM File here you can see the latest at the bottom of the page. and the installation with rpm command as:
sudo -s
#install wget if not installed on cloud instances
yum install wget epel-release daemonize -y

# Latest version of Jenkins requires daemonize package dependency
wget https://pkg.jenkins.io/redhat/jenkins-2.192-1.1.noarch.rpm
rpm -ivh jenkins-2*.rpm
Jenkins installation using rpm option

Jenkins installation on Ubuntu

Note: This section added in the year July 2022.
Recent changes in the Ubuntu publick key authentication on the debain package manager.
sudo apt update
sudo apt install default-jre
curl -fsSL https://pkg.jenkins.io/debian/jenkins.io.key | sudo tee   /usr/share/keyrings/jenkins-keyring.asc > /dev/null
echo deb [signed-by=/usr/share/keyrings/jenkins-keyring.asc]   https://pkg.jenkins.io/debian binary/ | sudo tee   /etc/apt/sources.list.d/jenkins.list > /dev/null
sudo apt-get update
sudo apt-get install jenkins
systemctl status jenkins

How to install Open JDK on CentOS?


Once the Jenkins installation completed we need to run with JRE, We have two choices - Open JRE, or Oracle JRE to run Jenkins CI. JRE is part of JDK so let's install Open JDK. Using `yum` repo we can install the OpenJDK which also includes Open JRE.

yum install -y java 
#Check Java installation successful
java -version

Now we are done with the installation part move to bring up the Jenkins CI service.

Starting your Jenkins CI master on CentOS7

Every RHEL flavor Linux versions support service command to run the service in the background and will be executed when a software added to the system, systemctl will help us to control it for start or stop or restart and to check the status of the service.

service jenkins start
chkconfig jenkins on


Let's check the status of the Jenkins service:

service jenkins status -l

Check the Jenkins service status

How to accessing your Jenkins CI URL?


By default Jenkins runs on the 8080 port combination with the IP address as shown:

http://<jenkins ip> :8080/

On my Vagrant box I can access the Jenkins URL as an example:
http://192.168.33.100:8080/


Jenkins first-time UI
Wow!! Lovely, We are ready to operate on Jenkins now you can set the value present Password in the given path and copy it and reset the user profile and password values which will be overrides the default/one time password.

How to create First Admin user on Jenkins?

Here is the sample user profile setting details:

  • User name: ci_admin
  • Password : welcome1 [you can provide much stronger one for your CI project]
  • Confirm Password : welcome1
  • Full name : Continuous Integration admin
  • Email:  ignore [optional]
Create First Admin User sample


Click on the '   Save and Continue  ' button then it navigates to 'Instance Configuration' page, shows Jenkins URL.

How to configure Remote Agent using WebSocket?

1. Please enter the "Name" that uniquely identifies an agent in the Jenkins domain.
2. Enter Remote root directory such as /workspace
3. Enter the "Label" value this is the hook to run remotely any build.
4. Under Launching method 
Launch agent by connecting it to the controller

choose -> Use WebSocket tic the checkbox.

Jenkins Slave WebSocket Configuration


Save the configuration by hitting "save" button.

Slave configuration you can use the following shell script:
#!/bin/bash

# Ensure JDK installed on the agent box
AGENT_CMD='java -jar agent.jar -jnlpUrl http://mstr:8080/computer/node1/jenkins-agent.jnlp -secret 5650304d6aae3ebf424479e20978a7cd1408e3f539e243cbd309abbccd88a3 -workDir "/tmp/jenkins"'
nohup $AGENT_CMD > node1-vt-agent.out 2>&1 &

# print the log output
tailf node1-vt-agent.out
  

Executed on node1 example screenshot
Enjoy the Continuous integration fun with Jenkins!!

Monday, October 22, 2018

Kubernetes cluster configuration in a Virtualbox with vagrant

Thanks to Rajkumar who had developed the Vagrantfile and published in the github on Kubernetes cluster configuration in a Virtualbox with vagrant. For those who don't know about Vagrant it is a tool that will be used for virtualization into a different level and more powerful way of using your system resources to run multiple operating virtual boxes in your Laptop/Desktop systems.

You just need to follow the simple steps which I had done in my experiment:

Prerequisites for Kubernetes Cluster Creation

  1. Download latest Vagrant
  2. Download latest version of Oracle VirtualBox
System resources requirements on VirtualBox

  • 2 GB for each node
  • 2 cores CPUs for each node
Here I have don this expeiment on my Windows 7 laptop. You could do same on any Windows higher version as well. Total 3 VMs will be created under a group named as - "Kubernetes Cluster" as defined in Vagrantfile.


Infrastructure as a Code: Vagrantfile 
# -*- mode: ruby -*-
# vi: set ft=ruby :
#Vagrant::DEFAULT_SERVER_URL.replace('https://vagrantcloud.com')
servers = [
{
:name => "k8s-master",
:type => "master",
:box => "ubuntu/xenial64",
:box_version => "20180831.0.0",
:enp0s8 => "192.168.33.10",
:mem => "2048",
:cpu => "2"
},
{
:name => "k8s-slave-1",
:type => "node",
:box => "ubuntu/xenial64",
:box_version => "20180831.0.0",
:enp0s8 => "192.168.33.11",
:mem => "2048",
:cpu => "2"
},
{
:name => "k8s-slave-2",
:type => "node",
:box => "ubuntu/xenial64",
:box_version => "20180831.0.0",
:enp0s8 => "192.168.33.12",
:mem => "2048",
:cpu => "2"
}
]
# This script to install k8s using kubeadm will get executed after a box is provisioned
$configureBox = <<-SCRIPT
# install docker v17.03
# reason for not using docker provision is that it always installs latest version of the docker, but kubeadm requires 17.03 or older
apt-get update
apt-get install -y apt-transport-https ca-certificates curl software-properties-common
curl -fsSL https://download.docker.com/linux/ubuntu/gpg | apt-key add -
add-apt-repository "deb https://download.docker.com/linux/$(. /etc/os-release; echo "$ID") $(lsb_release -cs) stable"
apt-get update && apt-get install -y docker-ce=$(apt-cache madison docker-ce | grep 17.03 | head -1 | awk '{print $3}')
# run docker commands as vagrant user (sudo not required)
usermod -aG docker vagrant
# install kubeadm
apt-get install -y apt-transport-https curl
curl -s https://packages.cloud.google.com/apt/doc/apt-key.gpg | apt-key add -
cat <<EOF >/etc/apt/sources.list.d/kubernetes.list
deb http://apt.kubernetes.io/ kubernetes-xenial main
EOF
apt-get update
apt-get install -y kubelet kubeadm kubectl
apt-mark hold kubelet kubeadm kubectl
# kubelet requires swap off
swapoff -a
# keep swap off after reboot
sudo sed -i '/ swap / s/^\(.*\)$/#\1/g' /etc/fstab
# ip of this box
IP_ADDR=`ifconfig enp0s8 | grep Mask | awk '{print $2}'| cut -f2 -d:`
# set node-ip
sudo sed -i "/^[^#]*KUBELET_EXTRA_ARGS=/c\KUBELET_EXTRA_ARGS=--node-ip=$IP_ADDR" /etc/default/kubelet
sudo systemctl restart kubelet
SCRIPT
$configureMaster = <<-SCRIPT
echo "This is master"
# ip of this box
IP_ADDR=`ifconfig enp0s8 | grep Mask | awk '{print $2}'| cut -f2 -d:`
# install k8s master
HOST_NAME=$(hostname -s)
kubeadm init --apiserver-advertise-address=$IP_ADDR --apiserver-cert-extra-sans=$IP_ADDR --node-name $HOST_NAME --pod-network-cidr=172.16.0.0/16
#copying credentials to regular user - vagrant
sudo --user=vagrant mkdir -p /home/vagrant/.kube
cp -i /etc/kubernetes/admin.conf /home/vagrant/.kube/config
chown $(id -u vagrant):$(id -g vagrant) /home/vagrant/.kube/config
# install Calico pod network addon
export KUBECONFIG=/etc/kubernetes/admin.conf
kubectl apply -f https://raw.githubusercontent.com/ecomm-integration-ballerina/kubernetes-cluster/master/calico/rbac-kdd.yaml
kubectl apply -f https://raw.githubusercontent.com/ecomm-integration-ballerina/kubernetes-cluster/master/calico/calico.yaml
kubeadm token create --print-join-command >> /etc/kubeadm_join_cmd.sh
chmod +x /etc/kubeadm_join_cmd.sh
# required for setting up password less ssh between guest VMs
sudo sed -i "/^[^#]*PasswordAuthentication[[:space:]]no/c\PasswordAuthentication yes" /etc/ssh/sshd_config
sudo service sshd restart
SCRIPT
$configureNode = <<-SCRIPT
echo "This is worker"
apt-get install -y sshpass
sshpass -p "vagrant" scp -o StrictHostKeyChecking=no vagrant@192.168.33.10:/etc/kubeadm_join_cmd.sh .
sh ./kubeadm_join_cmd.sh
SCRIPT
Vagrant.configure("2") do |config|
servers.each do |opts|
config.vm.define opts[:name] do |config|
config.vm.box = opts[:box]
config.vm.box_version = opts[:box_version]
config.vm.hostname = opts[:name]
config.vm.network :private_network, ip: opts[:enp0s8]
config.vm.provider "virtualbox" do |v|
v.name = opts[:name]
v.customize ["modifyvm", :id, "--groups", "/Kubernetes Cluster"]
v.customize ["modifyvm", :id, "--memory", opts[:mem]]
v.customize ["modifyvm", :id, "--cpus", opts[:cpu]]
end
# we cannot use this because we can't install the docker version we want - https://github.com/hashicorp/vagrant/issues/4871
#config.vm.provision "docker"
config.vm.provision "shell", inline: $configureBox
if opts[:type] == "master"
config.vm.provision "shell", inline: $configureMaster
else
config.vm.provision "shell", inline: $configureNode
end
end
end
end

The Vagrantfile will be composed with the Ruby array that creates k8s-head and k8s-node1, k8s-node2 definitions. Once the Ubuntu Xenial boxes provisioned custom shell scripts are used for boot time execution.


  • Both Master, Slave nodes common tasks are executed with the Shell provisioning inline options.
  • Install Docker CE 17.03
  • Added vagrant user to docker group to run docker commands as vagrant user (without using sudo for each not required)
  • Install the kubelet kubeadm kubectlk
  • kubelet requires swap off


You can do all the setups required to run the following in the sequence : 
  • k8s-master node runs on 192.168.33.10
  • k8s-slave1 node runs on 192.168.33.11
  • k8s-slave2 node runs on 192.168.33.12
Bootstrap Setup


Master node will be required the following steps
Slave node will be running and after bootup only runs inline joining the kubernetes cluster with a script generated in the master. node.

Executing the setup
vagrant up

check the VM are created as expected
vagrant status

Vagrant status of kuberenetes cluster
Check that all are in running state, if not you need to check the log file that is generated in the same path where Vagrantfile exists.

Connect with your PuTTY to k8s-master that is running on 192.168.33.10 IP address.

Check the versions of kubeadm, kubectl, and kubelet
  kubectl version
  kubeadm version
  # Better format output
  kubectl version -o yaml
  kubeadm version -o yaml
  

Kubeadm, kubectl, kubelet versions
Check the nodes list

kubectl get nodes

kubectl get nodes output

Note: Make sure that your Windows firewall disabled to run the Vagrant on your Windows laptop.

You might be more interested to explore and know about the latest Docker 19 Community Edition learning experiments on Ubuntu 19.04

References:

Categories

Kubernetes (25) Docker (20) git (15) Jenkins (12) AWS (7) Jenkins CI (5) Vagrant (5) K8s (4) VirtualBox (4) CentOS7 (3) docker registry (3) docker-ee (3) ucp (3) Jenkins Automation (2) Jenkins Master Slave (2) Jenkins Project (2) containers (2) create deployment (2) docker EE (2) docker private registry (2) dockers (2) dtr (2) kubeadm (2) kubectl (2) kubelet (2) openssl (2) Alert Manager CLI (1) AlertManager (1) Apache Maven (1) Best DevOps interview questions (1) CentOS (1) Container as a Service (1) DevOps Interview Questions (1) Docker 19 CE on Ubuntu 19.04 (1) Docker Tutorial (1) Docker UCP (1) Docker installation on Ubunutu (1) Docker interview questions (1) Docker on PowerShell (1) Docker on Windows (1) Docker version (1) Docker-ee installation on CentOS (1) DockerHub (1) Features of DTR (1) Fedora (1) Freestyle Project (1) Git Install on CentOS (1) Git Install on Oracle Linux (1) Git Install on RHEL (1) Git Source based installation (1) Git line ending setup (1) Git migration (1) Grafana on Windows (1) Install DTR (1) Install Docker on Windows Server (1) Install Maven on CentOS (1) Issues (1) Jenkins CI server on AWS instance (1) Jenkins First Job (1) Jenkins Installation on CentOS7 (1) Jenkins Master (1) Jenkins automatic build (1) Jenkins installation on Ubuntu 18.04 (1) Jenkins integration with GitHub server (1) Jenkins on AWS Ubuntu (1) Kubernetes Cluster provisioning (1) Kubernetes interview questions (1) Kuberntes Installation (1) Maven (1) Maven installation on Unix (1) Operations interview Questions (1) Oracle Linux (1) Personal access tokens on GitHub (1) Problem in Docker (1) Prometheus (1) Prometheus CLI (1) RHEL (1) SCM (1) SCM Poll (1) SRE interview questions (1) Troubleshooting (1) Uninstall Git (1) Uninstall Git on CentOS7 (1) Universal Control Plane (1) Vagrantfile (1) amtool (1) aws IAM Role (1) aws policy (1) caas (1) chef installation (1) create organization on UCP (1) create team on UCP (1) docker CE (1) docker UCP console (1) docker command line (1) docker commands (1) docker community edition (1) docker container (1) docker editions (1) docker enterprise edition (1) docker enterprise edition deep dive (1) docker for windows (1) docker hub (1) docker installation (1) docker node (1) docker releases (1) docker secure registry (1) docker service (1) docker swarm init (1) docker swarm join (1) docker trusted registry (1) elasticBeanStalk (1) global configurations (1) helm installation issue (1) mvn (1) namespaces (1) promtool (1) service creation (1) slack (1)