Installation of Docker CE for Docker Host and Docker Client on Ubuntu 19.04
In this blog-post, I would like to discuss the detailed steps that involved for install the latest version of Docker as Learning Lab on your own laptop or desktop. The same set of exercise can be done on any cloud instance as well.
Here is the ideology for setting up a lab in your laptop both docker server and docker client in different VirtualBox. Hope this picture gives more details!
Let's get started now with the following sequence of steps that could carry out to build Two Docker server and Docker Client on the Ubuntu 19.04 on VirtualBox. Docker Host runs on 192.168.33.250 and the Docker client runs on the 192.168.33.251 IP address.
Here is the ideology for setting up a lab in your laptop both docker server and docker client in different VirtualBox. Hope this picture gives more details!
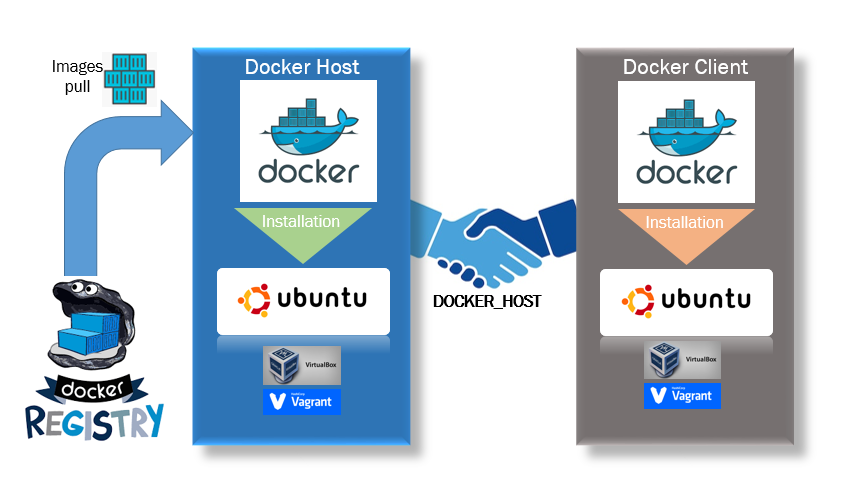 |
| Docker Host and Docker Client setup in a Laptop |
Docker Installation prerequisites
The list of the prerequisites are :- Ubuntu 19.04 64bit OS [ 16.xx above recommended ]
- User with sudo privileges vagrant by default
- Vagrant Installed
- Oracle VirtualBox Installed
- Good speed internet
 |
| Knowing the IP Address in Linux |
Step 1: Creating Ubuntu Disco VirtualBoxes with Vagrant
Create the Vagrant VirtualBoxes for Docker Host and Docker Client with the following lines in Vagrantfile:# Ubuntu
Vagrant.configure("2") do |config|
config.vm.provision "shell", inline: "echo Docker host, client vm creation script"
config.vm.provider "virtualbox" do |vb|
vb.memory = "4096"
end
config.vm.define "dockerhost" do |dockerhost|
dockerhost.vm.box = "roboxes/ubuntu1904"
dockerhost.vm.network "private_network", ip: "192.168.33.250"
dockerhost.vm.hostname = "dockerhost.test.com"
end
config.vm.define "dockerclient1" do |dockerclient1|
dockerclient1.vm.box = "roboxes/ubuntu1904"
dockerclient1.vm.network "private_network", ip: "192.168.33.251"
dockerclient1.vm.hostname = "dockerclient1.test.com"
end
end
You can bring up the vagrant boxes by running the:
Now connect with the PuTTY with the two IP addresses which are defined in the Vagrantfile.
Login with 'vagrant' user, Check the operating system version in Ubuntu we can get it by lsb_release COMMAND
 After confirming the OS version we can proceed to install the docker.
In regular Ubuntu, you can proceed for update the Software Repositories
After confirming the OS version we can proceed to install the docker.
In regular Ubuntu, you can proceed for update the Software Repositories

Next, it’s recommended to uninstall any old Docker software before proceeding.
To get the latest repo for Debian packages, as Ubuntu uses the deb kernel
Above command will install the older version because it was updated for Ubuntu once in a year. alternatively, you can use the following command to install Docker CE latest version for the current Ubuntu suitable version.
Validate the docker version installation with the following command:
sudo docker --version
To more details about server and client versions of docker-engine
sudo docker version
The following execution output:
Execution output as follows:
The list of commands used on the two terminals(docker host and docker client) to install docker on the Ubuntu are:
Step 1: Switch to super user make a directory that could be used as home directory, add user and execute the following commands
After brainstorming, looking into the multiple communities, git pages, and StackOverflow answers finally reached to a fix as updating the resolve.conf file with following:
First, temporarily add a known DNS server to your system.
 After resolved you can proceed to play with Docker Client.
You can run a docker command with referring to DockerHost using -H option.
You can try to get the images it will show nothing docker client when you do not mention -H option or DOCKER_HOST undefined
First, determine that docker deamon running in the Docker Host. In the Docker client, defining the DOCKER_HOST to tell the docker CLI we will use the remote Docker Host by specifying tcp://[docker host ip]:[deamon port]
Now all set to run docker commands in Docker Client VM, we can able to check the images list without -H option now.
We can run a container but actually, it will connect to the Docker Host, instead of running in Docker Client.
Verify this with listing images, on both will show the same list because actual image downloaded in the DockerHost VM.
Here we have snippet of instructions to install Docker-ce on CentOS 7.
1> Docker deamon will be running with 'dockerd' not as 'docker deamon'
You might be intrested to read similar article for CentOS, We have already have a full article on 'How to install docker on CentOS7 box'. Official Reference guide:
https://docs.docker.com/v17.09/get-started/
vagrant up
Now connect with the PuTTY with the two IP addresses which are defined in the Vagrantfile.
Login with 'vagrant' user, Check the operating system version in Ubuntu we can get it by lsb_release COMMAND
lsb_release -a

- As usual, it’s a good idea to update the local database of software to make sure you’ve got access to the latest revisions.
- Therefore, open a terminal window and type:
- Allow the operation to complete.

Step 2: Uninstall Old Versions of Docker if exists
Use the following command to remove the existing docker from the Ubuntu:sudo apt-get remove docker docker-engine docker.io
Next, it’s recommended to uninstall any old Docker software before proceeding.
curl -fsSL https://download.docker.com/linux/ubuntu/gpg | sudo apt-key add -
To get the latest repo for Debian packages, as Ubuntu uses the deb kernel
sudo add-apt-repository "deb [arch=amd64] https://download.docker.com/linux/ubuntu $(lsb_release -cs) stable"
Step 3: Install Docker
Here we have two different options, To install Docker on Ubuntu, in the terminal window enter the command:sudo apt install docker.io -y
Above command will install the older version because it was updated for Ubuntu once in a year. alternatively, you can use the following command to install Docker CE latest version for the current Ubuntu suitable version.
sudo apt-get install docker-ce -y
Validate the docker version installation with the following command:
sudo docker --version
To more details about server and client versions of docker-engine
sudo docker version
The following execution output:
 |
| Docker CE installation on Ubuntu 19.04 |
Test the Docker installation
The following basic docker container commands help us to understand everything is working fine on this container engine.
docker run hello-world
docker image ls  #lost the image that was downloaded
docker container ls -all # list the containers
docker container --help
Execution output as follows:
 |
| docker container commands |
Step 4: Start and Automate Docker
The Docker service needs to be set up to run at startup. To do so, type in each command followed by entering:sudo systemctl start docker sudo systemctl enable docker
The list of commands used on the two terminals(docker host and docker client) to install docker on the Ubuntu are:
sudo apt-get remove docker docker-engine docker.io
apt-get update
apt-get install apt-transport-https ca-certificates curl software-properties-common -y
add-apt-repository "deb [arch=amd64] https://download.docker.com/linux/ubuntu  $(lsb_release -cs)  stable"
apt-get update
apt-get install docker-ce
docker --version
docker version
Dedicated user for docker operations
Everytime when you run the docker command you need to use the 'sudo' before it. To avoid this, we can configure a Unix user dedicated for docker operations then, the user must be a member of 'docker ' group. This might be a bit tricky but useful, it gives more flexibility to run the docker related commands.Step 1: Switch to super user make a directory that could be used as home directory, add user and execute the following commands
 sudo -i
 mkdir /u01/docker
 useradd -s /bin/bash -d /u01/docker -g docker docker
 passwd docker
 chown docker:docker /u01/docker
The trouble with failure in name resolution
This could be strange, but when we tried to run the docker container on the DockerHost or on DockerClient got the same message as :root@dockerhost:~# ERRO[2019-08-02T23:43:48.602072101-07:00] Not continuing with pull after error: error pulling image configuration: Get https://production.cloudflare.docker.com/registry-v2/docker/registry/v2/blobs/sha256/fc/fce289e99eb9bca977dae136fbe2a82b6b7d4c3724 74c9235adc1741675f587e/data?verify=1564817623-vxb615oMpsW7Kmp%2BJgQ8lfIOSmI%3D: dial tcp: lookup production.cloudflare.docker.com: Tem porary failure in name resolution
After brainstorming, looking into the multiple communities, git pages, and StackOverflow answers finally reached to a fix as updating the resolve.conf file with following:
- the search line include docker.com because the docker pull uses this domain name
- include 8.8.8.8 nameserver to have name resolving capability to the VM
- include nameserver as per the IP address used for Docker Host
First, temporarily add a known DNS server to your system.
echo "nameserver 8.8.8.8" | sudo tee /etc/resolv.conf > /dev/null
apt -y install openresolv
mkdir -p /etc/resolvconf/resolv.conf.d
echo nameserver 8.8.8.8 >> /etc/resolvconf/resolv.conf.d/head
echo 'search docker.com' | sudo tee -a /etc/resolvconf/resolv.conf.d/head
echo 'nameserver 192.168.1.XXX' | sudo tee -a /etc/resolvconf/resolv.conf.d/head
resolvconf --enable-updates
resolvconf -u
Command execution changes

Playing within Docker Client on Ubuntu 19.04
You can run a docker command with referring to DockerHost using -H option.
docker -H tcp://192.168.33.250:2375 images
You can try to get the images it will show nothing docker client when you do not mention -H option or DOCKER_HOST undefined
docker images
First, determine that docker deamon running in the Docker Host. In the Docker client, defining the DOCKER_HOST to tell the docker CLI we will use the remote Docker Host by specifying tcp://[docker host ip]:[deamon port]
export DOCKER_HOST=tcp://192.168.33.250:2375
Now all set to run docker commands in Docker Client VM, we can able to check the images list without -H option now.
docker images
We can run a container but actually, it will connect to the Docker Host, instead of running in Docker Client.
docker run alpine
Verify this with listing images, on both will show the same list because actual image downloaded in the DockerHost VM.
docker images
 |
| Play within Docker Client on Ubuntu 19.04 |
Docker CE installation on CentOS7
Here we have snippet of instructions to install Docker-ce on CentOS 7.
sudo -E yum-config-manager --add-repo "$DOCKERURL/centos/docker-ce.repo"
yum install -y yum-utils device-mapper-persistent-data lvm2
yum-config-manager --add-repo https://download.docker.com/linux/centos/docker-ce.repo
yum-config-manager --enable docker-ce-edge
yum-config-manager --enable docker-ce-test
yum install -y docker-ce
docker -v
usermod -aG docker vagrant
systemctl start docker
systemctl enable docker
systemctl status docker
docker info
docker run hello-world
Takeaways from this experiment
Two important takeaways from this experiment are:1> Docker deamon will be running with 'dockerd' not as 'docker deamon'
.ps aux | grep "docker daemon" # OLD2> Docker default port 2376 earlier, new one is 2375 3> If docker.com is not in searchable dns then manually need to add in the resolv.conf file by updating head file.
You might be intrested to read similar article for CentOS, We have already have a full article on 'How to install docker on CentOS7 box'. Official Reference guide:
https://docs.docker.com/v17.09/get-started/


Comments