Sunday, May 30, 2021

Docker Service Stack deployment

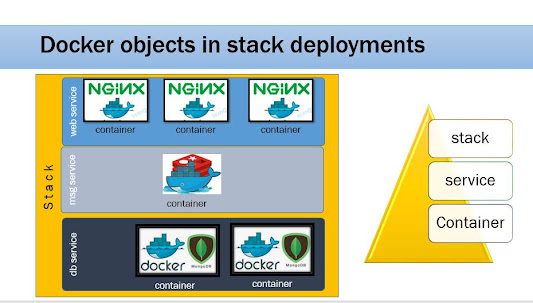
To work with Docker service stack deployment we should have an orchestrator either Swarm or Kubernetes. Here, in this post, I will be experimenting with the Docker swarm cluster.

Prerequisites

  • Docker installed machine
  • Docker swarm initialized and active

  • Create the manifestation file that describes the task, which will be available in the service definition. We can use the declarative definitions for each service in a YAML file. 

    Docker Swarm Service Stack Deployment
    Docker Swarm Service Stack Deployment


    I read the book: Learn Docker - Fundamentals of Docker 19.x, where I found the nice explanation given in the 


    Let's run the docker swarm visualizer container, which will show the Swarm cluster node status, container service status it will be very clear to understand how the orchestrator capabilities work for Docker containers.
    docker run -it –d \
      -p 8080:8080 \
      -v /var/run/docker.sock:/var/run/docker.sock  \   
      dockersamples/visualizer
    
    Alternatively, you can use the docker-compose file as a replacement for the container run command:
    version '3'
    
    services:
      viz:
        image:  dockersamples/visualizer
        volumes:
          - "/var/run/docker.sock:/var/run/docker.sock"
        ports:
          - "8080:8080"
    
    You can enhance it's usability with your own parameters to run the containers.

    When no deployments swarm nodes contain empty:

    Initial Swarm Visualization 


    Visualizer shows us the number of master and worker swarm nodes participating in the cluster. The green glow-filled circle indicates the active Node of the Docker Swarm cluster. 

    Docker stack service deployment

    The docker swarm service logs can be viewed in two ways using the parameter as service ID or using service NAME
     
    version: "3.7"
    services:
      whoami:
        image: training/whoami:latest
        networks:
          - test-net
        ports:
          - 81:8000
        deploy:
          replicas: 6
          update_config:
            parallelism: 2
            delay: 10s
          labels:
            app: sample-app
            environment: prod-south
    
    networks:
      test-net:
        driver: overlay
    
    The menifestation tells about the desired state  of the application, where we mentioned what is the port we want to use on the host and corresponding container port. Here 81 is host port, 8000 is container port. This service uses test-net network resource. The deploy section mentioned as replicas: 6, that means 6 containers will be created on Docker Swarm clsuter. You wish to run the multiple containers run parallel on the same node. We can use labels to identify and remove the services in runtime that will help in monitoring the applicaiton, It is also useful to terminate the services by descovering with these labels.

    Run the following docker Stack deployment command as:
    docker stack deploy whoami --compose-file docker-service-whoami.yml
    
    docker stack ls
    
    Stack deployment automatically creates overlay network
    docker network ls
    docker service ls
    docker container ls
    curl http://192.168.33.250:81
    
    The execution will produce output as follows:

    Curl command output from the Docker swarm cluster


    Now let's see the deployment of whoami sample:
    docker service logs whoami_whoami
    docker service logs kiw9ckp68hu5
    
    After the deployment of 'whoami' service see that is distributed amont multiple machines which built-in capability of the Docker swarm.

    Docker Swarm Visualization shows replicas=6 on multi-host deployment

    Docker Cluster Resilience Test case

    Here we can do the test for the resilience two levels:
    • container level
    • node level

    Use case 1: Container level fail-over 

    Step 1: Determine the running containers list
    Step 2: Remove a container from the stack 
    Step 3: The service deployment will automatically create the new container to maintain the DESIRED state as 6 when a container removed ACTUAL State gone to 5, to maintain it Docker Swarm will work to birng up the service.
    docker container ls
      docker container rm -f whoami_whoami.3.selectyourown-container
    docker ps


    Use case 1: Remove a container Swarm service recreate the replacement container

    This concludes containers high availability using service deployment using stack on swarm cluster. The actual real usecase that node level will give HA in tne next.

    Use case 2: When the node fails - Service Migration

    Brought down the Machine and see the outcome on the Swarm Visualizer:

    One your Vagrant machines you can stop one of the node to see the impact how it will recover or maintaine the DESIRED State of replicas=6, Here in our example, the service which is running on node1 continue running on available nodes (mstr, node2) by migrating the service to them. This migration will be taken care by the Docker Swarm automatically. We can also define choices in the YAML file. 

    Swarm Visualization of migration of services to other worker: Vagrant node1 halt

    The Visualization tool shows clear picture of how the Docker Swarm capable of migrate the service when there is issue/failure on node.
     
    It will clearly show how High-Availability can be achieved with the Docker Swarm orchestrator.
    Jai Hind!!

    Saturday, May 22, 2021

    Creating your Custom Image using Dockerfile

    How do you create docker image?

    There are multiple ways to create new docker images

    • docker commit: creates a new layer (and a new image) from a running container.
    • docker build: performs a repeatable build sequence using dockerfile.
    • docker import: loads a tarball into Docker engine, as a standalone base layer.

    We don't prefer to use docker import, because the import option can be used for various hacks, but its main purpose is to bootstrap the creation of base images.

    Working on Docker Custom Image

    Docker images can be pulled from Docker registries. Docker owns Docker Hub and Docker cloud public repositories where you could find the free images. Docker store is a place where Docker images could be on sale. You can create an image and sell it who need it. Docker client is CLI which allows us to deal with the Docker objects. Docker objects are Docker images, Containers, Network, volumes and services. An image is a read-only template that allows us to create instances in runtime containers.

    Dockerfile structure


    We can create an image from a base image by adding some customizations like installing new libraries, software. For example, using oraclelinux as base image on top it installs httpd.
    Here base image could be available in the public registry or custom image build for your project.

    The easiest way to customize our docker image using Dockerfile, Where Dockerfile includes instructions to create layers in your docker image. Let's explore how to build our own image with dockerfile with syntax

    How to create an efficient image via a Dockerfile?


    • Start with an appropriate base image
    • Do NOT Combine multiple applications into a single container
    • Avoid installing unnecessary packages
    • Use multi-stage builds 


    Dockerfile format

    The dockerfile is a construct of a set of instructions to build the docker image. The dockerfile starts with comments where every scripting language allows us to use '#'(hash symbol) to comment a line. Next base image FROM where the image can be pulled. Here we have two options Docker Private registry for your organization otherwise Docker Hub public cloud which can be used for the initial learnings or for Proof of Concepts to built.
    Create a Dockerfile in any editor, my preferrable editor is VisualStudio Code, which gives me nice syntax highlighting for Dockerfile instructions.
    # This is first sample Dockerfile
    FROM busybox
    LABEL AUTHOR Pavan Devarakonda
    RUN echo "Building sample docker image"
    CMD echo "Hello Vybhava Container!"
    

    To create the docker image following command:
    docker build -t hello .
    
    Here the important thing is that Dockerfile don’t follow any root directory you need to specify at the end of the build command in the above we have used dot(.) that is the current directory. You have other option too you can define other PATH as per your needs of project team collaboration.
    Docker build command best options
    docker build -f /path/to/a/Dockerfile . #absolute path
    docker build -t vybhava/myapp . #relative path of Dockerfile
    docker build -t vybhava/myapp:1.0 . # with tag label value
    

    Usage of .dockerignorefile


    To increase the build performance, exclude files and directories by adding a .dockerignore file to the context directory.
     *.md
     !README.md
     *.tmp
    

    Escape Parser Directive


    Exploring Docker instructions 

    Let's examine each command in detail how it works.
     

    FROM Instruction

    The FROM instruction initializes a new build stage and sets the Base Image for subsequent instructions. Let's see an example
    # This is first sample Dockerfile
    FROM ubuntu
    CMD ["/usr/bin/wc","--help"]
    
    Ref: https://docs.docker.com/engine/reference/builder/#from
     

    COPY and ADD instructions

    copies all files and folders from current directory to /app folder in container-Image
    COPY . /app 
    

    copies everything from the web folder to container-Image /app/web
    COPY ./web /app/web
    

    copies specific file to /data/my-sample.txt file inside container-Image
    COPY sample.txt /data/my-sample.txt
    

    Compressed files such as tar, tar.gz, gz or zip files when copying to container-Image it will uncompresses it which can be any format.
    ADD jdk-8u241-linux-x64.tar.gz /u01/app
    ADD APEX_21.1.zip /u01/
    

    You can add files from the url to a container Image
    ADD http://github.com/sample.txt /data/
    

    EXPOSE

    The EXPOSE instruction informs Docker that the container listens on the specified network ports at runtime. https://docs.docker.com/engine/reference/builder/#expose The LABEL instruction adds metadata to an image. A LABEL is a key-value pair. To include spaces within a LABEL value, use quotes and backslashes as you would in command-line parsing. 

    Reference : https://docs.docker.com/engine/reference/builder/#label
     

    RUN instruction

    RUN has 2 forms:
    RUN  (shell form, the command is run in a shell, which by default is /bin/sh -c on Linux or cmd /S /C on Windows)
    RUN ["executable", "param1", "param2"] (exec form)
    
    The RUN instruction will execute any commands in a new layer on top of the current image and commit the results. The resulting committed image will be used for the next step in the Dockerfile. 

    Reference: https://docs.docker.com/engine/reference/builder/#run


    ENV instruction


    The ENV instruction sets the environment variable 'key' to the value "value". Example:
    ENV JDK_DIR /tmp
    ENV myvar=/home/tomcat
    ENV myvar=/home/apache2 var2=$myvar
    ENV var3=$myvar
    

    The environment variables set using ENV will persist when a container is run from the resulting image.
     

    WORKDIR instruction

    Once the container comes to running state will switch to the directory which you mentioned as WORKDIR instruction. The value you pass it to WORKDIR is a PATH that should be existing in the container.
     
    Example: WORKDIR /tmp

    ENTRYPOINT and CMD instructions

    The ENTRYPOINT and CMD both the commands are executed run-time that is Container startup time. We cannont have multiple ENTRYPOINT or CMD commands in a Dockerfile

    An ENTRYPOINT allows configuring a container that will run as an executable.

    ENTRYPOINT has two forms:

       ENTRYPOINT ["executable", "param1", "param2"] (exec form, preferred)
       ENTRYPOINT command param1 param2 (shell form)


    Example1

    ENTRYPOINT with CMD params

       
    # This is Entrypoint sample dockerfile
    FROM alpine
    LABEL MAINTAINER BHAVANISHEKHAR@GMAIL.COM
    ENTRYPOINT ["ping"]
    CMD ["-c","4","www.docker.com"]
    
    Build the image from the above instructions:
     docker build -t entrycp:1.0 -f entrycmdparm.Dockerfile .
    
    #Run the container
    
    docker run entrycp:1.0
    

    Example 2:

    ENTRYPOINT param with CMD param

       
    # This is Entrypoint sample dockerfile
    FROM ubuntu
    LABEL USER Pavan
    ENTRYPOINT ["top", "-b"]
    CMD ["-c"]
    

    dockerfile is a blue-print for docker image created with instructions

    Python Web Framework Flask App on Docker Container

     Namaste this post is an extension of the Docker image management. In this post, I would like to talk about how the Dockerfile content will work to build the Python web framework using the Flask app.


    Let's consider a web platform we have multiple choices to use as a web application to run on docker container:

    1. Python web app using Flask
    2. Node.JS app
    3. Web app run with Go

    For all these program execution structures is similar you must have 'app' folder. Where you can write your web application code.


    FROM python:3.9.4-alpine
    
    COPY requirements.txt /
    RUN pip3 install -r /requirements.txt
    
    COPY . /app
    WORKDIR /app
    
    ENTRYPOINT ["./gunicorn.sh"]
    
    Here the base image used as Python3 version with apline which is thinner image. As pip installer will use requirement.txt file to install the dependencies libraries and packages required for running Flask.
    COPY instruciton used to copy the files from docker host machine to container image.
    WORKDIR is like cd command.
    ENTRYPOINT instruction will take param which can be a script or command that could be executed

    Step 1: Get the Flask Docker app Dockerflle from GitHub. You can have the following repository by Fort on the GitHub then you can use the

    git clone
    on Docker daemon running VM.
        git clone https://github.com/BhavaniShekhar/Flask_Docker_App-1.git
        cd Flask_Docker_App-1/
    	ls -lrt
      

    Step 2: Update some files and commit your changes. Here I've modified the index.html present in the

     vi app/templates/index.html
    . Now, all set we can save the changes.
      git add .
      git commit -m 'added text to index.html'
      
    Remember this will works only when you set the
     git config --global user.email 
    and
     git config --global user.name

    Step 3: Build the docker image with the following command:

     
      docker build -t flask:1.3 .
      

    Step 4: Construct the container based on the flask image

     
      docker run -d -p 8081:80 flask:1.3
      

    Step 5: Python Flask based web app ready to use open a browser and try to access it with host ip and host port http://192.168.33.250:8081/


    You can see the output as follows:

    Monday, May 10, 2021

    Docker Private Registry with Frontend UI

    Hey! In this DevOps learning post, I've done my experiment on Docker Registry-Server connecting with the docker registry UI as a frontend. To support this Frontend service, we have an Apache HTTP server container used as a docker-registry-frontend image.


    Docker Registry Server connect with Frontend UI
    Docker Registry Server connect with Frontend UI

    Step 1: Go to the docker hub search for 'docker-registry-frontend' given version Pull the image to your local system.

    docker pull registry 
    docker pull konkardkleine/docker-registry-frontend:v2 
    docker images 
    
    docker network create registry 
    docker network ls
    
    Step 2: Create the registry server using a docker container run command which expose the port as 5000 and the network that we have created in the step1. This separate network creation will be easy to isolate with other containers running on the same host.
    docker run --rm -d -p 5000:5000 --name registry-server \
    --network registry 
    To verify the access of registry-server
    docker logs registry-server -f
    
    Step 3: You can find many other web UI options on the Docker Hub, Here I've selected the web-ui image - konradkleine/docker-registry-frontend:v2. Here we have two environment variables need to set HOST and PORT. To access this registry web page we need to open the port with -p option. 

    Create the registry-ui container as follows:
    docker run \
      -d --rm --name registry-ui --network registry \
      -e ENV_DOCKER_REGISTRY_HOST=192.168.33.250 \
      -e ENV_DOCKER_REGISTRY_PORT=5000 \
      -p 8080:80 \
      konradkleine/docker-registry-frontend:v2
                 
    Step 4: To verify the access logs of registry-ui web server run the following command:
    docker logs registry-ui -f
    
    Step 5: Open a duplicate terminal and do the following image tag to use it on our private registry.
    docker tag busybox dockerhost.test.com:5000/busybox
    docker images 
    
    docker push localhost:5000/nginx
    
    Now let's see on the browser where we can access the registry-ui which is actually running with Apache HTTPD 2 webserver


    Docker Registory UI Frontend
    Docker Private Registry Web 


    Step 6:
    After push you can see the images on the registry-ui same you can check with curl command as well like this:
     curl -X GET http://localhost:5000/v2/_catalog
    {"repositories":["nginx"]}
    

    Please write your comments and share if you like and think that it will be helpful for other.

    Tuesday, May 4, 2021

    Backup and Recovery, Migrate Persisted Volumes of Docker

     Namaste !! Dear DevOps enthusiastic, In this article I would like to share the experimenting of data that is persistence which we learned in an earlier blog post

    In real world these data volumes need to be backed up regularly and if in case of any disaster we can restore the data from these backups from such volumes  

    Backup and Recovery Docker Volumes
    Docker Volumes Backup and Restore

    This story can happen in any real-time project, The data from the on-premises data center to migrate to a cloud platform. One more option is when Database servers backup and restore to different Private networks on a cloud platform.

    Here I've tested this use-case on two Vagrant VirtualBox's. One used for backup and other for restore MySQL container.

    Setting up the Docker MySQL container with Volume

    Step 1: Let's create a volume with a name as first_vol:

        docker volume create first_vol #create 
        docker volume ls #Confirm 
    
    Step 2: create a container with volume for backup of My SQL Database image
    docker run -dti --name c4bkp --env MYSQL_ROOT_PASSWORD=welcome1 \
     --volume first_vol:/var/lib/mysql mysql:5.7
    
    Step 3: Enter into the c4bkp container
    docker exec -it c4bkp bash
    

    Create data in MySQL database


    Step 4: Log in to the MYSQL database within the My SQL database container
     mysql -u root -p
     password: 
    
    Enter the password as per the environment variable that is defined at the time of container, key pair

     
  • create a database named as 'trainingdb' mysql prompt in the same container
    CREATE DATABASE trainingdb; use trainingdb;
    
  • Now check the database which is created using show command, then create the TABLE name as traininings_tbl with required fields and their respective datatypes:
      SHOW CREATE DATABASE trainingdb;
      
      create table trainings_tbl(
       training_id INT NOT NULL AUTO_INCREMENT,
       training_title VARCHAR(100) NOT NULL,
       training_author VARCHAR(40) NOT NULL,
       submission_date DATE,
       PRIMARY KEY ( training_id )
    );
    
      
  • Now insert the rows into the training_tlb table, here you can imagine any project table can be used with UI as this is an experiment we are entering manually entering records:
    INSERT INTO trainings_tbl(training_title, training_author, submission_date) VALUES("Docker Foundation", "Pavan Devarakonda", NOW());
    INSERT INTO trainings_tbl(training_title, training_author, submission_date) VALUES("AWS", "Viswasri", NOW());
    INSERT INTO trainings_tbl(training_title, training_author, submission_date) VALUES("DevOps", "Jyotna", NOW());
    INSERT INTO trainings_tbl(training_title, training_author, submission_date) VALUES("Kubernetes", "Ismail", NOW());
    INSERT INTO trainings_tbl(training_title, training_author, submission_date) VALUES("Jenkins", "sanjeev", NOW());
    INSERT INTO trainings_tbl(training_title, training_author, submission_date) VALUES("Ansible", "Pranavsai", NOW());
    INSERT INTO trainings_tbl(training_title, training_author, submission_date) VALUES("AWS DevOps", "Shammi", NOW());
    INSERT INTO trainings_tbl(training_title, training_author, submission_date) VALUES("AWS DevOps", "Srinivas", NOW());
    INSERT INTO trainings_tbl(training_title, training_author, submission_date) VALUES("Azure DevOps", "Rajshekhar", NOW());
    INSERT INTO trainings_tbl(training_title, training_author, submission_date) VALUES("Middleware DevOps", "Melivin", NOW());
    INSERT INTO trainings_tbl(training_title, training_author, submission_date) VALUES("Automation experiment", "Vignesh", NOW());
    commit;
    
    After storing a couple of records into the table, we are good to go for testing with the persistent data. Check the table data using 'SELECT' query:
        select * from trainings_tbl;
        
    Now let's exit from the container. 

  • Step 5:
    Taking the backup
         docker run --rm --volumes-from c4bkp  -v $(pwd):/backup alpine tar czvf /backup/training_bkp1.tar.gz /var/lib/mysql/trainingdb
         or
         docker run --rm --volumes-from c4bkp  -v $(pwd):/backup ubuntu tar czvf /backup/training_bkp.tar.gz /var/lib/mysql/trainingdb
         ls -l *gz
        
    Here the most important option is --volumes-from it should point to the mysql container. The backup file content we can check with here t indicates test the .gz file.
        tar tzvf training_bkp.tar.gz

    Migrate Data

    Step 6: The data in the tar.gz file as backup which can be migrated/moved to another docker host machine where you wish to restore the data with the same mount location of the container from which image you have created the backup. Example source machine used mysql:5.7 image same should be used on the destination machine. 

    Let me copy to the share folder in the vagrant box so that it can be accessable on the another vagrant box:
    cp training_bkp1.tar.gz /vagrant/
    

    Restore from the Backup

    Step 7: Create a new container and restore the old container volume database Now you cna open two terminals run the following 'restore' volume to run the 'for_restore' container:
    docker run -dti --name for_restore --env MYSQL_ROOT_PASSWORD=welcome1 \
     --volume restore:/var/lib/mysql mysql:5.7
    #check inside container volume location
    docker exec -it for_restore bash -c "ls -l /var/lib/mysql"
    
    To restore the data from the backup tar file which we have already taken from first_vol volume.
    docker run --rm --volumes-from for_restore \
     -v $(pwd):/restore ubuntu bash -c "cd /var/lib/mysql/ && tar xzvf /restore/training_bkp.tar.gz --strip-components=3"
    
    I've googled to understand the --strip-components how it helps us in extracting only specified sub-directory content.
    Now the exciting part of this experiment is here...
  • Recovered Data in MySQL database container


    check the other terminal in the /var/lib/mysql folder will be filled with extracted database files.
    Once you see the data is restored this approach can be useful to remote machine then it is the migration strategy for docker volumes.
  • Step 8: Cleanup of Volumes -- optional You can use the following command to delete a single data volume
    docker volume rm datavol 
    

    To delete all unused data volumes using the following command
        docker volume prune
    

    References used for this post

  • Create db on My SQL
  • Crate table insert
  • MySQL database password recovery or restart
  • Sunday, May 2, 2021

    Docker SSHFS plugin external storage as Docker Volume

     Namaste, In this exciting Docker storage volume story, this experiment is going to use two Vagrant VirtualBox. You can also use any two Cloud instances (may be GCP, AWS, Azure etc.,). Where DockerHost is going to run the docker containers and DockerClient box is going to run the SSH daemon. 

    SSHFS Volume in docker


    Docker Volume with External Storage using SSHFS

    Docker allows us to use external storage with constraints. These constraints will be imposed on cloud platforms as well. The external or Remote volume sharing is possible using NFS. 

    How to install SSHFS volume?


    Step-by-step procedure for using external storage as given below :
    1. Install docker plugin for SSHFS with all permission is recommended:
      docker plugin install \
      --grant-all-permissions vieux/sshfs
      
    2. Create a Docker Volume
        docker volume create -d vieux/sshfs \
      -o sshcmd=vagrant@192.168.33.251:/tmp \
      -o password=vagrant -o allow_other sshvolume3
      
    3. Mount the shared folder on the remote host:
      mkdir /opt/remote-volume # In real-time project you must have a shared volume accross ECS instances
      
    4. The remote box in my example, it is a 192.168.33.251 box. check the PasswordAuthentication value, the default value will be no, but if your volume using this remote box communication happen when you provide the ssh login password vagrant@dockerclient1:/tmp$ sudo cat /etc/ssh/sshd_config |grep Pass PasswordAuthentication yes
    5. Check the sshvolume what is its configuration and which remote VM it is connected:
           docker volume inspect sshvolume3
        

      docker inspect sshfs volume
      Docker Volume inspect sshfs 

    6. Now Create an alpine container using the above-created sshvolume3
    7.   docker container run --rm -it -v sshvolume3:/data alpine sh
        
    8. Validate now the data created in side the container will be attached volume that is mapped to remote virtualbox
    9. Enter the following commands to create a file and store a line of text using echo command.
      sshfs using container
      Docker container using sshfs volume
    10. On the remote box check that the file which is created inside the container will be available on the remote box 192.168.33.251 box
    Remote box /tmp containers file


      You can use this remote volume inside docker-compose and also stack deployment YAML files.
    1. Create a service that uses external storage
      docker service create -d \
       --name nfs-service \
       --mount 'type=volume,source=nfsvolume,target=/app,volume-driver=local,volume-opt=type=nfs,volume-opt=device=:/,"volume-opt=o=10.0.0.10,rw,nfsvers=4,async"' \
       nginx:latest
      
    2. List the service and validate it by accessing it.
      docker service ls
          

    Hope you enjoyed this post of learning. please share this with your friends and colleagues.

    Categories

    Kubernetes (24) Docker (20) git (13) Jenkins (12) AWS (7) Jenkins CI (5) Vagrant (5) K8s (4) VirtualBox (4) CentOS7 (3) docker registry (3) docker-ee (3) ucp (3) Jenkins Automation (2) Jenkins Master Slave (2) Jenkins Project (2) containers (2) docker EE (2) docker private registry (2) dockers (2) dtr (2) kubeadm (2) kubectl (2) kubelet (2) openssl (2) Alert Manager CLI (1) AlertManager (1) Apache Maven (1) Best DevOps interview questions (1) CentOS (1) Container as a Service (1) DevOps Interview Questions (1) Docker 19 CE on Ubuntu 19.04 (1) Docker Tutorial (1) Docker UCP (1) Docker installation on Ubunutu (1) Docker interview questions (1) Docker on PowerShell (1) Docker on Windows (1) Docker version (1) Docker-ee installation on CentOS (1) DockerHub (1) Features of DTR (1) Fedora (1) Freestyle Project (1) Git Install on CentOS (1) Git Install on Oracle Linux (1) Git Install on RHEL (1) Git Source based installation (1) Git line ending setup (1) Git migration (1) Grafana on Windows (1) Install DTR (1) Install Docker on Windows Server (1) Install Maven on CentOS (1) Issues (1) Jenkins CI server on AWS instance (1) Jenkins First Job (1) Jenkins Installation on CentOS7 (1) Jenkins Master (1) Jenkins automatic build (1) Jenkins installation on Ubuntu 18.04 (1) Jenkins integration with GitHub server (1) Jenkins on AWS Ubuntu (1) Kubernetes Cluster provisioning (1) Kubernetes interview questions (1) Kuberntes Installation (1) Maven (1) Maven installation on Unix (1) Operations interview Questions (1) Oracle Linux (1) Personal access tokens on GitHub (1) Problem in Docker (1) Prometheus (1) Prometheus CLI (1) RHEL (1) SCM (1) SCM Poll (1) SRE interview questions (1) Troubleshooting (1) Uninstall Git (1) Uninstall Git on CentOS7 (1) Universal Control Plane (1) Vagrantfile (1) amtool (1) aws IAM Role (1) aws policy (1) caas (1) chef installation (1) create deployment (1) create organization on UCP (1) create team on UCP (1) docker CE (1) docker UCP console (1) docker command line (1) docker commands (1) docker community edition (1) docker container (1) docker editions (1) docker enterprise edition (1) docker enterprise edition deep dive (1) docker for windows (1) docker hub (1) docker installation (1) docker node (1) docker releases (1) docker secure registry (1) docker service (1) docker swarm init (1) docker swarm join (1) docker trusted registry (1) elasticBeanStalk (1) global configurations (1) helm installation issue (1) mvn (1) namespaces (1) promtool (1) service creation (1) slack (1)