Thursday, September 3, 2020

Configuring Fresh Jobs in Jenkins

Hello, Dear DevOps Automation enthusiast! This post is intended targeted to those who have just started the journey in the Continuous Integration and Continuous Deployment on the Cloud Platforms or On-premises environments.

Pre-requisites

  • Latest Stable version of Jenkins installed 
  • Jenkins Master is in running state on your machine/VM/Cloud instance
  • Able to login to the Jenkins Console

In the left pane, you can click on 'New Item' or Click on the 'Start Using Jenkins' link. The welcome screen shows a link to create a new job!

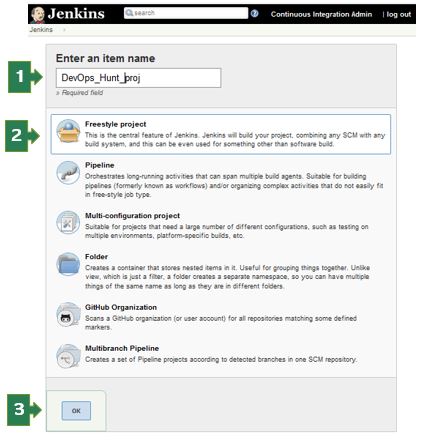
Jenkins First Job Project creation


You need to enter the value for 
Name for the build project
Type of project
  1. Freestyle Project
  2. Pipeline
  3. Multi-configuration Project
  4. Folder
  5. GitHub Organization
  6. Multibranch Pipeline

Enter the name of the project, Select the 'Freestyle project' for the first time and click on the 'OK' button. New page loads with 6 sections/tabs for build project inputs.

Job Configuration Sections
In Jenkins console we have various Job Configuration types
Jenkins Job Configuration


  1. General - Description of the project, Enable project based security, change date pattern for BUILD_TIMESTAMP, Discard old builds enable will help you for easy migration of Jenkins master.
  2. Job Notification -  End points, You can enable notification mail when someone changed configuration. Rebuild without asking parameters or we can disable the rebuild for a particular job. You can choose the build requires lockable resources, which means other jobs not allowed when this job is in progress. This project is parameterized enabled then you can add different type Parameters such as String Parameter, Choice Parameter, Password Parameter, Node
  3. Jenkins job configuration allows us to use 5 different choices of 'Source code management' as:
a. None
b. CVS
c. CVS Projectset
d. Git
e. Subversion
                    Default it is selected as - None


            Build Trigger
            1. Jenkin's job will be triggered by a 'Build Triggers' section. Here we have Trigger build remotely from scripts, 
            2. Build after other projects are built when there is dependency are in the projects
            3. Build periodically - This choice asks you on what period you want to execute this job
            4. Enable Artifactory trigger - when docker image is pushed you want to run a job 
            5. GitHub hook trigger for GITscm polling - requires authentication for webhook accessing GitHub repository
            6. Poll SCM - for all types of source code repository updates can trigger the job.
            Build Environment

            Usually, when we run a build, Jenkins uses /tmp/somerandomnumber.sh in Linux machines as the automatically generated script will create workspace in the slave machine. 
            1. Delete workspace before build starts
            2. Use secret text(s) or file(s)
            3. Provide configuration files
            4. send files or execute commands over SSH before the build starts 
            5. send files or execute commands over SSH after the build runs
            6. Abort the build if it's stuck
            7. Add timestamps to the Console Output
            8. Ant/Ivy-Artifactory Integration
            9. Create a formatted version number
            10. Farm Repository
            11. Generic-Artifactory Integration
            12. Gradle-Artifactory Integration
            13. Inject environment variables to the build process
            14. Inject passwords to the build as environment variables
            15. Inspect build log for published Gradle build scans
            16. Maven3-Artifactory Integration
            17. Run Xvnc during build
            18. Setup Kubernetes CLI (kubectl)
            19. With Ant

            Build

            The build section will have an Execute shell with command text box. where you can enter the shell commands. which will become a shell script.


            2. Pipeline Project

            If you choose the Pipeline Project then it will have the following sections
            1. General
            2. Job Notifications
            3. Build Triggers
            4. Advanced Project options
            5. Pipeline 

            General 

            In the General section, you can see
            Enable project-based security

            Discard old builds when you check this -> Strategy where you have LogRotation based on - Days to keep builds or Max # of builds to keep 
            Advance option - 
            Days to keep artifacts - if not empty default 14, artifacts from builds older than this number of days will be deleted, but the logs, history, reports, etc for the build will be kept
            Max # of builds to keep with artifacts - if not empty, only up to this number of builds have their artifacts retained

            Do not allow concurrent builds
            Do not allow the pipeline to resume if the master restarts
            GitHub project

            Job Notifications


            Notify when Job configuration changes
            Pipeline speed/durability override
            Preserve stashes from completed builds
              Rebuild options: Rebuild Without Asking For Parameters
              Disable Rebuilding for this job
            Sidebar Links
            This project is parameterized selected then you are allowed to use following parameters:
            1. Node
            2. String
            3. Active Choices parameter -> 
              1. Name 
              2. Script option will have choice to enter the Groovy script
              3. Choice type:  Single select, Multi select, Radio button, Checkbox 
              4. Enable Filters
              5. The filter starts at 1

            Build Triggers

            1. Build after other projects are built
            2. Build periodically
            3. Build whenever a SNAPSHOT dependency is built
            4. Enable Artifactory trigger
            5. GitHub hook trigger for GITScm polling
            6. Poll SCM
            7. Disable this project
            8. Quiet period
            9. Trigger builds remotely (e.g., from scripts)

            Advanced Project Options

            Click on the 'Advanced' button

            Pipeline

            Definition - Pipeline script
                the script, Use Groovy sandbox.

            After you configured the Job, you have to Apply to save the configuration until now. 

            If you are working on the Visual Studio code as editor then you can install the Extention. 

            Groovy extension


            Jenkinsfile Extension


            Monday, May 25, 2020

            Microk8s Installation and Configure Dashboard

            Microk8s is the most happening thing in Kubernetes World. Here I would like to share my exploration of microk8s. Earlier there was 'Minikube' which is targets to Developers community to reduce the operations.

            MicroK8s


            Assumption
            You know how to create a VM using Vagrant, VirtualBox

            Microk8s installation on Ubuntu 

            To install you should be super user on your Ubuntu VM sudo -i The snap is a package manager available in all Linux distributions. Here in the Ubuntu 18.04 validating is it available. Check snap package tool available
            snap version
            
            Now we all set, run the install the microk8s command here the --classic is must
            snap install microk8s --classic --edge
            
            Check the version
            microk8s.kubectl version --short
            
            Create an alias to simplify your command
            alias k="microk8s.kubectl"
            
            Let's use k now
            k get nodes
            k get nodes -o wide
            
            # check the namespaces list
             k get namespaces
             k get all --all-namespaces
            
            This might take couple of minutes on your laptop that is actually depends on your system capacity and speed. To start the microk8s Duplicate Terminal and try to run a pod. use same aliase here as well. alias k="microk8s.kubectl" on Vagrant user
               sudo usermod -a -G microk8s vagrant
               sudo chown -f -R vagrant ~/.kube
            
            
            deployment expose k expose deploy nginx --port 80 --target-port 80 type ClusterIP which elinks not installed, so lets install it.
            microk8s.start
            
            Once it is installed microk8s we can validate it by inspect option
            microk8s.inspect
            
            If there any warnings suggestions goahead and do that. To get all the command options for microk8s
            microk8s -h
            
            To get the status of kubenetes cluster
            microk8s.status
            
            To get the dashboard
            microk8s.enable dashboard dns metrics-server
            
            kubectl get all --namespaces
            microk8s kubectl get all -A
            
            kubernetes.service get the ip access in the browser To get the password use admin as user
            microk8s.config
            
            To login with Token option on the dashboard need to get the token. microk8s.kubectl -n kube-system get secret |grep kubernetes-dashboard-token microk8s.kubectl -n kube-system describe secrets kubernetes-dashboard-token To terminate your kubernetes cluster on microk8s
            microk8s.stop
            

            Deployment to microk8s

            microk8s.kubectl create deployment microbot --image=dontrebootme/microbot:v1
            microk8s.kubectl scale deployment microbot --replicas=2
            
            For more experiments like this please do watch our YouTube channel


            Tuesday, May 12, 2020

            Kubernetes (K8s) StatefulSet (sts)

            Greetings of the day dear Orchestrator!! In this post, we will discuss exploring the Kubernetes StatefulSet(sts

            What is the purpose of Stateful deployment?

            Kubernetes' basic unit is Pod, which will be ephemeral in nature and it was designed in such a way that it cannot store the state. To store and maintain the state of the application, Kubernetes introduced a new type of deployment manifestation called it as StatefulSet.


            Here in this post, we will be experimenting with the most important deployment model that is StatefulSet which will be interconnected with the multiple storage related objects PersistantVolume(PV) and PersistentVolumeClaim (PVC).   

            Assumptions

            To work on this experiment you must have Kubernetes cluster running on single node or multi-node and it should have a NFS remote storage access that depends on your platform. Here I've EC2 instance having  NFS service configured and run:

            Let's define the couple of PV(4) using the NFS server which will be consumed by the PVC. The Stateful deployment is going to have the Pod and PVC template manifestation.

            Creating a YAML file for pvc :
            apiVersion: v1
            kind: PersistentVolume
            metadata:
              name: nfs-pv0
            spec:
              storageClassName: manual
              capacity:
                storage: 200Mi
              volumeMode: Filesystem
              accessModes:
                - ReadWriteOnce
              mountOptions:
                - hard
                - nfsvers=4.1
              nfs:
                path: /export/volume/pv0
                server: 172.31.46.253
            ---
            apiVersion: v1
            kind: PersistentVolume
            metadata:
              name: nfs-pv1
            spec:
              storageClassName: manual
              capacity:
                storage: 200Mi
              volumeMode: Filesystem
              accessModes:
                - ReadWriteOnce
              mountOptions:
                - hard
                - nfsvers=4.1
              nfs:
                path: /export/volume/pv1
                server: 172.31.46.253
            ---
            apiVersion: v1
            kind: PersistentVolume
            metadata:
              name: nfs-pv2
            spec:
              storageClassName: manual
              capacity:
                storage: 200Mi
              volumeMode: Filesystem
              accessModes:
                - ReadWriteOnce
              mountOptions:
                - hard
                - nfsvers=4.1
              nfs:
                path: /export/volume/pv2
                server: 172.31.46.253
            ---
            apiVersion: v1
            kind: PersistentVolume
            metadata:
              name: nfs-pv3
            spec:
              storageClassName: manual
              capacity:
                storage: 200Mi
              volumeMode: Filesystem
              accessModes:
                - ReadWriteOnce
              mountOptions:
                - hard
                - nfsvers=4.1
              nfs:
                path: /export/volume/pv3
                server: 172.31.46.253
            
            Now, use the following command to create the PVC:
            Syntax :
            kubectl create -f nfs-pv.yaml
            Output :
            Checking the PVC are created or not with the simple ls command :
            Syntax :
            ls
            Output :

            Using another YAML file for creating PV files :
            ---
            apiVersion: v1
            kind: Service
            metadata:
              name: nginx
              labels:
                app: nginx
            spec:
              ports:
              - port: 80
                name: web
              clusterIP: None
              selector:
                app: nginx
            ---
            apiVersion: apps/v1
            kind: StatefulSet
            metadata:
              name: web-sts
            spec:
              serviceName: "nginx"
              replicas: 4
              selector:
                matchLabels:
                  app: nginx
              template:
                metadata:
                  labels:
                    app: nginx
                spec:
                  containers:
                  - name: nginx
                    image: gcr.io/google_containers/nginx-slim:0.8
                    ports:
                    - containerPort: 80
                      name: web-sts
                    volumeMounts:
                    - name: www
                      mountPath: /usr/share/nginx/html
              volumeClaimTemplates:
              - metadata:
                  name: www
                spec:
                  storageClassName: manual
                  accessModes:
                    - ReadWriteOnce
                  resources:
                    requests:
                      storage: 100Mi 
            Now, use the following command to create the PV:
            Syntax:
            kubectl create -f web-sts.yaml
            Output :

            Checking the PV are created or not with the following command :

            Syntax :
            kubectl get pv 
            Output :

            Ready to use Statefulsets now, you can watch all the running terms at one place by using the below command :
            Syntax :
            watch kubectl get all
            Output :


            Thursday, May 7, 2020

            K8s Storage Volumes part 1 - EmptyDir

            Hello, Dear DevOps enthusiasts, In this post, we are going to explore the emptyDir Volume, which is going to work as local data share between containers in a Pod.

            I had read the book titled 'Kubernetes in action', from that book I want to understand Persistance Volumes and Persistence Volume Claims in detail. will run the following example for PV that uses emptyDir volume type.

            Every new learning is like a game! if you take each trouble as a game level it will be a wonderful game. Once you finish the desired state it's winning the game! why to wait let's jump on this game

            Kubernetes emptyDir Volume

            Assumptions

            • Docker installed
            • Kubernetes Installed and configured Cluster
            • AWS access to EC2 instances


            We need to create a Tomcat container and Logstash container in the Kubernetes pod. In the below diagram, it will share the log file using Kubernetes volume that is empty dir.


            The tomcat and Logstash cant use the network via localhost and it will share the filesystem.
            Creating a YAML file :

            apiVersion: apps/v1
            kind: Deployment
            metadata:
              name: tomcat
            spec:
              replicas: 1
              selector:
                matchLabels:
                    run: tomcat
              template:
                metadata:
                  labels:
                    run: tomcat
                spec:
                  containers:
                  - image: tomcat
                    name: tomcat
                    ports:
                      - containerPort: 8080
                    env:
                    - name: UMASK
                      value: "0022"
                    volumeMounts:
                      - mountPath: /usr/local/tomcat/logs
                        name: tomcat-log
                  - image: docker.elastic.co/logstash/logstash:7.4.2
                    name: logstash
                    args: ["-e input { file { path => \"/mnt/localhost_access_log.*\" } } output { stdout { codec => rubydebug } elasticsearch { hosts => [\"http://elasticsearch-svc.default.svc.cluster.local:9200\"] } }"]
                    volumeMounts:
                      - mountPath: /mnt
                        name: tomcat-log
                  volumes:
                    - name: tomcat-log
                      emptyDir: {}
            

            Output :


            Now, creating the tomcat and logstash pods.
            Syntax : 
            kubectl create -f tomcat-longstash.yaml
            Output :
            Now, checking the tomcat and logstash pods are ready.
            Syntax : 
            kubectl get pods
            Output :


            Troubleshooting levels:
            We have faced 2 levels of game-changers, when we tried to type the YAML file content it was a lot of indentations which matters a lot if you miss something it throughs error with hint as 'line numbers'. The most interesting thing when we define the two containers one after other, there is 'spec' should be handled properly.

            In level 2 it is another adventurous journey, the Logstash image is no longer available in the docker hub. we have tweaked here and there to find what best repo gives this. With the googling reached to the elastic.co where ELK related images are published after replacing of Logstash image name. The second level of game over end entered into next level!


            Finally, the last stage of the game, Connecting the logstash container and able to see the /mnt directory which contains logs that are generated from tomcat server. That concludes our experiment is successful.

            Syntax : 
            kubectl exec -it tomcat-646d5446d4-l5tlv -c logstash -- /bin/bash
            ls /mnt

            Output :

            Hence this will conclude that we can define the manifestation for the inter container sharing the storage.

            Enjoy this fun-filled learning on Kubernetes! contact us for support and help on the Infrastructure build and delivery.

            Wednesday, May 6, 2020

            K8s Storage NFS Server on AWS EC2 Instance

            Hello DevOps enthuiast, In this psot we would like to explore the options available on Kubernetes Storage and Volume configurations. Especially in AWS environment if we have provisioned the Kubernetes Cluster then how we can use the storage effectively, need to know all the options. In the sequence of learning on 'Kubernetes Storage' experimenting on the NFS server on AWS EC2 instance creation and using it as Persistent Volume. In the later part, we would use the PVC to claim the required space from the available PV. That in turn used inside the Pod as specifying a Volume. 

            Kubernetes Storage: NFS PV, PVC

            Assumptions

            • Assuming that you have AWS Console access to create EC2 instances. 
            • Basic awareness of the Docker Container Volumes
            • Understand the need for Persistency requirements

            Login to your aws console
            Go to EC2 Dashboard, click on the Launch instance button
            Step 1: Choose an AMI: "CentOS 7 (x86_64) - with updates HVM" Continue from Marketplace


            Step 2: Choose instance type:


            Step 3: Add storage: Go with default 1 vCPU, 2.5GHz and Intel Xeon Family, meory 1GB EBS, click 'Next'


            Step 5: Add Tags: Enter key as 'Name' and Value as 'NFS_Server'


            Step 6: Configure Security Group: select existing security group


            Step 7: Review instance Launch: click on 'Launch' button


            Select the existing key pair or create new key pair as per your need


             Now Let's use PUTTY terminal login as centos and switch to root user using 'sudo -i'
            yum install nfs-utils -y
            systemctl enable nfs-server
            systemctl start nfs-server
             mkdir /export/volume -p
            chmod 777 /export/volume
            vi /etc/exports
            
            write the following
              /export/volume *(no_root_squash,rw,sync)
            
            Now save and quit from vi editor and run the following command to update the Filesystem.
              exportfs -r
              
            Confirm the folder name by turning it to green colored by listing the folder.
              ls -ld /export/
              

            Here the NFS volume creation steps completed! ready to use. # Kuernetes PersistentVolume, PersistentVolumeClaim
            Create 'nfs-pv.yaml' file as:
            apiVersion: v1
            kind: PersistentVolume
            metadata:
              name: nfs-pv
            spec:
              capacity:
                storage: 5Gi
              volumeMode: Filesystem
              accessModes:
                - ReadWriteOnce
              mountOptions:
                - hard
                - nfsvers=4.1
              nfs:
                path: /export/volume
                server: 172.31.8.247
             
            Let's create the PersistentVolume with NFS mounted on separate EC2 instance.
              kubectl create -f nfs-pv.yaml
            
            Check the pv creation successful by kubectl command
              kubectl get pv
             

            Create PersistenceVolumeClaim

            Now create a pvc PersistentVolumeClaim with:
            apiVersion: v1
            kind: PersistentVolumeClaim
            metadata:
              name: my-nfs-claim
            spec:
              accessModes:
                - ReadWriteOnce
              volumeMode: Filesystem
              resources:
                requests:
                  storage: 5Gi
                  
            
            Now use the create subcommand:
              kubectl create -f my-nfs-claim.yaml
            
            Let's validate that PVC created
              kubectl get pvc
            
            Now all set to use a Database deployment inside a pod, let's choose MySQL.
            proceed with creating a file with name as mysql-deployment.yaml manifestation file:
            apiVersion: apps/v1 # for versions before 1.9.0 use apps/v1beta2
            kind: Deployment
            metadata:
              name: wordpress-mysql
              labels:
                app: wordpress
            spec:
              selector:
                matchLabels:
                  app: wordpress
                  tier: mysql
              strategy:
                type: Recreate
              template:
                metadata:
                  labels:
                    app: wordpress
                    tier: mysql
                spec:
                  containers:
                  - image: mysql:5.6
                    name: mysql
                    env:
                    - name: MYSQL_ROOT_PASSWORD
                      value: welcome1
                    ports:
                    - containerPort: 3306
                      name: mysql
                    volumeMounts:
                    - name: mysql-persistent-storage
                      mountPath: /var/lib/mysql
                  volumes:
                  - name: mysql-persistent-storage
                    persistentVolumeClaim:
                      claimName: my-nfs-claim
              
            Let's create the mysql deployment which will include the pod definitions as well.
            kubectl create -f mysql-deployment.yaml
            # Check the pod list
            kubectl get po -o wide -w
            
            >> Trouble in ContainerCreating take the name of the pod from the previous command.
            kubectl logs wordpress-mysql-xx
            
            check nfs mount point shared On the nfs-server ec2 instance
            exportfs -r
            exportfs -v
            

            Validation of nfs-mount: Using the nfs-server IP mount it on the master node and worker nodes.
            mount -t nfs 172.31.8.247:/export/volume /mnt
            
            Example execution:
            root@ip-172-31-35-204:/test
            # mount -t nfs 172.31.8.247:/export/volume /mnt
            mount: /mnt: bad option; for several filesystems (e.g. nfs, cifs) you might need a /sbin/mount.type helper program.
            
            The issue is with nfs on master and cluster verified with:
            ls -l /sbin/mount.nfs
            
            Example check it...
            root@ip-172-31-35-204:/test# ls -l /sbin/mount.nfs
            ls: cannot access '/sbin/mount.nfs': No such file or directory
            
            This confirms that nfs-common not installed on the master node. same thing required on worker nodes aswell. Fix: The client needs nfs-common:
            sudo apt-get install nfs-common -y
            
            Now you need th check that mount command works as expected.After confirming mount is working then unmount it.
            umount /mnt
            
            Check pod list, where the pod STATUS will be 'Running'.
            kubectl get po
            
            SUCCESSFUL!!! As Volume Storage is mounted we can proceed! Let's do the validation NFS volume Enter into the pod and see there is a volume created as per the deployment manifestation.
            kubectl exec -it wordpress-mysql-newpod-xy /bin/bash
            
            root@wordpress-mysql-886ff5dfc-qxmvh:/# mysql -u root -p
            Enter password:
            Welcome to the MySQL monitor.  Commands end with ; or \g.
            Your MySQL connection id is 2
            Server version: 5.6.48 MySQL Community Server (GPL)
            
            Copyright (c) 2000, 2020, Oracle and/or its affiliates. All rights reserved.
            
            Oracle is a registered trademark of Oracle Corporation and/or its
            affiliates. Other names may be trademarks of their respective
            owners.
            
            Type 'help;' or '\h' for help. Type '\c' to clear the current input statement.
            
            create database test_vol;
            
            
            mysql> create database test_vol;
            Query OK, 1 row affected (0.01 sec)
            
            show databases
            
            Test that persistant volume by deleting the pod
            kubectl get po
            kubectl delete po wordpress-mysql-886ff5dfc-qxmvh
            kubectl get po
            
            As it is auto healing applied and new pod will be created, inside the new pod expected to view the volume with
              kubectl exec -it wordpress-mysql-886ff5dfc-tn284 -- /bin/bash
            
            Inside the container now
            mysql -u root -p
            enter the password 
            
            Surely you could see that "test_vol" database accessible and available from this newly created pod.
            show databases;
            
            Hence it is proved that the volume used by pod can be reusable even when pod destroyed and recreated.
            Go and check the nfs-server mounted path /export/volume you can see the databases created by the mysql database will be visible. 

            Reference: https://unix.stackexchange.com/questions/65376/nfs-does-not-work-mount-wrong-fs-type-bad-option-bad-superblockx

            Thursday, April 30, 2020

            Kubernetes clustering in AWS EC2 (Ubuntu 18.04)

            In this post, I would like to share the manual steps that work to build a Kubernetes Cluster on Ubuntu 18.04 LTS. We will be using the Docker to install Kubernetes.


            The three-node cluster that we will be forming in this post will consist of one Master node and two Slave nodes. Therefore, follow the steps described below to install Kubernetes on Ubuntu nodes.


            Kubernetes Cluster configured on Ubuntu EC2 instances

            AWS setup for Kubernetes

            Step 1 : 

            Install three Ec2 instances in AWS console.
            The AMI we are choosing here is Ubuntu 18.04 LTS (HVM).
            Choose AMI
            In this step, we can choose any instances types with your own perspective. I have taken a general-purpose instance type. Click on "Next:Configure Instance Details".
            Instance Types 
            In configuring instance details we can directly create more instances if u give the number in the number of instances section. You can see in the below figure.Click on "Next:Add Storage".
            Instance details


            We can see storage here it is the same for all and it is enough to cluster the Kubernetes. So that we are not adding any particular storage. You can add storage to your requirements.Click on "Next:Add Tags".

            Storage
             Tag is a tab which is generally used to assign AWS resource. It contains a key and an optional value. These are user-defined values.It is not mandatory to add a tag.Click on "Next:Configure Security Group".
            Create a Tag
             Click on Add Rule and add HTTP & ALL TCP rule.You can generate your custom configure security groups and then Click on "Review and launch".
             Review everything and click on the "Launch" button on the bottom.

            Review
            If you click on the launch button it will default ask about key pair. It is used for connecting your AWS to gitbash. It is better to use your existing key pair and do not delete it.
            Selecting the Key pair to login to EC2 instance
            Here we get launching is done.
            Launch successful
            Instances have been launched and you can see the instance states in the below image.
            Instances
            Step 2 :
            In this step, access your instances as shown in the below image. Here in the place of ec2-13-235-134-115.ap-south-1.compute.amazonaws.com, we have taken the IPv4 Public Ip address.


            The terminal we are using here is Git Bash. Open three Git Bash terminals and you need to connect the three nodes in the same way for every step that is coming up.


            Kubernetes installation on Ubuntu 18.04

            Step 1: Pre-requisites install docker

            We need to install the latest version of the docker in three nodes with the below command in the terminal.

            # Check the hostname and the IP address are sync in the hosts file
            cat /etc/hosts
            #If not please edit the /etc/hosts file
            hostname -i #should show the IP ADDRESS against the hostname that is mapped
            #Install Docker better option is convenence script
            apt install docker.io


            Add caption

            To check for the docker version number the below code is used.

            docker version 


            Step 2: Auto start enable for docker

            We need to enable docker on these three nodes to automatically start when next reboot happens by running the following command.

            systemctl enable docker
            

            Step 3 : Install curl command

            To transfer the data to the URL we use curl. Run the below command :

            sudo apt install curl -y 


            Step 4 :

            To access the signing keys we need to run the below command :

            curl -s https://packages.cloud.google.com/apt/doc/apt-key.gpg | sudo apt-key add 


            Step 5 :

            For connecting your Xenial Kubernetes repository just run the below code :
            apt-add-repository "deb http://apt.kubernetes.io/ kubernetes-xenial main" 


            Step 6 :

            To create the kubernetes clustering nodes for faster access path we run the below code :
            apt install kubeadm -y 


            Check for the Kubernetes version after installing it. Run the below code to get version.

            kubeadm version

            Kubernetes Deployment :

            Step 1 :

            For starting Kubernetes deployment first we need to check for swap memory.
            Run the command shown here :
            cat /etc/fstab
            free -m

            As you can see swap is 0 it means no swap memory if you are having the swap memory use the following code :
            sudo swapoff -a
            Run the below command in master node to process the slave nodes this command output is mandatory.

            On local VM try:
            kubeadm init  --apiserver-advertise-address=192.168.33.250 --pod-network-cidr=192.168.0.0/16 --ignore-preflight-errors="all" 
            On AWS VM:
            kubeadm init --pod-network-cidr=192.168.0.0/16 --ignore-preflight-errors="all" 


            Run these general commands to your cluster.
            mkdir -p $HOME/.kube
            sudo cp -i /etc/kubernetes/admin.conf $HOME/.kube/config
            sudo chown $(id -u):$(id -g) $HOME/.kube/config

            Deployment of Flannel pod network on cluster.
            kubectl apply -f https://raw.githubusercontent.com/coreos/flannel/master/Documentation/kube-flannel.yml


            Check for the status network and To do this run the below command :
            kubectl get pods --all-namespaces


            Check the status of nodes :
            kubectl get nodes
            In the slave node running the below command to generate Kubernetes on the master node:
            kubeadm join 192.168.100.6:6443 --token 06tl4c.oqn35jzecidg0r0m --discovery-token-ca-cert-hash  sha256:c40f5fa0aba6ba311efcdb0e8cb637ae0eb8ce27b7a03d47be6d966142f2204cf 


            kubectl get nodes


            Happy to see that nodes are joining!! 

            Categories

            Kubernetes (24) Docker (20) git (13) Jenkins (12) AWS (7) Jenkins CI (5) Vagrant (5) K8s (4) VirtualBox (4) CentOS7 (3) docker registry (3) docker-ee (3) ucp (3) Jenkins Automation (2) Jenkins Master Slave (2) Jenkins Project (2) containers (2) docker EE (2) docker private registry (2) dockers (2) dtr (2) kubeadm (2) kubectl (2) kubelet (2) openssl (2) Alert Manager CLI (1) AlertManager (1) Apache Maven (1) Best DevOps interview questions (1) CentOS (1) Container as a Service (1) DevOps Interview Questions (1) Docker 19 CE on Ubuntu 19.04 (1) Docker Tutorial (1) Docker UCP (1) Docker installation on Ubunutu (1) Docker interview questions (1) Docker on PowerShell (1) Docker on Windows (1) Docker version (1) Docker-ee installation on CentOS (1) DockerHub (1) Features of DTR (1) Fedora (1) Freestyle Project (1) Git Install on CentOS (1) Git Install on Oracle Linux (1) Git Install on RHEL (1) Git Source based installation (1) Git line ending setup (1) Git migration (1) Grafana on Windows (1) Install DTR (1) Install Docker on Windows Server (1) Install Maven on CentOS (1) Issues (1) Jenkins CI server on AWS instance (1) Jenkins First Job (1) Jenkins Installation on CentOS7 (1) Jenkins Master (1) Jenkins automatic build (1) Jenkins installation on Ubuntu 18.04 (1) Jenkins integration with GitHub server (1) Jenkins on AWS Ubuntu (1) Kubernetes Cluster provisioning (1) Kubernetes interview questions (1) Kuberntes Installation (1) Maven (1) Maven installation on Unix (1) Operations interview Questions (1) Oracle Linux (1) Personal access tokens on GitHub (1) Problem in Docker (1) Prometheus (1) Prometheus CLI (1) RHEL (1) SCM (1) SCM Poll (1) SRE interview questions (1) Troubleshooting (1) Uninstall Git (1) Uninstall Git on CentOS7 (1) Universal Control Plane (1) Vagrantfile (1) amtool (1) aws IAM Role (1) aws policy (1) caas (1) chef installation (1) create deployment (1) create organization on UCP (1) create team on UCP (1) docker CE (1) docker UCP console (1) docker command line (1) docker commands (1) docker community edition (1) docker container (1) docker editions (1) docker enterprise edition (1) docker enterprise edition deep dive (1) docker for windows (1) docker hub (1) docker installation (1) docker node (1) docker releases (1) docker secure registry (1) docker service (1) docker swarm init (1) docker swarm join (1) docker trusted registry (1) elasticBeanStalk (1) global configurations (1) helm installation issue (1) mvn (1) namespaces (1) promtool (1) service creation (1) slack (1)