After User creation you can see the updates as shown in the SonarQube Administration console select the tab Security and in the newly created User click on the Update Token
a. Enter Token Name: Jenkins CI admin
b. Generate
c. Copy the token value that can be used in the Jenkins Global credential creation scope as "secret text"
After Token Generation completes click on the "Done".
Running Jenkins on Docker
This step is optional step, you can have a individually Jenkins installed on your VM.
docker run --name jenkins-master -u root --rm \
 -d -p 8081:8080  -p 50001:50000 \
 -v jenkins-data:/var/jenkins_home \
 -v /var/run/docker.sock:/var/run/docker.sock \
 jenkinsci/blueocean
On the PWD automatically opens 8081 if not manually you can open that port, To view log files of Jenkins container you can run the following:
docker logs jenkins-master
On the Jenkins Dashboard Sample credentials :
SonarQube : admin/welcome1
Jenkins: ci-admin/welcome123
Jenkins Integration Setup for SonarQube
Step 1. Install plugin - SonarQube Scanner
Navigate to Manage Jenkins > Manage Plugin > Available > on the search for the word 'sonarqube' select SonarQube Scanner to "Install without resart".
 |
| SonarQube Scanner plugin installation |
Configure System for SonarQube
Step 2: Configure SonarQube Server on the Jenkins
Manage Jenkins > Configure System > SonarQube Server
a. Select the check box - Environment variables Enable injection of SonarQube server configuration as build environment variables
Here you can give any name which is easy to represent that SonarQube Server. And enter the SonarQube Server URL and Save this confiburation.
 |
| Configure System on Jenkins for SonarQube Server |
b. click on the 'Add SonarQube' under section SonarQube installations
SonarQube URL [ You can enter your SonarQube running URL here]
http://ip172-18-0-13-c1ja09je75e000b5n1m0-9000.direct.labs.play-with-docker.com/projects
c. Please enter the server authentication token clicks on the 'Add' button to SonarQube authentication token.
Select the 'Secret Text' option.
Keep in Global scope. Mandatory when anonymous access is disabled. [Remember this Token which you have generated and saved on the SonarQube console]
d. Save this SonarQube 'Configure System'.
Sonar scanner installation on Jenkins Container
Enter into the Jenkins-master container and then do the following steps
1. Download Sonar scanner zip file
2. unzip it to /opt path rename the folder with sonar-scanner instead of having lengthy version attached.
3. modify the sonar-runner.properties file by adding following line
Assuming you are using Docker Jenkins container so entering into the container
$ docker exec -it jenkins-master bash
cd /tmp
wget https://binaries.sonarsource.com/Distribution/sonar-scanner-cli/sonar-scanner-cli-4.6.0.2311-linux.zip
unzip sonar-scanner-cli-4.6.0.2311-linux.zip -d /opt
cd /opt
mv sonar-scanner-4.6.0.2311-linux sonar-scanner
ls # confirm
modify the properties file present in the conf folder
vi /opt/sonar-scanner/conf/sonar-scanner.properties
Now update the line as follows:
#----- Default SonarQube server
#sonar.host.url=http://localhost:9000
sonar.host.url=http://192.168.0.28:9000
update only the Default SonarQube server url line as shown above.
Reference link : https://binaries.sonarsource.com/Distribution/sonar-scanner-cli/sonar-scanner-cli-4.6.0.2311-linux.zip
Global Tool Configuration
On the Global tool configuration page search for the "SonarQube Scanner" section under SonarQube Scanner Installation, Click on the "Add SonarQube Scanner" button
a. SonarQube Scanner Name: sonarqube-scanner
b. Deselect the 'Install Automatically' option. Enter the path for SONARQUBE_RUNNER_HOME /opt/sonar-scanner, make sure that correct path you have used here.
c. 'Apply and Save' the Global Tool configuration
Now all set to run the Jenkins Job!
Create Jenkins FreeStyle project
1. Create Job - Name it as 'SonarCodeAnalysisJob'
2. Source Code management: Git Url where code resides to scan.
Example I've used: https://github.com/BhavaniShekhar/my-app.git
a. Please enter the Git repo URL :
https://samsonawane@bitbucket.org/websym12/sampleweb.git
b. Add Credentials -> use Jenkins Credential provider on the pop-up window to enter the username and password for your git URL to access. then back select the newly created credentials. \
 |
| Jenkins Credentials Provider for Jenkins |
Select the GitHub credentials [optional if GIT repo is Public not required]
 |
| Git as SCM on Jenkins |
3. Go to the Build section
"Execute SonarQube Scanner" Task to run
JDK to be used for the sonar analysis
path to project properties
Analysis properties
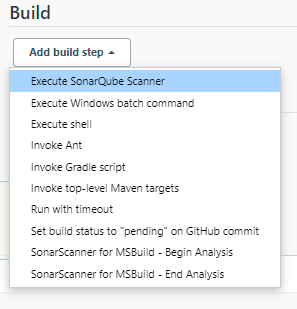 |
| Jenkins Build select Execute SonarQube Scanner |
        #Required props as metadata
        sonar.projectKey=Vybhava
        sonar.projectName=Robotics
        sonar.projectVersion=1.0

        #Path to source code
        sonar.sources=/var/jenkins_home/workspace/$JOB_NAME/src
Additional arguments
JVM Options
Save the job
Click on '
Build Now'.
It should trigger SonarQube Server Report


Comments