Saturday, December 28, 2019

Docker Storage and Volumes


In this blog-post, I would like to discuss Docker Storage and storage drivers and Application data management using Docker Volumes. Every fact we explore in detailed experimented and collected and published here.

Docker Container Persistent Storage

When you see the word 'Storage' we get in mind that HARD disk, CD, DVD, pen drive, shared NFS, etc., For Docker storage that referred to the storage of images, containers, volumes and we need to store the data that belongs to an application. It may be an application code or database that referred to in the application service. Each one has its own isolation with others. 

Actual physical Storage deals with different devices. Linux got the Logical storage devices where you can make use of single disk into multiple disks drives called logical drives as we see in Windows (C: D:). Disk space can be shared across multiple containers partition of disks and a group of partitions. Docker uses this capability with special storage drivers.

Which bit is which part of the drive is known by using the filesystem. Docker uses the FUSE filesystem.

Docker persistence Storage Volume

 Manage Application data

Overlay2 is the default and preferred storage driver in most modern Linux platforms.
device-mapper is generally preferred when we want to take advantage of LVM.

 What is Docker CoW?

The secret of Docker is Unix COW(Copy on Write) is a key capability that helped to build Docker container storage. CoWs movement is pretty simple the content of the layers are moved between containers in gzip files copy-on-write is a strategy of sharing and copying for maximum efficiency it saves space and also reduces startup time.

The data appears to be a copy, but is only a link (or reference) to the original data the actual copy happens only when someone tries to change the shared data whoever changes the shared data ends up sharing their own copy instead.
 

 Why CoW?

The race condition challenge in Linux from COW is handled by kernel's memory subsystem with private memory mappings. Create a new process quickly using fork() even if is many GB of RAM
Changes are visible only to the current process, private maps are fast even on huge files it uses mmap() fr map files MAP_PRIVATE. How does it work? The answer is MMU ( Memory Management Unit) Here each memory access translates  to an actual physical location, alternatively a page fault

What happens without CoW?

  • It would take forever to start a container
  • The container would use up a lot of space
  • Without copy-on-write on your desktop
  • Docker would not be usable on your Linux machine
  • There is no docker at all


How do you know what Storage-Driver in use?

To know the docker storage driver information we can use the 'docker info' command one of the attributes that show 'Storage Driver' value. We can use JSON query tool 'jq' which is available in all Latest Linux platforms.

docker info -f '{{json .}}'|jq -r '.Driver'

or else you can use the -f or --format option as follows:
docker info -f 'Storage Driver: {{.Driver}}'
docker info --format '{{.Driver}}'

Let's run this commands
Docker Info JSON format extraction methods

Selecting Docker storage drivers

  • The storage driver handles the details about the way how to interact with each other layers.
  • The storage driver controls how images and containers are stored and managed on your Docker host.
  • To create data in the writable layer of the container
  • No persistence of data in containers
  • use stackable image layers and the copy-on-write (CoW) strategy

Docker Bind mount

Bind mounts can only be mounted inside the container in the read-only and read-write mode so they are flexible as per the need to prevent file corruption.

 Docker tmpfs mounts

tmpfs are only available for Linux platforms.
tmpfs Sample 1:
docker run -d -it \
 --name tmptest1 \
 --mount type=tmpfs,destination=/app \
  nginx:latest 

docker container inspect tmptest1
docker container stop tmptest1
docker container rm tmptest1
or 
docker container rm -v -f tmptest1

Sample tmpfs for a container

tmpfs Sample 2: If we don't mention the destination what will be considers as container path. let's see
docker run -d -it --name tmptest2 \
 --tmpfs /app \
 nginx:latest 
# Understand the source and destinations paths
docker container inspect --format '{{json .Mounts}}' tmptest2
docker container inspect -f '{{.HostConfig.Mounts}}' tmptest2
docker container stop tmptest2
docker container rm tmptest2

Sample 2  tmpfs in Docker


Docker Volume

The Docker Volumes are easier to backup or migrate than the bind mounts
The interesting feature of Volumes is that they work on both Linux and Windows container’s
New volumes can have their content pre-populated by a container.
Volumes can be managed with both CLI and API.

Create Docker Volumes
There are two methods to create a docker volume

  • Container creation does the local volume using –v option
  • Container creation using --mount option
Let's see both examples of how they work for containers.

Container and Volume Relationship

Docker containers are ephemeral as much as possible. By removing a container DOESN'T remove the volume attached to it. Let's experiment with it, As we know Volumes are persistent attachable storage that holds data in a folder on the Host machine and it has a mapping inside the docker container as a mounted volume.
#Check the available Volumes list
docker volume ls 

# Create a Volume name it as web-volume
docker volume create web-volume

# Use the newly created volume 'web-volume' with nginx container 'myweb'
docker run -d --name myweb \
--mount source=web-volume,destination=/usr/share/nginx/html nginx

# Stop the Container and remove container 'myweb'
docker container stop myweb && docker container rm myweb

# Validate the list of Volumes - still web-volume exists
docker volume ls 
The execution goes as shown below:
Docker volume persistent example 
Hence the experiment concludes that after the removal of the container, still, the volume exists which we can reuse further by creating new containers and attach to this volume.

  Storage and Volumes References

For Any kind of Docker Containerization support - please call us on +91 9618715457
Let's see the external storage how to use within container in another super exciting post


Sunday, December 22, 2019

Docker Trusted Registry (DTR) deep dive

This post is a continuous post of Docker Enterprise edition on CentOS7 usage.
Let's understand the usage of the DTR. How we can integrate it with Docker UCP? How the DTR help us to maintain the docker repository easy way. What benefits we can get with DTR?

As we had already installed docker-ee and UCP deployed on it with swarm cluster on a CentOS7.

What is new in Docker Trusted Registry?

Here I've collected some of the DTR Primary Usage Scenarios

CI/CD with Docker

• Image repository - Centrally located base images
• Simple upgrades - Store individual build images
• Scan and Pull tested images to production

Containers as a Service (CaaS)

• Deploy Jenkins executors or nodes
• Instant-on developer environment
• Selected curated apps from a catalog
• Dynamic composition of micro-services (“PAAS”)

General Features

• Organizations, Teams & Repositories permissions UI
• Search index, API & UI
• Interactive API documentation
• Image deletion from index
• Image garbage collection Experimental
• Docker Content Trust: View Docker Notary signatures in DTR
• Admin & Health UI
• Registry Storage Status
• LDAP/AD Integration
• RBAC API (Admin, R/W, R/O)
• User actions/API audit logs
• Registry v2 API & v2 Image Support
• One-click install/upgrade

Cloud Platform Features 

• Docker Storage drivers for the filesystem, AWS s3, and Microsoft azure 
• Support Tooling 
• Support for Ubuntu, RHEL, CentOS and Windows 10

Docker Trusted Registry DTR Flow

System Requirement for DTR


The RAM requirement is high which is 16 GB size to run the DTR in the production system.
DTR cannot be installed where UCP installed that is not on the Swarm master node. Because the UCP uses default ports 80 and 443 in the master node, where DTR also needs the same ports to run so other nodes are preferable. Hence I'm using node1 to have DTR.


  • DTR requires Docker Universal Control Plane UCP to run you need to install UCP on all swarm nodes where you plan to install DTR.

Install Docker Trusted Registry DTR

This is a simple docker container running the command with the latest DTR version to deploy on the docker enterprise engine.

 
#Installing Docker Trusted Registry (DTR)
docker run -it \
 --rm docker/dtr:2.4.12 install \
 --ucp-insecure-tls 

The installation will links to the UCP that we had installed already.
Get the DTR Connected from the UCP console. Go to the 'Admin Settings'

Admin Settings on UCP Console to view Docker Trusted Registry installed


Access the DTR console

Let's login to the DTR console, From the UCP Console, we got that where the DTR installed successfully that URL. Because we have not used trusted certs it will proceed only after accepting the Security Exception in the browser.

docker trusted registry (DTR) login 
Here the user credentials are the same as given for UCP.


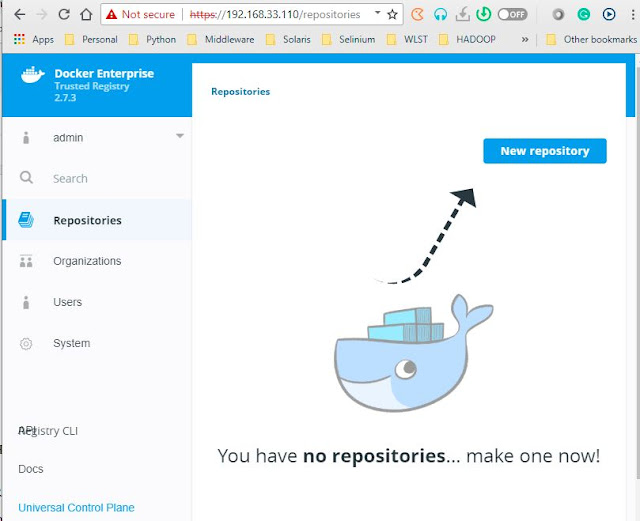
DTR Console looks almost similar to UCP console, You can proceed to create the new repository, where the pointer showing!

Extra bite

Where this DTR container is running let's see what all those containers created

docker trusted registry containers list

DTR Backup Notes


When you do backup DTR following will be taken care:

  • Configurations are backed up
  • Certificate and keys are backed up
  • Repository metadata are backed up


User, Orgs, and teams are not backed up with DTR backup.


References


Official Document on DTR
Slide on DTR Features
DTR Back up


Saturday, December 21, 2019

Docker Security

Hey, dear Docker DevOps enthusiast! In this post we will discuss about docker security, docker service security, docker engine-level security, etc.

SELinux is Security-Enhanced Linux

it provides a mechanism for supporting access control security policies
SELinux is a set of kernel modifications and user-space tools that have been added to various Linux distros.

The 'root' user by default owns the processes spawned by a container are run.

secgroup limits the disk quota.

Security Issue


Rotate your join-token for both worker and manager when there is a suspicion that someone might have got access to the token for adding managers to the cluster.

Secretes are immutable in a docker swarm cluster. They cannot be updated sof if you want to modify the secret then you have to create a new secret file and update that to the existing service.
step 1: First we need to Create new secret,
step 2: Attach the newly created secret with an update option the service to use this new secret.
step 3: The Service resart may require - docker swarm cluster would take car of that
step 4: and delete the old secret


 docker service update --help |grep secret

      --secret-add secret                  Add or update a secret on a service

      --secret-rm list                     Remove a secret


secrets and configs are encrypted during transit and at rest in a docker swarm.
Configs operate in a similar way to secrets, except that they are not encrypted at rest and are mounted directly into the container’s filesystem without the use of RAM disks. Configs can be added or removed from a service at any time, and services can share a config.


The default location of secrets inside a Docker container '/run/secrets/'. The default locaiton of a config file when using Docker config '/'.

References:


Install and setup for the Docker Compose

Hello DevOps enthusiast, In this post, We will discuss docker-compose why we need and how it can resolve the multi-container application issues. What is it's limitations?

How Docker-compose works?


What is Docker-compose? why?

If we are working on multi-container apps then it is a hassle because we would be doing repeatedly the following tasks:

  • Build images from Dockerfiles 
  • Pull images from the Hub or a private registry 
  • Configure and create multiple containers for each service required to run the application
  • Start and stop containers individually each one
  • Stream their logs to check the status and troubleshoot

In contrast to all the above hassles, The Docker compose developed as best tool for defining & running multi-container docker applications. We can use YAML files to configure application services (docker-compose.yml) Simplified control for multi-container applications - we can start all services with a single command: docker compose up and can stop all services with a single command: docker compose down

Docker-compose can be used to scale up selected services when required

Features of docker-compose


  • We can define and run multi-containerized Docker applications where it could be database, web server, proxy containers to run the complete application.
  • Docker-compose uses single YAML file to configure all applications dependent services
  • The docker-compose is powerful with a single command, we can create and start all the services from the configuration.
  • Mainly for dev and test environments can be used for repetitive tasks which deals with Docker containers 
  • We can build multiple isolated environments on a single host
  • It preserves volume data when containers are created using docker-compose.yaml file.
  • Docker-compose has a wonderful feature that, Only recreate containers that have changes
  • We could define the variables and moving a composition between environments such as development to test or staging.


Installing Docker-compose

There are two ways to install the docker-compose :
  1.  Using GitHub
  2.  Using pip install 

Using GitHub download 

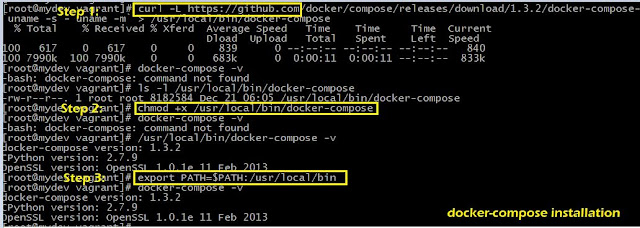
Step 1: Run the following curl command to download from the GitHub the current stable release of Docker-compose
Old compose worked! But it don't support all compose versions.
sudo curl -L https://github.com/docker/compose/releases/download/1.3.2/docker-compose-`uname -s`-`uname -m` > /usr/local/bin/docker-compose 
Better option to use latest version always! take the stable version from the GitHub
sudo curl -L https://github.com/docker/compose/releases/download/v2.2.3/docker-compose-`uname -s`-`uname -m` > /usr/local/bin/docker-compose 
Step 2: Apply executable permissions to the docker-compose binary:
ls -l /usr/local/bin/docker-compose #You must be in root user
chmod +x /usr/local/bin/docker-compose 
ls -l /usr/local/bin/docker-compose #Ensure the docker-compose file have execute permissions
Step 3: set the ENV var with the latest path in the bashrc or .bashprofile
echo "export PATH=$PATH:/usr/local/bin" >> .bashrc
Step 4: Check the version of docker-compose command
docker-compose -v

Install docker-compose using GitHub download

Best References for docker-compose:


Friday, December 13, 2019

Docker Networking

Hello, dear DevOps enthusiast, welcome back to DevOpsHunter learners site! In this post, we would like to explore the docker networking models and different types of network drivers and their benefits.

What is Docker Networking?

Understanding docker networking

Docker provided multiple network drivers plugin installed as part of Library along with Docker installation. You have choice and flexibilities. Basically the classification happen based on the number of host participation. SinbleHost WILL 

Let's see the types of network drivers in docker ecosystem.

docker network overview

Docker Contianers are aim to built tiny size so there may be some of the regular network commands may not be available. We need to install them inside containers.

Issue #1 Inside my container ip or ifconfig not working, How to resolve 'ip' command not working?

Solution:
  apt update;  apt install -y iproute2  


Issue #2: ping command not working how to resolve this ?? Solution: Go inside your container
  apt update;  apt install -y iputils-ping  
  

What is the purpose of Docker Network?


  • Containers need to communicate with external world (network)
  • Reachable from external world to provide service (web applications must be accessable)
  • Allow Containers to talk to Host machine (container to host)
  • inter-container connectivity in same host and multi-host (container to container)
  • Discover services provided by containers automatically (search other services)
  • Load balance network traffic between many containers in a service (entry to containerization)
  • Secure multi-tenant services (Cloud specific network capability)
Features of Docker network
  • Type of network-specific network can be used for internet connectivity
  • Publishing ports - open the access to services runs in a container
  • DNS - Custom DNS setting Load balancing - allow, deny with iptables
  • Traffic flow - application access Logging - where logs should go # check the list of docker networking

To explore docker network object related commands you can use --help

docker network help output

Listing of docker default networks. It also shows three network driver options ready to use :
docker network ls 

# There are 3 types of network drivers in Docker-CE Installation with local scoped(Single host) which are ready to use - bridge, host, null. There is the significance in each type of driver.

docker network create --driver bridge app-net
docker network ls
# To remove a docker network use rm
docker network rm app-net
Let's experiment
docker run -d -it --name con1 alpine
docker exec -it con1 sh
# able to communicate with outbound responses
ping google.com

To check the network route table entries inside a container and on your Linux box where Docker Engine hosted:
ip route
or 
ip r

we are good to go for validate that from con1 container able to communicate other container con2 ping con2 # Bridge utility if it is not found then install
yum -y install bridge-utils
# check the bridge and its associated virtual eth cards brctl show

The 'brctl' show command output

There is the mapping of IP address shows the bridge attached to container

Default Bridge Network in Docker

The following experiment will let you understand the default bridge network that is already available when the docker daemon is in execution.


docker run -d -it --name con1 alpine
docker run -d -it --name con2 alpine

docker ps
docker inspect bridge

default bridge network connected with con1, con2
After looking into the inspect command out you will completely get the idea how the bridge works.

Now let's identify the containers con1 and con2
docker exec -it con1 sh
ip addr show
ping -c 4 google.com
ping -c 4 ipaddr-con2
ping -c 4 con2        --- should not work means dns will not work for default bridges
exit
# remove the containers which we tested docker rm -v -f con1 con2

User-defined Bridge Network


docker network create --driver bridge mynetwork
docker network ls
docker inspect mynetwork

docker run -d -it --name con1 --network mynetwork alpine
docker run -d -it --name con2 --network mynetwork alpine

docker ps
docker inspect mynetwork

Now let's see inside the container with the following:
docker exec -it con1 sh
ip addr show
ping -c 4 google.com
ping -c 4 ipaddr-con2
ping -c 4 con2        --- should WORKS, that means dns is avaialable in mynetwork
exit 

Clean up of all the containers after the above experiment
docker rm -v -f con1 con2 #cleanup
Now we can check the connection between two user defined bridge networks.

docker network create --driver bridge mynetwork1
docker network create --driver bridge mynetwork2

docker run -d -it --name con1 --network mynetwork1 alpine
docker run -d -it --name con2 --network mynetwork1 alpine

docker run -d -it --name con3 --network mynetwork2 alpine
docker run -d -it --name con4 --network mynetwork2 alpine

docker inspect mynetwork1
docker inspect mynetwork2

Now we can get the IP Address of containers of both the networks, using the 'docker inspect' command
docker exec -it con1 sh
ping -c 4 ipaddr-con3 #get the ip address using docker container inspect con3
ping -c 4 con3 # This will not work because two bridges isolated

Docker Host networking diriver

Now in the experiment of Host Network example


 docker run --rm -d --network host --name my_nginx nginx
 curl localhost
Now you know about how to run a container attached to a network, But now a container created already with default bridge network that can be attach to a custom bridge network is it possible ? is that have same IP address?

How to connect a user-defined network object with running Container?

We can move a docker container from default bridge network to a user defined bridge network it is possible. When this change happen the container IP address dynamically changes. 

docker  network connect command is used to connect a running container to an existing user-defined bridge. The syntax as follows:
 docker network connect [OPTIONS] NETWORK CONTAINER

Example my_nginx already running container.
docker run -dit --name ng2 \
  --publish 8080:80 \
  nginx:latest 

docker network connect mynetwork ng2

Observe after connecting to User defined bridge network check the IP Address of the container.

To disconnect use the following:
docker network disconnect mynetwork ng2
Once the disconnected check the IP Address of the container ng2 using 'docker container inspect ug2'. This will concludes that container can be migrated from one network to other without stopping it. There is no errors while performing this.

Overlay Network for Multi-host


Docker overlay network will be part of Docker swarm or Kubernetes where you have Multi-Host Docker ecosystem.
docker network create --driver overlay net-overlay
# above command fails with ERROR
docker network ls
The overlay networks will be visible in the network list once you activate the Swarm on your Docker Engine. and for network overlay driver plugins that support it you can create multiple subnetworks. #if swarm not initialized use following command with the IP Address of your Docker Host
docker swarm init --advertise-addr 10.0.2.15
Overlay Network will serve the containers association with Docker 'service' object instead of 'container' object. # scope of the overlay shows swarm
docker service create --help
# Create service of nginx 
docker service create --network=net-overlay --name=app1 --replicas=4 ngnix
docker service ls|grep app1 
docker service inspect app1 |more # look for the VirtualIPs in th output

Docker Overlay driver allows us not only multi-host communication, the overlay driver plugins that support it you can create multiple subnetworks.
docker network create -d overlay \
                --subnet=192.168.0.0/16 \
                --subnet=192.170.0.0/16 \
                --gateway=192.168.0.100 \
                --gateway=192.170.0.100 \
                --ip-range=192.168.1.0/24 \
                --aux-address="my-router=192.168.1.5" --aux-address="my-switch=192.168.1.6" \
                --aux-address="my-printer=192.170.1.5" --aux-address="my-nas=192.170.1.6" \
                my-multihost-network
docker network ls
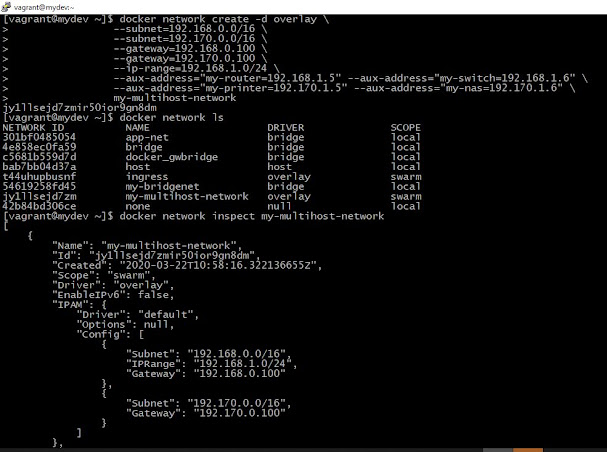
docker network inspect my-multihost-network # Check the subnets listed out of this command
The output as follows:
 

Docker doc has an interesting Network summary same as it says --

  • User-defined bridge networks are best when you need multiple containers to communicate on the same Docker host.
  • Host networks are best when the network stack should not be isolated from the Docker host, but you want other aspects of the container to be isolated.
  • Overlay networks are best when you need containers running on different Docker hosts to communicate, or when multiple applications work together using swarm services.
  • Macvlan networks are best when you are migrating from a VM setup or need your containers to look like physical hosts on your network, each with a unique MAC address.

Reference:


  1. Docker Networking: https://success.docker.com/article/networking 
  2. User-define bridge network : https://docs.docker.com/network/bridge/ 
  3. Docker Expose Ports externally: https://bobcares.com/blog/docker-port-expose/

Categories

Kubernetes (24) Docker (20) git (13) Jenkins (12) AWS (7) Jenkins CI (5) Vagrant (5) K8s (4) VirtualBox (4) CentOS7 (3) docker registry (3) docker-ee (3) ucp (3) Jenkins Automation (2) Jenkins Master Slave (2) Jenkins Project (2) containers (2) docker EE (2) docker private registry (2) dockers (2) dtr (2) kubeadm (2) kubectl (2) kubelet (2) openssl (2) Alert Manager CLI (1) AlertManager (1) Apache Maven (1) Best DevOps interview questions (1) CentOS (1) Container as a Service (1) DevOps Interview Questions (1) Docker 19 CE on Ubuntu 19.04 (1) Docker Tutorial (1) Docker UCP (1) Docker installation on Ubunutu (1) Docker interview questions (1) Docker on PowerShell (1) Docker on Windows (1) Docker version (1) Docker-ee installation on CentOS (1) DockerHub (1) Features of DTR (1) Fedora (1) Freestyle Project (1) Git Install on CentOS (1) Git Install on Oracle Linux (1) Git Install on RHEL (1) Git Source based installation (1) Git line ending setup (1) Git migration (1) Grafana on Windows (1) Install DTR (1) Install Docker on Windows Server (1) Install Maven on CentOS (1) Issues (1) Jenkins CI server on AWS instance (1) Jenkins First Job (1) Jenkins Installation on CentOS7 (1) Jenkins Master (1) Jenkins automatic build (1) Jenkins installation on Ubuntu 18.04 (1) Jenkins integration with GitHub server (1) Jenkins on AWS Ubuntu (1) Kubernetes Cluster provisioning (1) Kubernetes interview questions (1) Kuberntes Installation (1) Maven (1) Maven installation on Unix (1) Operations interview Questions (1) Oracle Linux (1) Personal access tokens on GitHub (1) Problem in Docker (1) Prometheus (1) Prometheus CLI (1) RHEL (1) SCM (1) SCM Poll (1) SRE interview questions (1) Troubleshooting (1) Uninstall Git (1) Uninstall Git on CentOS7 (1) Universal Control Plane (1) Vagrantfile (1) amtool (1) aws IAM Role (1) aws policy (1) caas (1) chef installation (1) create deployment (1) create organization on UCP (1) create team on UCP (1) docker CE (1) docker UCP console (1) docker command line (1) docker commands (1) docker community edition (1) docker container (1) docker editions (1) docker enterprise edition (1) docker enterprise edition deep dive (1) docker for windows (1) docker hub (1) docker installation (1) docker node (1) docker releases (1) docker secure registry (1) docker service (1) docker swarm init (1) docker swarm join (1) docker trusted registry (1) elasticBeanStalk (1) global configurations (1) helm installation issue (1) mvn (1) namespaces (1) promtool (1) service creation (1) slack (1)