Jenkins installation on Windows
Hello DevOps Guys, We will install the Jenkins Controller on the Windows machine.
How to install Jenkins on Windows machine?
Here in this post we will explore Step-by-Step installation instructions for Jenkins on Windows platform.
 |
| Jenkins installation on Windows |
Step 1: Install and set Java
Please visit the Oracle Java SE download page: http://www.oracle.com/technetwork/java/javase/downloads/index.html .
Oracle providing the new option on the download page, that is "JDK Script Friendly URLs" page. Choose the JDK for your operating system (Windows 10 or 11) 64bit to download. Double click downloaded file launches installer wizard, proceed with the agree and set up the installation location as per your disk/drive availability.
Verification of Java installation
Open a CMD prompt run "java -version" if Java installed correctly in the PATH you will get the installed version as output. if not set the PATH from the type ENVIRONMENT VARAIABLES search ->EDIT ENVIRONMENT VARAIABLES in the USER VARIABLES section add new variable as JAVA_HOME -> C:\Program Files\Java. and then set PATH with %JAVA_HOME%\bin;%PATH% and launch a fresh CMD prompt and re-test.
java -versionSetting JAVA_HOME path manually on your CMD
SET JAVA_HOME="C:\Program Files\Java\jdk-11.0.14"
SET PATH= %JAVA_HOME%\bin;%PATH%
java -version
should return Java version as jdk-11.0.14.
 |
| Checking Java version on Windows Command Prompt |
Once Java all set then next we are good to go for Jenkins download.
Step 2: Download and install Jenkins
I believe that a Picture tells 1000 words of worth! visit jenkins download page link, you may be on Windows 10 or 11(At the time of this blog post Windows versions).
 |
| Jenkins download for Windows |
2.1 Welcome Screen


 |
| Jenkins completed setup |
Step 3: How to run Jenkins server on Windows?
cd "C:\Program Files\Jenkins"
java -jar jenkins.war
 |
| Jenkins start using java jar command defender firewall protection |
java -jar jenkins.war --httpPort=9090
Step 4: Launch the Jenkins Controller on Browser
 |
| Jenkins console access on Windows machine |
Troubleshoot Jenkins issues
Issue 1: Windows service start fails immediately without any log message.
 |
| Jenkins service stopped when started |
Basic investigation you could try to trigger jenkins service from the CMD prompt, On windows you can start any of the service from the COMMAND prompt as follows
net start jenkins
 |
| Trouble in starting Jenkins from the CMD prompt |
This above screen tells something wrong in the Jenkins system requirement does not allowing to start the Jenkins service. You could do look into the jenkins.out log file present in the Jenkins installed location. Check the reason why it is failed to start. Here I found the reason is JDK Unsupported version.
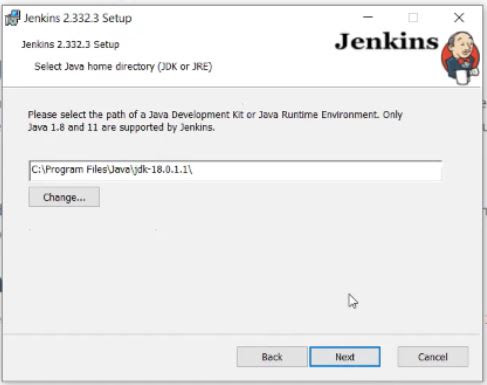
Issue 2: Jenkins failed to start cause Unsupported Java version
Cause: Here if you see the JDK version used 18.0.1.1 where as Jenkins is comfortable with JDK1.8 or 11 versions same thing in the error message.

The Fix: Uninstall the JDK 18.0.1.1 from your Control Panel. Install the compatible Java either 1.8 or 11 version and then launch Jenkins. This is only applicable this year may be next year another JDK version will be supported by Jenkins!
If you like this post please share with your tech teams & friends...


Comments