Showing posts with label Kubernetes. Show all posts

Saturday, February 8, 2025

Kafka Message system on Kubernetes


Setting up the Kubernetes namespace for kafka
apiVersion: v1
kind: Namespace
metadata:
  name: "kafka"
  labels:
    name: "kafka"

k apply -f kafka-ns.yml 
Now let's create the ZooKeeper container inside the kafka namespace
apiVersion: v1
kind: Service
metadata:
  labels:
    app: zookeeper-service
  name: zookeeper-service
  namespace: kafka
spec:
  type: NodePort
  ports:
    - name: zookeeper-port
      port: 2181
      nodePort: 30181
      targetPort: 2181
  selector:
    app: zookeeper
---
apiVersion: apps/v1
kind: Deployment
metadata:
  labels:
    app: zookeeper
  name: zookeeper
  namespace: kafka
spec:
  replicas: 1
  selector:
    matchLabels:
      app: zookeeper
  template:
    metadata:
      labels:
        app: zookeeper
    spec:
      containers:
        - image: wurstmeister/zookeeper
          imagePullPolicy: IfNotPresent
          name: zookeeper
          ports:
            - containerPort: 2181
image1 - kube-kafka1
From the ZOOKEEPER services get the Cluster IP and use it in the Kafka broker configuration which is next step we are going to perform.
apiVersion: v1
kind: Service
metadata:
  labels:
    app: kafka-broker
  name: kafka-service
  namespace: kafka
spec:
  ports:
  - port: 9092
  selector:
    app: kafka-broker
---
apiVersion: apps/v1
kind: Deployment
metadata:
  labels:
    app: kafka-broker
  name: kafka-broker
  namespace: kafka
spec:
  replicas: 1
  selector:
    matchLabels:
      app: kafka-broker
  template:
    metadata:
      labels:
        app: kafka-broker
    spec:
      hostname: kafka-broker
      containers:
      - env:
        - name: KAFKA_BROKER_ID
          value: "1"
        - name: KAFKA_ZOOKEEPER_CONNECT
          value: ZOOKEEPER-INTERNAL-IP:2181
        - name: KAFKA_LISTENERS
          value: PLAINTEXT://:9092
        - name: KAFKA_ADVERTISED_LISTENERS
          value: PLAINTEXT://kafka-broker:9092
        image: wurstmeister/kafka
        imagePullPolicy: IfNotPresent
        name: kafka-broker
        ports:
          - containerPort: 9092

In the above line number 37 you need to change according to your Zookeeper service NodePort. Now apply
k apply -f kafka-broker.yml
after apply
watch kubectl get all -n kafka
Image: Kube kafka 2
Step 3: Enable Network communications To ensure that Zookeeper and Kafka can communicate by using this hostname (kafka-broker), we need to add the following entry to the /etc/hosts file on
echo "127.0.0.1 kafka-broker" > /etc/hosts
Set the port forwarding as following: kubectl port-forward 9092 -n kafka Image: Kafka on Kubernetes
Open new terminal and run the following:

Test Kafka Topics using Kafkacat

To easily send and retrieve messages from Kafka, we’ll use a CLI tool named KCat 7Install KCat using the below command:
apt install kafkacat
Image : Kafkacat installation

Producing message and Consume using Kafcat

Run the below command to create a topic named topic1 and send a test message “hello everyone!” you can enter your own messages.
echo "hello everyone!" | kafkacat -P -b 127.0.0.1:9092 -t topic1
   
Now let's consume the message using kafkacat command:
  kafkacat -C -b 127.0.0.1:9092 -t topic1
  
Image : Kafkacat Producer Consumer
Happy learning Kafka on the Kubernetes, The above experiment I've run on the Killercoda terminal.

Wednesday, January 22, 2025

Job & CronJob - Batch Job

What is Job object in Kubernetes?


A Job object will be used to create one or more Pods and the Job ensures that a specified number of Pod instances will be created and terminates after completion of the Job. There could be finite jobs which will run within given certain timeout values. Job tracks for 'Successful' completion of the required task. Jobs can be run in two variants they can be parallel and also non-parallel.

Kubernetes Job types


There are 3 types of jobs non-parallel jobs [single pod jobs - unless it fails. creates replacement pod when pod goes down] parallel jobs with a fixed completion count parallel jobs with task queue 

##Example type 1: hundred-fibonaccis.yml
---
apiVersion: batch/v1
kind: Job
metadata:
    name: fibo-100
spec:
  template:
    spec: 
      containers:
      - name: fib-container 
        image: truek8s/hundred-fibonaccis:1.0
      restartPolicy: OnFailure
  backoffLimit: 3
Create the Job:
kubectl create -f hundred-fibonaccis.yml
Now let's describe the job:
kubectl describe job fibo-100
Describing a Job in Kubernetes


In the Job description you can observe the attributes such as parallelism, Pod Statuses.
 
On the other terminal which is running in parallel, Observe the pod status change from Running to Completed:
kubectl get po -w 
Pod still exists to get the logs
kubectl logs [podname] -- [container] 
We can see the Fibonacci number series printed out from the container logs.
Fibonacci series printed from kubctl logs command


##Example type 2
---
apiVersion: batch/v1
kind: Job
metadata:
  name: counter
spec:
  template:
    metadata:
      name: count-pod-template
    spec:
      containers:
      - name: count-container
        image: alpine
        command:
         - "/bin/sh"
         - "-c"
         - "for i in 100 50 10 5 1; do echo $i; done"
      restartPolicy: Never
To create the counter-job use the following command :
kubectl create -f counter-job.yaml
Check Job list:
kubectl get jobs
Check the Pod:
kubectl get po 
Check the log:
kubectl logs count-pod-xxx 
Counter Job execution output using kubectl logs


Now let's Describe the job counter :
kubectl describe jobs counter 
You can observer the Start Time and Pod Statuses from the above command ##cleanup delete job:
kubectl delete jobs counter-job 
no need to delete pod, When a Job deleted automatically removes the corresponding all its pods.

Controlling Job Completions

In some situations you need to run the same job multiple times, we need to define completions: number it under Job-> Specifications (spec section)
  ---
apiVersion: batch/v1
kind: Job
metadata:
  name: hello-job
spec:
  completions: 2
  template:
    spec:
      containers:
        - name: busybox-container
          image: busybox
          command: ["echo", "hello Kubernetes job!!!"]
       restartPolicy: Never
  
Observe the number of the Completions on the
watch kubectl get all
  kubectl get pods
  kubectl delete job hello-job
  kubectl get pods 
Once Job is deleted all its relavant resource will be cleaned up automaticall.

Parallelism

In some project there will be need to run multiple pods running in parallel
  ---
apiVersion: batch/v1
kind: Job
metadata:
  name: hello-job
spec:
  parallelism: 2
  template:
    spec:
      containers:
        - name: busybox-container
          image: busybox
          command: ["echo", "hello Kubernetes job!!!"]
       restartPolicy: Never
  
Observe the number of the Completions on the How backoffLimit works on Job? Let's do simple exeriment and understand this 'backoffLimit' attribute.
  ---
apiVersion: batch/v1
kind: Job
metadata:
  name: hello-job
spec:
  parallelism: 2
  backoffLiit: 4
  template:
    spec:
      containers:
        - name: busybox-container
          image: busybox
          command: ["ech0o", "hello Kubernetes job!!!"]
       restartPolicy: Never
  
Observe command mistyped purposefully, which will fail to create new Pod.

Working with CronJob


Job that works like a crontab in Linux systems. Any task that needs to be executed based on the scheduled time then we can use this Kubernetes Object.

##Example CronJob
---
apiVersion: batch/v1beta1
kind: CronJob
metadata:
  name: hello-cron
spec:
  schedule: "* * * * *"
  jobTemplate:
    spec:
      template:
        spec:
          containers:
          - name: busybox-container
            image: busybox
            command: ["echo", "Namste Kubernetes Cronjob!!!"]
           restartPolicy: OnFailure
Creating the sample CronJob by running the following command:
kubectl create -f cronjob.yaml

Open in new terminal and run the following command to watch continuously:
watch kubectl get all 
Check the Pod Logs: Use the Pod name to view the logs and see the output of the CronJob: kubectl get po ; kubectl logs PODNAME

kubernetes logs cronjob run pod


The schedule field is set to "* * * * *", which means the job will run every minutes.
The job runs a busybox container that prints the given text message.

Check the pods section in the above output

Kubernetes CronJob


  • Saturday, May 11, 2024

    Kubernetes Deployment

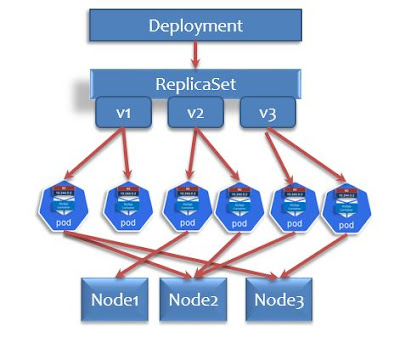
    Hello DevSecOps, SRE or Platform Engineer or DevOps Engineers, In this post I want to discuss, Understanding of Kubernetes deployment it's hierarchy of kube objects. Declaratives and imperative ways to make deployment on kube clusters. 

    How to deploy an application on  Kubernetes pods, just follow these steps as shown in this post. 

    Here is new learning, I would like to share with you about Kubernetes deployment hierarchy, which internally calls the replication controller to make desired number of replicas of pod temple specified.

    Kubernetes Deployment hierarchical Structure
    Kubernetes Deployment hierarchy


    Let's go to have a deep understanding about Kubernetes deployment hierarchy.

    1. Generating Kubernetes Deployment Manifest file

    We need to create a YAML file to define the deployment of the 'httpd' Apache Webserver. Here we are going to use the '--dry-run' option with client as value and '-o yaml' to generate the YAML file, to redirect the output we can use the greater than symbol to store in a file. e.g: httpd-deploy.yaml

    Command : 
    k create deploy httpd-deploy --image=httpd:alpine --dry-run=client -o yaml
    k create deploy httpd-deploy --image=httpd:alpine --dry-run=client -o yaml >httpd-deploy.yaml
    
    vi httpd-deploy.yaml
    
    We can modify the httpd-deploy.yaml file as per our requirements such as changing the Image tag value so that we can reuse it for every new version available on the Docker Hub that is public repository.
    apiVersion: apps/v1
    kind: Deployment
    metadata:
      labels:
        app: httpd-deploy
      name: httpd-deploy
    spec:
      replicas: 1
      selector:
        matchLabels:
          app: httpd-deploy
      strategy: {}
      template:
        metadata:
          labels:
            app: httpd-deploy
        spec:
          containers:
          - image: httpd:alpine
            name: httpd
    
    To create,confirm the deployment we can use the following commands
    k create -f httpd-deploy.yaml #create
    k get deploy,po #confirmation
    

    Listing deployments

    The 'kubectl' command will allow us to use the object either 'deployments' or 'deploy' or even singular word 'deployment' to list all the Deployments of default namespace 
    kubectl get deployments
    # or use alias name  
    kubectl get deploy
    # or use alternative name  
    kubectl get deployment
    

    Validate deployment history

    We can describe the Deployment object details as follows:
    kubectl describe deploy web-deployment  
    Deployments contains Pods and its Replica information. 
    To Show Rollout History of the given Deployment
    kubectl rollout history deployment web-deployment 

    4. Create/Update deployments using Image tags

    Updates the existing deployment using update application new version. Do some R&D work here. Goto the Docker Hub find the Niginx tags consider the version tags to deploy. Currently I could see 1.22.0 and 1.23.1 versioned tags. So start with the new deployment with nginx:1.22.0 image after the pods up and application looks good we can update to the latest version that is nginx:1.23.1 versioned image.
    k create deploy web-deploy --image=nginx:1.22 --replicas=2
    k get deploy,po -o wide
    
    # upgrade to new version 1.24
    k set image deploy/web-deploy nginx=nginx:1.24 
    k get deploy,po -o wide
    

    5. Rollback/Rollforward Revisions

    Rolls back or roll Forward to a specific revision versions can be done as follows:

    Use the same strategy to create the app-deploy.yml file as given in the above; Do type the following commands to avoid the hyphenation issues.
    Example app-deploy.yml as below:
    apiVersion: apps/v1
    kind: Deployment
    metadata:
      labels:
        app: app-deploy
      name: app-deploy
    spec:
      replicas: 1
      selector:
        matchLabels:
          app: app-deploy
      template:
        metadata:
          labels:
            app: app-deploy
        spec:
          containers:
          - image: httpd:2.4.59-alpine
            name: httpd
      
    Now let's play for the the rollback option, where we will have some number of revisions recorded and we can navigate to the previous version using 'rollout undo' with '--to-revision' option.
    kubectl create –f app-deploy.yml 
    kubectl get deploy app-deploy
    kubectl apply –f app-deploy.yml --record 
    k rollout history deployment app-deploy 
    k set image deploy/app-deploy httpd=httpd:2.4.59-bookworm --record
    k rollout history deployment app-deploy 
    k set image deploy/app-deploy httpd=httpd:2.4-bookworm --record
    k set image deploy/app-deploy httpd=httpd:bookworm --record
    k rollout history deployment app-deploy 
    k rollout undo deploy/app-deploy --to-revision=3
    k get deploy,po -o wide
    

    The following image will shows the Rollback example clearly


    Hope you got the bit taste of Kubernetes Deployment. Write back your comment with suggestion or what you learnt from this post.

    Friday, December 30, 2022

    Kubernetes Troubleshooting

     We as DevOps and DevSecOps Engineers working on many microservice based application architectures where we need to manage Kubernetes Cluster  Troubleshot at various levels.

    You cannot rely on single point of look for failures. While working on Kubernetes Troubleshooting we can make ourselves easy to understand the problem, if we could classify the problem belong to the following categories.
    1. Application Failure
    2. Master node/ControlPlane Failures
    3. Worker node Failures

    Application Failure - trobleshooting

    Here I'm listing out these with my understanding and experiance in practice tests provided by Munshad Mohammad on KodeKloud.
    1. You should know the architecture how it is deployed what all its dependents, where they have deployed with what endpoints, what names used.
    2. Check the service 'name' defined and referring service should match and also check the services 'Endpoints' are correctly defined and in referenceing used correctly.
      k -n dev-ns get all
      
    3. Better to check that the selector are as properly aligned or not, as per the architecture design definitions. if it is not then you need to change them.
      k -n test-ns edit svc mysql-service
      
    4. Identify is there any mismatch for the environment values defined in the deployment cross check with the Kubernetes objects those are integrating.
      k -n test-ns descrube deploy webapp-mysql
      
      If that doesn't match example mysql-user value was mismatched then you can change it, it will automatically redeploy the pods.
      k -n test-ns edit deploy webapp-mysql
    5. Check also service NodePort port correctly mentioned or not. If it mismatches then need to replace with correct one as per the design.
      k -n test-ns describe service/web-service
      k -n test-ns edit service/web-service # edit nodePort value correct
      

    Controlplane/Kubernetes Master node Failure - Troubleshooting

    1. Initial analysis start from nodes, pods
      To troubleshoot the controlplane failure first thing is to check the status of the nodes in the cluster.
      k get nodes 
      
      they all should be healthy then, go for the next step that is status of the pods,deployments,services,replicasets (all) within the namespace on which we have trouble.
      k get po 
      k get all 
      
      Then ensure that pods that belongs to kube-system are 'Running' status.
    2. Check the Controlplane services
      # Check kube-apiserver
      service kube-apiserver status 
      or 
      systemctl status kube-apiserver 
      
      # Check kube-controller-manager
      service kube-controller-manager status 
      or 
      systemctl status kube-controller-manager
      
      # Check kube-schduler
      service kube-schduler status 
      or 
      systemctl status kube-schduler
      
      # # Check kubelet service on the worker nodes 
      service kubelet status 
      or 
      systemctl status kubelet 
      
      # # Check kube-proxy service on the worker nodes 
      service kube-proxy status 
      or 
      systemctl status kube-proxy 
      
      # Check the logs of Controlplane components 
      kubectl logs kube-apiserver-master -n kube-system 
      # system level logs 
      journalctl -u kube-apiserver 
      
    3. If there is issue with the Kube-scheduler then to correct it we need to change the YAML file preent in default location `vi /etc/kubernetes/manifests/kube-scheduler.yaml`
      You may need to check the file `/etc/kubernetes/manifests/kube-controller-manager.yaml` parameters given for 'command'. Sometime there could be missing or incorrectly entered for the VolumeMounts paths values, if you correct them the kube-systeem pods automatically starts!

    Worker Node failure - Troubleshooting

    This is mostly around kubelet serivce unable to come up. The bronken Kubernetes cluster can be identified by listing your nodes, where it tells us 'NotReady' state. There could be several reason each one is a case that need to be understood, where Kubelet cannot communicate with the Master node. Identifying the reason is the main thing here.
    1. Kubelet service not started: There could be many reasons when worker node fails. One such is if there is a CA certs rotated on the there should be manually you need to start the kubelet service and validated it is running on worker node.
      # To investigate whats going on worker node 
      ssh node01 "service kubelet status"
      ssh node01 "journalctl -u kubelet"
      # To start the kubelet 
      ssh node01 "service kubelet start"
      
      Once started you need to double check that kubelet status again if it shows 'active' then fine.
    2. Kubelet Config mismatch : The kubelet service even you start it is failed to come up. There could be some CONFIG related issue. In one of the example practice test given that ca.crt file path wrongly mentioned. You may need to correct the ca.crt file path in the worker node in such case you must know where the kubeconfig resides! so the path is '/var/lib/kubelet/config.yaml' After editing the ca.crt file you need to start the kubelet
      service kubelet start 
      and check the kubelet logs using journalctl.
      journalctl -u kubelet -f 
      And ensure that in the controlplane node list show that node01 status as 'Ready'.
    3. Cluster Config mismatching: There could be conffig.yaml file currupted where master ip or port configured wrongly or cluster name, user, context may be wrongly entered that could be reason where kubelet unable to communicate with the master node. Compare the configuration available on the master node and worker node if you found mismatches correct them and restart the kubelet.
    4. Finally, check the kubelet status on the worker node and on the master node check the list of nodes.
    Enjoy the Kubernetes Administration !!! Have more fun!

    Monday, December 26, 2022

    Kubernetes Tools Tricks & Tips

    Hey Guys, Welcome to "DevOps Hunter" blog! In this post I would like to share my learnings at different times collected that is about Kubernetes commands and their applied tricks and tips.

    • Initially I've collected few kubectl related alias command tricks
    • Play with the etcd database and then backup and recovery short-cuts
    • Finally worked on the Kubernetes command tools kubectx, kubens for easy switching in CLI.


    Come on! let's explore about the API resources which we might be frequently use when we prepare the YAML files for each Kubernetes Objects.

    kubectl api-resources
    

    We can get sometime the API version mismatch due to change in API version. This can be examine what is new in the current version

    How do you identify the certificate file used to authenticate 'apiserver'?

    cat /etc/kubernetes/manifests/kube-apiserver.yaml|grep tls-cert
        - --tls-cert-file=/etc/kubernetes/pki/apiserver.crt
    
    The tls-cert-file will be Kubernetes apiserver cerificate file path .

    How do you identify the certificate file used to authenticate 'kube-apiserver' as a client to ETCD server?

    You can look into the kube-apiserver manifest file.

    cat /etc/kubernetes/manifests/kube-apiserver.yaml 
    

    Do you have any alias tricks for Kubernetes CLI commands?

    Yes, I do have many but here I would like to common usable Bash shell alias.
    # kubectl can be used with k most common alias 
    alias k='kubectl'
    
    # This is to list all available objects, alias will be used with many Kubernetes Objects
    alias kg='kubectl get'
    
    # This will be used to describe any kubernetes object 
    alias kdp='kubectl describe'
    

    Looking into the logs

    Kubernetes collects the logging from all the containers that run in a Pod.
    # To look into the logs of any pod 
    alias kl='kubectl logs'
    
    # To get into the pod containers 
    alias kei='kubectl exec -it'
    

    Realtime scenario: maintenance window on worker node

    There can be regular routine maintenance windows on worker nodes may be to have OS patching on the node or any other urgent maintenance then how to handle is important activity as Kubernetes Administrator.

    When maintenance starts on node01:

     alias k="kubectl"
     k drain node01 --ignore-daemonsets
     # check pods scheduling on which nodes 
     k get po -o wide
     # check nodes status - observe that node01  STATUS = Ready,SchedulingDisable
     k get nodes 
    

    when maintenance on node01 completes, How to releae that node back to ready state?

    First make the node as schedulable using uncordon, then check nodes

     k uncordon node01
     the uncordon sub-command will mark node as schedulable, bring back to ready state for node.
     
     # Check pods, nodes 
     k get nodes,pods -o wide
    
    Existing nodes will not be re-scheduled back to the node01. But if any new pods are created they will be scheduled.

    Locking your node for not to perform schedule any new pods

    Without effecting existing pods on the node make the node Unschedulable can be done with the cordon
     k cordon node01
     k get nodes -o wide
     
    cordon sub-command will mark node as unschedulable.

    Kubernetes Ugrade plan

    Similar to any OS package managers allow us to upgrade here we can do it for Kubernetes. But we need to be little cautious, If there is any upgrade plan then we need to check that from the kubenetes CLI
     kubeadm upgrade plan
     

    How do you find the ETCD cluster address from the controlplane?

    From the describe output you can identify the etcd address which is present in the --advertis-client-urls value.

    k describe po etcd-controlplane -n kube-system|grep -i advertise-client
    Annotations:          kubeadm.kubernetes.io/etcd.advertise-client-urls: https://10.36.169.6:2379
          --advertise-client-urls=https://10.36.169.6:2379
    

    How to get the version of etcd running on the Kubernetes Cluster?

    To get the version of the etcd by describe the etcd pod which is present in kube-sytem namespace.

    k get po -n kube-system |grep etcd
    etcd-controlplane                      1/1     Running   0          22m
    
    k describe po etcd-controlplane -n kube-system|grep -i image:
        Image:         k8s.gcr.io/etcd:3.5.3-0
    

    Where is the ETCD server certificate file located?

    To find the server certificate the file location present in '--cert-file' line. To skip -- in the grep use back slash

    k describe po etcd-controlplane -n kube-system|grep '\--cert-file'
          --cert-file=/etc/kubernetes/pki/etcd/server.crt
    
    Alternative: another way is to get certifiate files and key files of etcd. You know that etcd is a static pod and which will have the definitions and configuration details as manifest file at /etc/kubernetes/manifests/etcd.yaml. To run the the etcd backup we must pass certfiles, key files. Let's find those from the manifest file.
     cat /etc/kubernetes/manifests/etcd.yaml |grep "\-file"

    Where is the ETCD CA Certificate file located?

    Generally CA certificates file will be saved as ca.crt.

    k describe po etcd-controlplane -n kube-system|grep -i ca.crt
          --peer-trusted-ca-file=/etc/kubernetes/pki/etcd/ca.crt
          --trusted-ca-file=/etc/kubernetes/pki/etcd/ca.crt
    

    Backup and Recovery of ETCD database

    ETCD database BACKUP to a snapshot using following command

    ETCDCTL_API=3 etcdctl --endpoints=https://127.0.0.1:2379 \
    --cacert=/etc/kubernetes/pki/etcd/ca.crt \
    --cert=/etc/kubernetes/pki/etcd/server.crt \
    --key=/etc/kubernetes/pki/etcd/server.key \
    snapshot save /opt/snapshot-pre-boot.db
    
    # validate snapshot created in the /opt directory.
    ls -l /opt
    

    How to restore the etcd cluster database?

    Same command only in place of save use restore option.
    ETCDCTL_API=3 etcdctl  --data-dir /var/lib/etcd-from-backup \
    snapshot restore /opt/snapshot-pre-boot.db
    
    To know nmber of clusters configured on the node you can use the following :
    k config view
    # Be specific to cluster listing you can use get-clusters 
    k config get-clusters
    

    Kubernetes Tools

    Your life will be easy if you know these two tools as your tricks! kubectx, kubens two customized commandline tools.

    Using kubectx

    kubectx examples
    sudo git clone https://github.com/ahmetb/kubectx /opt/kubectx
    sudo ln -s /opt/kubectx/kubectx /usr/local/bin/kubectx
    kubectx -h
    kubectx -c
    kubectx 
    
    Download and Setup the kubectx

    kubens

    Setup the kubens and using it for switching between namespaces.
    sudo ln -s /opt/kubectx/kubens /usr/local/bin/kubens
    kubens
    kubens -h
    kubens kube-system
    k get po
    kubens -
    k get po
    
    Kubernetes namespace switching tool kubens setup and executions

    Network Tricks

    To find the weave-net running on which node
    k get po -n kube-system -l name=weave-net -o wide
    

    What is the DNS implementation in your Kubernetes Cluster?

    To know dns details the label used 'k8s-app-kube' we can run on pods, deployments we can get the complete implementation of DNS on the Kube:
    k -n kube-system get po,deploy -l k8s-app=kube-dns
    
    The execution sample output

    Finding Node info using jsonpath

    To work on the jsonpath you must know what is the output in json format first. then we can narrow-down to the required field data to be extracted.
    k get nodes -o jsonp 
    k get nodes -o jsonp | jq
    k get nodes -o jsonp | jq -c 'paths' |grep InternalIP
    
    To get the InternalIP address of each node can be retrived first we need to give a try for first node than we can change to all nodes using '*'.
    k get no -o jsonpath='{.items[0].status.addresses}'|jq
    k get no -o jsonpath='{.items[*].status.addresses[0]}'|jq
    k get no -o jsonpath='{.items[*].status.addresses[?(@.type=="InternalIP")]}'
    k get no -o jsonpath='{.items[*].status.addresses[?(@.type=="InternalIP")].address}'
    

    Kubectl autocomplete

    Set up autocomplete enable in bash shell if that is your current shell, bash-completion package should be installed first.
    source <(kubectl completion bash)
    Let's add this above line for autocomplete permanently in the .bashrc
    > ~/.bashrc
    Reference
    Hope you have enjoyed this post.

    Sunday, October 23, 2022

    Kubernetes security - Service accounts

    In this post we are going to learn more  about what is service accounts in Kubernetes and how that is useful.

    Prerequisites

    Kubernetes cluster Up and running

    Let's take the scenario where we get need to connect with the pods, nodes, deployments and other resources in the Kubernetes cluster. you might be working with the automated build with the CICD pipelines to interconnect with each other resources. Pod  is going to work with the planned application deployments.

    If  you're working in DevSecOps you need to focus on the regular monthly maintenance OS  patching scheduled in this case Kubernetes node maintenance should be done from a pod. 

    In the above two scenarios there is a need of service account inside the pod. When Kubernetes cluster is created at the same time service account also created and its name is default. We can also create our own service accounts using the following command

    Every service account is associated with the secret where service account name is  as first part for the secret name followed by token word will be makes it. Example default account has secret as default-token-****.

    Here I am going to work in a pod which needs authentication using the service account which created by me. To make this happen need to add a line in the pod definition, under spec section add line as serviceAccount followed by its value. Proceed to create a testing pod.

    kubectl create -f mypod-sa.yaml.

    To know what Pods are running in this cluster run 

    kubectl get pods

    Let's go head and see description of pod. Inside the Pod there is a volumeMount configured and it is accessible in specific path of container.

    kubectl exec -it mypod-sa -- /bin/bash
    Inside the pod 
    ls -lrt /var/run/secret/kubernetes.io/serviceaccount 

    Here we can see the namespace, token, and certificates file.

    TOKEN=`cat var/run/secret/kubernetes.io/serviceaccount/token`
      curl https://Kubernetescluster -k --header "Authorization: Bearer $TOKEN"
      

    Just this may be failed. This particular service account which is present in the pod. This cannot have the permissions so the other message saying reason as forbidden.

    Now what I am going to do investigate why that is having the permission issue. We need to create a role and rolebinding that associate with service account.

    Now all I want to do is same commnd previously executed command from the pod as run early.


    Every Service account will be associated with a secret which is the older Kubernetes model it was automatic but now that will be hidden in the latest Kubernetes 1.22 onwards. I'm working on the Kubernetes 1.25 version let's see how it will be now. here I am working on the KillerCoda builtin Kubernetes cluster. I would like to create a ServiceAccount and for it Secret object then that will be used to run a deployment, which is the common requirment in most of the real time projects.
    Now I will create a custom serviceaccount, which will be more privileaged to work with deployments.
      kubectl create serviceaccount vt-deploy-sa --dry-run=client -o yaml
    kubectl create serviceaccount vt-deploy-sa --dry-run=client -o yaml > vt-deploy-sa.yaml
    
    #Before running creating sa 
    kubectl get serviceaccounts
    kubectl create -f vt-deploy-sa.yaml 
    
    #Confirm it 
     kubectl get serviceaccounts
     kubectl describe sa vt-deploy-sa
     
    Here important rule you need to understand is, One Pod can have one serviceaccount. But in reverse to this, One serviceaccount can be attached with multiple Pods. Let's examine the default serviceaccount what authorized to do?
     kubectl auth can-i create  pods --as=system:serviceaccount:default:default
    to understand depth of the above command check about default serviceaccount used --as option with system:serviceaccount:NAMESPACE:SERVICEACCOUNTNAME
    When we create our custom serviceaccount we can define our own policy that could be telling what could be done such as list, create, delete etc actions. And that is needs a mapping which is done by Role and RoleBindings. Role is where I am allowed to define the policies for user,group,serviceaccount which it is about to bind. Then I am going to create the RoleBinding which will actually bind the serviceaccount with the Role which have policies.
     kubectl create role deploy-admin --verb=create,list,get,delete --resource=deployments 
    Here deploy-admin role is defined with create,list,get, delete actions on the deployment objects.
    kubectl create rolebinding deploy-rb --role=deploy-admin --serviceaccount=default:vt-deploy-sa
     
    here serviceaccont is defined with the namespace followed by custom serviceaccont.
    Now let's try the deployment with serviceaccount.
      kubectl create deploy webapp --image=tomcat \
     --replicas=4 --dry-run=client -o yaml > webapp-deploy.yaml
     
     
     vi webapp-deploy.yaml
     # removed null word containing lines
     apiVersion: apps/v1
    kind: Deployment
    metadata:
      name: webapp
    spec:
      replicas: 4
      selector:
        matchLabels:
          app: webapp
      template:
        metadata:
          labels:
            app: webapp
        spec:
          serviceAccountName: vt-deploy-sa
          containers:
          - image: tomcat
            name: tomcat
    
    # Create deployment 
    kubectl create -f webapp-deploy.yaml
    
    # list the deploy with default and then custom serviceaccount
    kubectl get deploy --as=system:serviceaccount:default:default
    kubectl get deploy --as=system:serviceaccount:default:vt-deploy-sa
    
    Now you ccan observe the difference between default serviceaccount vs custom serviceaccount capabilities.

    Saturday, October 22, 2022

    Kubernetes Security - ClusterRoles and ClusterRoleBindings

    Hello in this post we will explore about ClusterRoles and ClusterRoleBindings on Kubernetes Cluster. The ClusterRoleBindings are mapping a subjects with ClusterRole. Here Subjects are nothing but rules that can be applicable with an action on the Cluster resources. It deals with Users, Groups and service accounts. In this post we will try to focus with 'User' specific rules.

    Kubernetes User Access Control with ClusterRoleBindings to ClusterRole


    Prerequisite: 

    1. Kubernetes Cluster up and running 
    2. Basic understand on RBAC

    These system related resources such as pods, nodes, storage etcs will be administrated using ClusterRole and ClusterRoleBindings by assigning to a user.
     
    To list the ClusterRoles in the Kubernetes cluster
    kubectl get clusterrole
    # Get the Count 
    kubectl get clusterrole --no-headers |wc -l
    
    To know about the api-resources that have clusterrole and clusterrolebindings.
    k api-resources |grep cluster 
    To veiew the clusterrolebindings available in this Kubernetes Cluster
    kubectl get clusterrolebindings 
    # Get the Count 
    kubectl get clusterrolebindings --no-headers |wc -l
    

    Imperative way

    You can have single verb to used to create clusterrole. Here is an example, Create a role which should have access to list the deamonsets.

    # Initial check 
    kubectl get ds --as krish 
    
    kubectl create clusterrole list-ds-role --resource=daemonsets --verb=list
    kubectl describe clusterrole list-ds-role
    

    Create clusterrolebinding list-ds-rb for user 'krish' to map that clusterrole list-ds which created above.

    kubectl create clusterrolebinding list-ds-rb --clusterrole=list-ds-role --user=krish 
    
    After ClusterRoleBinding assigned to krish
    kubectl get ds --as krish 
    

    Create ClusterRole, ClusterRoleBinding imperative way

    Cleanup for ClusterRoles


    Cleanup activity can be in the reverse order. First delete the ClusterRoleBinding then clusterrole
    kubectl delete clusterrolebinding list-ds-rb 
    
    kubectl delete clusterrole list-ds 
    
    Cleanup ClusterRole and ClusterRoleBindings


    ClusterRole are Kubernetes Cluster wide and they are not part of any namespace. To know about user or groups are associated with cluster-admin role, use ClusterRoleBindings and describe it. Where we can see in the subject section that will reveals you about user/groups.
    kubectl describe clusterrolebinding cluster-admin
    To inspect the clusterrole 'cluster-admin' privileges describe will show the PolicyRules where what resources can be used? and what you can do? The '*' astriek is to indicate that 'all'. If you want to get all resources access then '*.*' should be given. And same way to indicate all actions such as create, delete, list, watch, get use '*'. A new user mahi joined the Kubernetes Administrtors team. She will be focusing on the nodes in the cluster. Let's create a ClusterRole and ClusterRoleBindings so that she gets access to the nodes .
     
    Initially we will check that she is able to access the nodes or not.
    kubectl create clusterrole node-admin 
     --verb=get,list,watch --resource=nodes --dry-run=client -o yaml > node-admin.yaml
    kubectl apply -f node-admin.yaml
    kubectl describe clusterrole node-admin
    
    Let's bind the node-admin clusterrole to mahi user using clusterrolebinding.
    kubectl create clusterrolebinding mahi-rb --clusterrole=node-admin --user=mahi --dry-run=client -o yaml > mahi-rb.yaml
    
    kubectl create -f node-admin-rb.yaml 
    kubectl describe clusterrolebindings node-admin-rb
    
    # Check michelle have the access to nodes 
    kubectl --as mahi get nodes
    
    If a user responsibilities are growing as they are into the organization for atime being. Here Maheshwari(mahi) user got more responsibilities for maintaining storge that used for Kubernetes cluster. Create the required ClusterRole and ClusterRoleBindings to allow her access Storage. Requirements:
    ClusterRole: storage-admin
    Resource: persistentvolumes
    Resource: storageclasses
    ClusterRoleBinding: mahi-storage-admin
    ClusterRoleBinding Subject: mahi
    ClusterRoleBinding Role: storage-admin
    
    Now you know all the steps how to proceed on the clusterrole, clusterrolebindings
     kubectl create clusterrole storage-admin \
      --verb=* --resource=persistentvolumes --resource=storageclasses \
      --dry-run=client -o yaml > storage-admin.yaml
      
    kubectl apply -f storage-admin.yaml
    kubectl describe clusterrole storage-admin
    
    kubectl create clusterrolebinding mahi-storage-admin-rb \
     --clusterrole=storage-admin --user=mahi --dry-run=client -o yaml > mahi-storage-admin-rb.yaml  
     
     kubectl create -f mahi-storage-admin-rb.yaml
     kubectl describe clusterrolebinding mahi-storage-admin-rb
     
    # Validate that authentication given for mahi user to access storage
    kubectl get pv --as mahi
    kubectl get sc --as mahi
    
    Here the last execution of fetching the storageclasses using 'mahi' is successful.

    Reference:

    Tuesday, October 18, 2022

    Kubernetes Security - RBAC

    My Understanding about RBAC in Kubernetes

    RBAC stands for Role based access control in our Kubernetes system we have users that needs to access the kubernetes cluster and it's resources. Here role is that categorize their needs. Let's say our project have developers, admins, presale users. We could define role named as "readers" that allows all users, because its common need to all user to read from the system. We could define a role called "writers" and allow certainer users like "developers" who contribute many things to develop in application end, "Admin" user can have this to control it. We could also define a role called "administrators" to admins users. Administrator role users can have full rights such as delete from the system.

    Role can be used to define "what can be done?"

    Role will be given to users, application software. If we need to deal with software then we need to use service account. Service accounts manages to having access control for services that runs softwares. Users can be created to have user access controls.

    RoleBindings - who can do it?

    In Kubernetes we have RoleBindings as an object. It allows us to users or groups to use roles by mapping that can be defined with role-bindings. RoleBinding is simple concept, role, rolebindings lives at namespace level. For example an ecommerce applicaiton, developers lives in shopping-cart namespace and presale namespace where all the presale systems live and presle team members will be using it. Administrator roles is design to to provide the entire kubernetes cluster level access permissions. That means all namespaces will be accessable to the admin role users. If you have 100 developers working for a project of micro-service based application, you cannot create 100 users and giving the access to each one. here it comes the solution with RBAC where you Kubernetes admin need to create Role and RoleBinding at once and that can be used to 100 users if more developers added still it works without any new ocnfigurations. Roles will lives in namespace constrained, ClusterRole will lives in cluster-wide kubernetes resources. let's see how it works with different users under roles with rolebindings. To check authorization-mode for kube-apiserver-controlplane in the kube-syste namespace.
    kubectl get po kube-apiserver-controlplane \
      -n kube-system -o yaml |grep authoriz

    How to get the roles present in a namespace?

    Let's say here we have created ecom as namespace and application will be ecom-app.
    apiVersion: v1
    kind: List
    metadata:
    items:
    - apiVersion: rbac.authorization.k8s.io/v1
      kind: Role
      metadata:
        name: developer
        namespace: ecom
      rules:
      - apiGroups:
        resourceNames:
        - ecom-app
        resources:
        - pods
        verbs:
        - get
        - watch
        - create
        - delete
    
    Role can be changed as per the project requirements that means initially a role may only have access to work with pods later we can add one more resource such as 'deployments'. You could also work on authorization permissions for a user role where you need to create new set of rule for 'deployments' and apiGroups can be defined with "apps" so that we could get access to the users who have this role.

    Monday, October 17, 2022

    Kubernetes Security - Certificates API


    Hello all! Welcome to new learning Kubernetes Certificate API in the series of "Kubernetes Security". a. Private key generation 


    Kubernetes Certificate API


    We must aware of what does certificate authority CA will do and in Kubernetes how it works.
    CA server it is a server which is runs certificate API.

    In your DevOps or DevSecOps team a New Kubernetes Admin joins you. Hhow to handle.

    Private key, Public key valid pair of CA server sign automated in Kubernetes, it performs following steps:

    1. Create CertificateSigningRequest object
    2. Review Request
    3. Approve Request
    4. Share Certs to Users

    Let's try how it works

     A user Maheshwari(Mahi) want to create certificate files first private key will be generated with RSA algorithm 'mahi.key' the key size could be 2048 bits.
    openssl genrsa -out mahi.key 2048
    
    b. Certificate Signing request (CSR) object Request can be created by providing key and subject values the result can be stored into a csr file by performing the following command:
    openssl req -new -key mahi.key -subj "/CN=mahi" -out mahi.csr
    c. Certificate Manifestation file can be created as any other Kubernetes object using YAML as mahi-csr.yaml where kind can be used as 'CertificateSigningRequest', under the request section we can add the csr content which can be encrypted with 'base64' Linux command along with the removal of newline chars.
    cat mahi.csr | base64 |tr -d "\n"
    
    Now prepare the CSR request manifestation using above outcome.
    Filename: mahi-csr.yaml
      ---
    apiVersion: certificates.k8s.io/v1
    kind: CertificateSigningRequest
    metadata:
      name: mahi 
    spec:
      groups:
      - system:authenticated
      request: LS0tLS1CRUdJTiBDRVJUSUZJQ0FURSBSRVFVRVNULS0tLS0KTUlJQ1ZEQ0NBVHdDQVFBd0R6RU5NQXNHQTFVRUF3d0ViV0ZvYVRDQ0FTSXdEUVlKS29aSWh2Y05BUUVCQlFBRApnZ0VQQURDQ0FRb0NnZ0VCQUs0eDJyd3QzU2F0ZDhxSThEUzJzVDlTcngydHMrQm5Ic202d2lCdkt0Vk5IeXdKCis3Q2VHR09JdlpWN3hOQ08vRkRpT3FXY05HMzhseFR6R2pwWkdqUDNoR2RZdHU1WFNnRjlBbkFGTVZENHBnOVIKOVQzVFBjbU1Rem9ZVllMUE44c2Y5Z3pWdGIrRHV5YTRPd0dVYUNuOUdvaW0yYUV0MTYxOWpmUzRSeEJPVXpjagpFaS9DWlAvY1VUd2dLZWNpTHRKWHhvSGYxRDVuVUhVUFFPQ1JWbGtJSDNkRmZYVWZHSjg3bmpNMzJyRXBqY3gxCkNVZWgzRktLNVA3ZC8rdFB2TUFuNEQ5MzgvLzlvZjBuLzZDa0pSMnZNUStIbkgyK000azArcGVpaWNwSUxQRS8KZVZuNk41UXpUSk5sWldHdmVTMU9ZYzdBczhGa2Q2OXZKanJHcHZjQ0F3RUFBYUFBTUEwR0NTcUdTSWIzRFFFQgpDd1VBQTRJQkFRQXV0ZlpQTTlVODlqaFR5ZzhXSkdsRThlOStuWXZ2MjBJQ08wTVV3bVB6dWNvWU1NMlNiK0x5CmhiS0lod3pUVW9QTk91RGk5aEEwaElVS0tmdmxiNENTOHI1UmJneWdheDNMUHpENXlZS1ZZTGR5NmNYRW9EWmoKbUx5d1VpTHY4UnNKdjI3TUF4bEZoZnBrZXFodTZPVTJBaGlWR
    signerName: kubernetes.io/kube-apiserver-client
      usages:
      - client auth
      
    Now let's create it with CertificateSigningRequest
    kubectl create -f mahi-csr.yaml
    You can see the CSR status using following command
    kubectl get csr 
    The CSR status can be any one of these values 'Approved', 'Issued', or 'Pending'

    Kubernetes Certificates

    Using 'kubectl certificate' object we Kubernetes Administrators can review the CertificateSigningREquest and then decide wheather to 'approve' or 'deny' the CSR. Before this we must recheck the status of the CSR from above 'kubectl get csr' command.
    To aprove the CSR request which we have prepared in the steps for mahi user. When you do a review of the CSR file content
    kubectl certificate approve mahi 
    
    If you thing the request doesn't look good you can reject by denying it.
    kubectl certificate deny agent-xyz
    To get rid of the inappropriate user csr request we can delete the csr.
    kubectl delete csr agent-xyz 
    
    kubectl get csr # To confirm it is deleted 
    
    This approved certificate can be viewed in YAML format
    kubectl get csr mahi -o yaml 
    
    copy the certificate from the above output it is in base64 encrypted format so need to decode it.
    echo "copy paste the certificate value from above yaml output" | base64 --decode 
    you could see the first and last lines mentioned with BEGIN and END CERTIFICATE All the certificate operations carried out by Controller Manager, If you look inside this ControllerManager it is having CSR-APPROVING, CSR-SIGNING they are responsible for carrying out these specific tasks. If anyone has sign certifciates they need Root Certificate and key of CA that we can see details with:
    cat /etc/kubernetes/manifests/kube-controller-manager.yaml 

    Official Document reference: 

    Thursday, October 13, 2022

    Kubernetes Security - Multiple Cluster with Multiple User Config

    Hello Guys! in this post we are going to explore about the Kubeconfig. This is a special configuration that will be part of Kubernetes Security. We can configure multiple clusters and different users can access these Kubernetes cluster. We can also configure the users can have access to multiple clusters.

    When we started working on Kubernetes Cluster there is a config file automatically generated for us. 

    To access a Kube Cluster using the certificate files generated for admin user can be given as follows:
    kubectl get pods \
     --server controlplane:6443
     --clisent-key: admin.key
     --client-certificate admin.crt 
     --certificate-authority ca.crt 
     
    Every time passing all these TLS details(server,client-key,client-certificate, certificate-authority) including in the kubectl command is tedious process. Instead of this we can move TLS Certificate file set into a config file that is called kubeconfig file. The usage will be as follows
    kubectl get pods 
      --kubeconfig config 
    
    Usually this config file will be stored under .kube inside the home directory. If the config file present in this $HOME/.kube/ location and file name as config is automatically detected by the kubectl command while executing.


    What is KubeConfig contains?


    The kubeconfig file have three sections clusters, users, contexts

    Cluster section used to define the multiple sets of Kubernetes clusters such as development, testing, preprod and prod environment wise cluster or different organizations integrations use separate clsuter or different cloud providers can have clusters example google-cluster or azure-cluster etc.

    And in the Users section we can have admin user, developer user etc. These users may have different privileges on different cluster resources.

    Finally contexts manages the above two sections together mapping to form a context. here we will get to know that which user account will be used to access which cluster.

    Remember, we are not going to create any new users or configuring any kind of user or authorization in this kubeconfig. We will be using only the existing users with their existing privileges and defining what user acces what cluster mapping. This way we don't have to specify tht user certifcates and server URL in each and every kubectl command to run.

    The kubeconfig is in yaml format which basically have above mentioned three sections.
    Kubernetes Configuration with different clusters map to Users


    Filename: vybhava-config
    apiVersion: v1
    kind: Config
    
    clusters:
    - name: vybhava-prod-cluster
      cluster:
        certificate-authority: /etc/kubernetes/pki/ca.crt
        server: https://controlplane:6443
    
    - name: vybhava-dev-cluster
      cluster:
        certificate-authority: /etc/kubernetes/pki/ca.crt
        server: https://controlplane:6443
    
    - name: vybhava-gcp-cluster
      cluster:
        certificate-authority: /etc/kubernetes/pki/ca.crt
        server: https://controlplane:6443
    
    - name: vybhava-qa-cluster
      cluster:
        certificate-authority: /etc/kubernetes/pki/ca.crt
        server: https://controlplane:6443
    
    contexts:
    - name: operations
      context:
        cluster: vybhava-prod-cluster
        user: kube-admin
        
    - name: test-user@vybhava-dev-cluster
      context:
        cluster: vybhava-dev-cluster
        user: test-user
    
    - name: gcp-user@vybhava-gcp-cluster
      context:
        cluster: vybhava-gcp-cluster
        user: gcp-user
    
    - name: test-user@vybhava-prod-cluster
      context:
        cluster: vybhava-prod-cluster
        user: test-user
    
    - name: research
      context:
        cluster: vybhava-qa-cluster
        user: dev-user
    
    users:
    - name: kube-admin
      user:
        client-certificate: /etc/kubernetes/pki/users/kube-admin/kube-admin.crt
        client-key: /etc/kubernetes/pki/users/kube-admin/kube-admin.key
    - name: test-user
      user:
        client-certificate: /etc/kubernetes/pki/users/test-user/test-user.crt
        client-key: /etc/kubernetes/pki/users/test-user/test-user.key
    - name: dev-user
      user:
        client-certificate: /etc/kubernetes/pki/users/dev-user/dev-user.crt
        client-key: /etc/kubernetes/pki/users/dev-user/dev-user.key
    - name: gcp-user
      user:
        client-certificate: /etc/kubernetes/pki/users/gcp-user/gcp-user.crt
        client-key: /etc/kubernetes/pki/users/gcp-user/gcp-user.key
    
    current-context: operations
    

    To view the configuration of current cluster you must have the config in $HOME/.kube/config 

    The content of kubernetes configuration can be view with the following command: :
    kubectl config view 
    Kubernetes Cluster view when default config used


    To view newly created customized configurations, we need to specify the file path "vybhava-config" file. Note here the "vybhava-config" is available in the current directory.
    kubectl config view --kubeconfig=vybhava-config


    Know your Kubernetes cluster 

    To check the list of cluster(s) exist in the default kubernetes cluster config
    kubectl config get-clusters
    Work with your customized config file vybhava-config to know clusters list
    kubectl config get-clusters --kubeconfig=vybhava-config

    Knowing about Kubernetes cluster from Kube Config


    KuberConfig user details

    To check the list of user(s) exist in the default kubernetes cluster config
    kubectl config get-users
    Work with your customized config file vybhava-config to know user list
    kubectl config get-users --kubeconfig=vybhava-config


    KubeConfig getting the users list

    KubeConfig Context

    Here the context will be using users, clusters  and each context is identified with a name define also here we can sees at the end of the configuration  current context. 

    To find how many contexts in vybhava-config To know for default cluster contexts :
    kubectl config get-contexts
    To identify what user configured in the 'operator' context we need to use the 'get-contexts' option the mapping output is displayed as a table where 'CURRENT' context will be pointed with '*' in the column.
    kubectl config --kubeconfig=vybhava-config get-contexts
    Kubernetes Config getting Contexts using kubectl

    Here in the Context section we could add a field namespace that can be specific to project module such as production cluster can be mapped to HR application that runs with hr-finance,hr-hirings namespce.

    Here we have executed all possible choices for fetching the Users, Clusters, Context from KubeConfig object. Now let's try to set the context


    delete user

    kubectl config --kubeconfig=vybhava-config get-users
    kubectl config --kubeconfig=vybhava-config delete-user test-user
    kubectl config --kubeconfig=vybhava-config get-users
    Deletion of Users from Config


    delete cluster

    kubectl config --kubeconfig=vybhava-config get-clusters 
    kubectl config --kubeconfig=vybhava-config delete-cluster vybhava-gcp-cluster
    kubectl config --kubeconfig=vybhava-config get-clusters 
    
    Kubernetes Cluster deletion from KubeConfig


    delete context

    kubectl config --kubeconfig=vybhava-config get-contexts 
    kubectl config --kubeconfig=vybhava-config delete-context gcp-user@vybhava-gcp-cluster
    kubectl config --kubeconfig=vybhava-config get-contexts 
    
    Deletion of Context from Kube Config

    The certificate files can be part in cluster certificate-authority user certificates, The best tells that instead of using admin.crt we must use absolute path to the certificate files such as here /etc/kubernetes/pki/ca.crt and one more way to use certificate-authority-data field value can be used with certificate file content base64 encoded data. As we learnt about the content is sensitive then we need to use base64 command to encode run command as  "base64 ca.crt" and that can be understood by Kubernetes automatically. 

    Tuesday, October 4, 2022

    Kubernetes Secrets

    Hello DevOps | DevSecOps teams, we are running into the new generation of microservices inside Pods where we need to focus on how we can protect them. And here this post is going with the Security rules imposing on the Kubernetes Cluster with Secret Objects which are specially designed to store the sensitive data in them to refer inside the Pod Containers. But they have limitation that they can hold up to 1MB size of data only.  

    Why Secret objects?

    • We can store Password, keys, tokens, certificates etc
    • Secrets will reduce the risk of exposing sensitive data
    • Access secrets using volumes and environment variables
    • Secrets object will be created outside pod/containers 
    • When it is created there is NO clues where it will be injected
    • All secrets resides in ETCD database on the K8s master


    This Kubernetes Secret Objects are similar to ConfigMaps Objects 

    Kubernetes Secret objects Using Volume, ENVIRONMENT variables

    Pre-check first we will check the Kubernetes Cluster is up and running.
    kubectl get nodes
    
    All the Kubernetes master and slave nodes are in Ready status.

    There are two ways to access these Secrets inside the Pod.
    1. Using Environment variables 
    2. Assign to Path inside Pod 

    Creating Kubernetes Generic Secrets

    We are talking about Secrets, Let's create a text that can be converted to encrypted format, if we want we can decode that into plain text. In Linux CLI we have base64 command that will be used to do this encode or decode text from file or from standard input to display on standard output that is on our terminal. 

    Secrets can be created in Kubernetes following ways: 

    1. from file or directory
    2. from literals
    3. Using YAML Declarative approace

    echo "admin" | base64 > username.txt 
    cat username.txt 
    cat username.txt | base64 -d
    
    # Now password
    echo "abhiteja" |base64 > password.txt
    cat password.txt | base64 -d
    
    # Create secret from file
    kubectl create secret generic db-user-pass --from-file=./username.txt --from-file=./password.txt
    kubectl get secrets
    kubectl describe secrets db-user-pass
    

    Validate

    Kubernetes secret creation with username, password

    The Pod  with Redis  image will be using the secrets as environment variables


    FileName: secretenv-pod.yml

    apiVersion: v1
    kind: Pod
    metadata:
      name: secret-env-pod
    spec:
      containers:
      - name: mycontainer
        image: redis
        env:
          - name: SECRET_USERNAME
            valueFrom:
              secretKeyRef:
                name: db-user-pass
                key: username.txt
          - name: SECRET_PASSWORD
            valueFrom:
              secretKeyRef:
                name: db-user-pass
                key: password.txt
      restartPolicy: Never  
    You can create the Pod using the following command:
    kubectl create -f secretenv-pod.yml
    kubectl get pods


    Secret environment variables in Redis Pod

    Get inside the Redis Pod into the container and check with the 'env' command which will show the SECRET_USERNAME and SECRET_PASSWORD 
    kubectl exec -it secret-env-pod -- bash 
    env | grep SECRET


    Secret as environment variables inside Pod Container

    From the literal

    Now let's see the simple option that is using --from-literal we can have as many as you wish to store as secret here I'm using three variables stored int the 'mysqldb-secret' object.
      
    k create secret generic mysqldb-secret \
     --from-literal=DB_Host=mysql01.vybhava.com \
     --from-literal=DB_User=root \
     --from-literal=DB_Password=Welcome123
     
      k describe secret mysqldb-secret
      k get secret -o yaml
      
    Execution output as follows:
    Kubernetes Secret creation from literal example

     
    Pod implementation the secret object you can see in the first option we have already discussed.

    Creating the Secret declarative way

    We can create a secret using the YAML where we can set the data fields as encrypted values

    Filename : mysecret.yaml
    apiVersion: v1
    data:
      username: a3ViZWFkbQo=
      password: a3ViZXBhc3MK
    kind: Secret
    metadata:
      name: mysecret
    Let's create the secret object with kubectl command
    kubectl create -f mysecret.yaml
    kubectl get secrets
    kubectl describe secrets mysecret
    

    Creating secret object in Kubernetes using kubectl


    Note that secret never shows the data present in the secret section, instead it will be showing the size of the data. It is like masking the sensitive data. And this secrete can be used inside the Pod defination as follows: Filename: mypod.yaml
    apiVersion: v1
    kind: Pod
    metadata:
      name: mypod
    spec:
      containers:
      - name: mypod
        image: redis
        volumeMounts:
        - name: redis-db
          mountPath: "/etc/redis-db"
          readOnly: true
      volumes:
      - name: redis-db
        secret:
          secretName: mysecret
    Creating the mypod defined as Pod and that using the volume defined with the secret section with mysecret which will referred to the above secret that we have created earlier.

    Create Pod that uses secrets as volume

    Encryption at rest configuration

    The secrets which are created in the Kubernetes are not really not secrets! So we don't share these declarative YAML files in source code repositories. 

    How this secret is stored in the ETCD DB 
    To know this we must have etcd-client installed on your machine, on my system it is Ubuntu so let me install it.

    apt-get install etcd-client
    # Validate installation 
    etcdctl 
      
    Kubernetes ETCD DB Client installation on Ubuntu


    Hope you enjoyed this post!!
    Please share with your friends and comment if you find any issues here.

    External References:

    Categories

    Kubernetes (25) Docker (20) git (15) Jenkins (12) AWS (7) Jenkins CI (5) Vagrant (5) K8s (4) VirtualBox (4) CentOS7 (3) docker registry (3) docker-ee (3) ucp (3) Jenkins Automation (2) Jenkins Master Slave (2) Jenkins Project (2) containers (2) create deployment (2) docker EE (2) docker private registry (2) dockers (2) dtr (2) kubeadm (2) kubectl (2) kubelet (2) openssl (2) Alert Manager CLI (1) AlertManager (1) Apache Maven (1) Best DevOps interview questions (1) CentOS (1) Container as a Service (1) DevOps Interview Questions (1) Docker 19 CE on Ubuntu 19.04 (1) Docker Tutorial (1) Docker UCP (1) Docker installation on Ubunutu (1) Docker interview questions (1) Docker on PowerShell (1) Docker on Windows (1) Docker version (1) Docker-ee installation on CentOS (1) DockerHub (1) Features of DTR (1) Fedora (1) Freestyle Project (1) Git Install on CentOS (1) Git Install on Oracle Linux (1) Git Install on RHEL (1) Git Source based installation (1) Git line ending setup (1) Git migration (1) Grafana on Windows (1) Install DTR (1) Install Docker on Windows Server (1) Install Maven on CentOS (1) Issues (1) Jenkins CI server on AWS instance (1) Jenkins First Job (1) Jenkins Installation on CentOS7 (1) Jenkins Master (1) Jenkins automatic build (1) Jenkins installation on Ubuntu 18.04 (1) Jenkins integration with GitHub server (1) Jenkins on AWS Ubuntu (1) Kubernetes Cluster provisioning (1) Kubernetes interview questions (1) Kuberntes Installation (1) Maven (1) Maven installation on Unix (1) Operations interview Questions (1) Oracle Linux (1) Personal access tokens on GitHub (1) Problem in Docker (1) Prometheus (1) Prometheus CLI (1) RHEL (1) SCM (1) SCM Poll (1) SRE interview questions (1) Troubleshooting (1) Uninstall Git (1) Uninstall Git on CentOS7 (1) Universal Control Plane (1) Vagrantfile (1) amtool (1) aws IAM Role (1) aws policy (1) caas (1) chef installation (1) create organization on UCP (1) create team on UCP (1) docker CE (1) docker UCP console (1) docker command line (1) docker commands (1) docker community edition (1) docker container (1) docker editions (1) docker enterprise edition (1) docker enterprise edition deep dive (1) docker for windows (1) docker hub (1) docker installation (1) docker node (1) docker releases (1) docker secure registry (1) docker service (1) docker swarm init (1) docker swarm join (1) docker trusted registry (1) elasticBeanStalk (1) global configurations (1) helm installation issue (1) mvn (1) namespaces (1) promtool (1) service creation (1) slack (1)