Showing posts with label AWS. Show all posts

Tuesday, June 13, 2023

Bitbucket Server installation on Linux

Bitbucket installation 

Bitbucket is most widely used in the IT industry to provide team collaborative work for short size of teams. Its greater ability is to have integration with Jira and other DevOps tools. Bitbucket encourages private repository creation by default. So they are mostly not available for search engines to discover these projects! So startup projects will do better here.

Prerequisites

JRE/JDK: To run the web UI Java is required, Your system must have the JRE/JDK, we can go with the Open JDK as you know that Oracle JDK is now not open to everyone to download!
Git: To run the Bitbucket we need Git as a source-code management tool.

Ensure the default port 7990 is available on the system. If you are running on the Cloud ensure the TCP port /7990 allows inbound traffic. On the AWS you need to update the Security Group that associated with the EC2 instance.

Option of Vagrant box 
 
Vagrant.configure(2) do |config|
    config.vm.box = "centos/8"
    config.vm.boot_timeout=600
    #config.landrush.enabled = true

    config.vm.define "mstr" do |mstr|
    mstr.vm.host_name = "mstr.devopshunter.com"
    mstr.vm.network "private_network", ip: "192.168.33.100"
     mstr.vm.provider "virtualbox" do |vb|
     vb.cpus = "4"
     vb.memory = "4096"
     end  
    end
      config.vm.define "node1" do |node1|
      node1.vm.network "private_network", ip: "192.168.33.110"
      node1.vm.hostname = "node1.devopshunter.com"
        node1.vm.provider "virtualbox" do |vb|
         vb.cpus = "2"
         vb.memory = "1024"
         end
     end
    
    config.vm.define "node2" do |node2|
    node2.vm.network "private_network", ip: "192.168.33.120"
    node2.vm.hostname = "node2.devopshunter.com"
        node2.vm.provider "virtualbox" do |vb|
        vb.cpus = "2"
        vb.memory = "1024"
        end
    end
 
  end
  

1) Bitbucket supports git version 2.31 to 2.39 currently 
2) Minimum ram required is 3GB. So need to modify the below line in vagrant file
vb.memory = "4096" then run vagrant reload mstr to get working.

If you want to install on CentOS/8

 
sudo yum remove git* -y

 sudo yum install java wget -y
 sudo yum groupinstall -y 'Development Tools';
 sudo yum install -y autoconf curl-devel expat-devel gettext-devel openssl-devel perl-CPAN zlib-devel gcc make perl-ExtUtils-MakeMaker cpio perl-CPAN vim
 
 wget https://mirrors.edge.kernel.org/pub/software/scm/git/git-2.39.3.tar.gz
 tar zxvf git-2.39.3.tar.gz
 cd git-2.39.3/
 ./configure
 make
 sudo make install prefix=/usr install
	

 wget https://product-downloads.atlassian.com/software/stash/downloads/atlassian-bitbucket-8.11.0-x64.bin
 sudo chmod +x atlassian-bitbucket-8.11.0-x64.bin
 ./atlassian-bitbucket-8.11.0-x64.bin
  

Bitbucket Setup configuration

Product: Bitbucket
License type: Bitbucket (server)
Organization: vybhavatechnologies
your instance is up and running
server-id: BDFG-ZKCQ-RWTR-YOXP [changes for you!]

click on the "Generate License" Button
pop-up confirmation please confirm it so that you can see the evaluation 90 days license key will be shown in the gray text box.

come to set up 
next Administrator account setup 
Username: admin
full name pavan devarakonda
email address pavan.dev@devopshunter.com
Please enter the strong password, enter same in the confirm password 

Goto bitbucket 


Login with a newly created admin account. Enjoy your Project creation and each Project can have multiple repositories. The repository which you create on the Bitbucket Web-UI is an empty bare repository. 


For Windows
- GitBash
- BitBucket 

How to add a project to git repo to the remote server.

On your local have a project directory and have some code.

Create a repo on the bitbucket say 'demo-repo1'
On your client VM or from your Personal Laptop Gitbash navigate to the folder and run the following command sequence to push the code to remote repository :
cd demo-local
git init 

git remote add origin https://url-demo-repo1.git  
git add .
git commit -m "update"
git push -u origin master
all the files in the demo-local will be added to remote repo.
Check the changes on the browser on the remote repo.

Saturday, October 1, 2022

K8s Storage Volumes Part 4 - Dynamic Provisioning

Hello guys! I am back with new learning on the Kubernetes Storage Volume section series of posts, We have already seen that how we can create a PV, And then claiming that with different PVC, then you can use the PVC in the Pod manifestation under volumes section, But, in this post we will be exploring the various options available for Dynamic Provisioning with StorageClass.

StorageClass - PersistentVolumeClaim used in Pod


Wanted to know Kubernetes StorageClasses in depth. Visited many blog posts with different cloud choices people are working. Initially I've gone through the Mumshadmohammad session and practice lab, triedout on GCP platform.
Previous Storage related posts

Basically, Kubernetes maintains two types of StorageClasses:
  1. Default storage class (Standard Storage class)
  2. User-defined storage class (Additional which is created with kubectl)
The additional storage-class will depend on the Public Cloud platform storage, There are different Provisioners :

  • On Azure - kubernetes.io/azure-disk
  • On AWS - kubernetes.io/aws-ebs
In this post, let's explore the AWS EBS option

# storageclass-aws.yml
kind: storageclass
apiVersion: storage.k8s.io/v1
metadata:
  name: aws-ebs-storageclass
provisioner: kubernetes.io/aws-ebs 
parameters:
  type: gp2
The key to dynamic provisioning is storage class. Thanks to Kubernetes have this great feature. The storage class manifestation starts with provisioner, this is depends on the Cloud platform which provides different storage abilities as per the access speed and size also matters.
kuberntes.io/gce-pd is the provisioner provided by Google. its related parameters we have define pd-standard, zone, reclaim policy. If you created using a storage class it will inherit its reclaim policy.
The Kubernetes cluster administrator setup one or more number of storage provisioners. Using which admin must create one or more storage classes and then user/developer will create claim (PVC). Where it uses storage class name field and then Kubernetes will creates automatically a PV that actual storage will linked. This way dynamically provisioned based on requested capacity, access mode, reclaim policy and provisioner specified in PVC and the matching storage class. And finally user use that claim as volume.
 
Specific to GCP users:
gcloud beta compute disks create \
  --size 1GB --region us-east1 pd-disk 
You can either use pv or storage class just for your reference here is the pv manifestation file:
#File: pv.yaml  
---
apiVersion: v1
kind: PersistentVolume
metadata:
  name: gcp-pv
spec:
  accessModes:
    - ReadWriteOnce
  capacity:
    storage: 500M
  gcePersistentDisk:
    pdName: pd-disk
	fsType: ext4
In the PV defination you can tell the specific size and filesystem type as well in your control. We are going to run this on GKE
gcloud container clusters get-credentials pd-cluster 
Defining the storage class with the following YAML
# File: sc-def.yaml
apiVersion: storage.k8s.io/v1
kind: StorageClass
metadata:
  name: google-sc
provisioner: kuberntes.io/gce-pd
parameters:
  type: pd-standard
  zone: us-east1-a 
reclaimPolicy: Delete

Now create it and validate it's creation
kubectl create -f sc-def.yaml
kubectl get sc 
Now let's create this claim PVC as follows:
  
# File: pvc-def.yaml  
apiVersion: v1
kind: PersistentVolumeClaim
metadata:
  name: myclaim
spec:
  accessMode:
    - ReadWriteOnce
  resources:
    requrests:
      storage: 500Mi
  storageClassName: "google-sc"
Here PVC uses the storage class which created in the above step.
kubectl create -f pvc-def.yaml
kubectl get pv,pvc 
Now all set to proceed to use the storage into a Deployment-Pod.
# File: mysql-deploy.yaml 
---
apiVersion: app/v1
kind: Deployment-Pod
metadata:
  name: mysql
  labels:
    app: mysql-db 
spec:
  replicas: 1
  selector:
    matchLabels:
	  pod-labels: mysql-pods
	spec:
	  containers:
	  - name: mysql
	    image: mysql:alpine
		env:
		- name: MYSQL_ALLOW_EMPTY_PASSWORD
		  valure: true
		volumeMounts:
		- name: mysql-data
		  mountPath: /var/lib/mysql
		  subPath: mysql
		volumes:
		- name: mysql-data
		  persistentVolumeClaim:
		    claimName: myclaim 
Create the mysql database processing pod
kubectl create -f mysql-db.yaml
kubectl get deploy,po 
To get into mysql db we need to get the shell acces into the pod.
kubectl exec -it mysql-podid -- /bin/bash 
Inside the container:
mysql
create database clients;
create table clients.project(type varchar(15));

insert into clients.project values ('evcars-stats');
insert into clients.project values ('electric-cars');
insert into clients.project values ('jagwar-cars');
Check the content of the database table:
select * from clients.project; 
Exit from the pod shell and Now try to delete this pod which is in deployment so it will replace new pod automatically. get inside the pod shell again check the database table content if all looks good then our test case is successful! Congratulations you learnt how to use Kubernetes Dynamic provisioning!
Cleanup Storage classes stuff using the kubectl delete command

The sequance goes as this:
1. Delete the Pod: kubectl delete pod sc-pod
2. Delete the PVC: kubectl delete pvc test-pvc
3. Delete StorageClass: kubectl delete sc test-sc

References:

Sunday, May 15, 2022

Controlling EC2 Instance from CLI: AWS automations

When you start learning few commands about AWS CLI you can plan to automate the process with simple bash shell script where you can include set of aws commands into it with simple bash script controls. 

How to automate AWS EC2 stop/start using aws cli?

Objective of this post is to develop a simple controlling script which can use the AWS CLI commands for start-instances, describe-instances, stop-instances and adding bash scripting logic to it. First we start experiment with each aws ec2 command, then we can proceed by collecting those successful commands to form a automation script. Let's explore now.

How to automate AWS EC2 instance using aws-cli


How to start an AWS EC2 instance "start-instances" command


To start the aws instance you need to pass the instance-id as argument. Following is the command example.
aws ec2 start-instances --instance-id i-instancenumber
Please change to your instance-id value replace the instancenumber with yours.
Execution output looks like this:

aws ec2 start-instances execution initially in pending state


aws ec2 stop-instances command

To stop the AWS EC2 Instance you need to pass the instance-id as a argument. Following is the command example.
aws ec2 stop-instances --instance-id i-instancenumber
Please change to your instance-id value replace the instancenumber with yours.

EXECUTION
aws ec2 stop-instances


Describe instance status


The describe-instances-status subcommand will show the InstanceState, InstanceStatus and also SystemStatus. We can pick any of these as per the automation needs.
aws ec2 describe-instances-status --instance-id i-instancenumber
Please change to your instance-id value replace the instancenumber with yours.
Describing instance status specific to InstanceState which can be extracted as Name value and here trick is use the --output to TEXT format.

aws ec2 describe-instance-status --instance-id i-instancenumber \
 --query 'InstanceStatuses[*].InstanceState.Name' --output text
This output is nicely choped to test wheather an instance is in 'running', 'stopped', or 'pending' state. Using this we can decide how to proceed next, if it is running we can move to the logic where stop the instance works. otherwise nothing [] is status then we can proceed to start instance logic.

Execution outputs as follows:

aws ec2 describe-instance-status execution output

How to get the EC2 Instance Public IP address?

The describe-instances subcommand will help us to retrieve all details of instances. So we use this subcommand to pick Private or Public IP Address of given EC2 instance. You need to provide the instanceid to fetch the EC2 instance public IP Address.

aws ec2 describe-instances --instance-id i-instancenumber \
 --query "Reservation[*].PublicIpAddress" --output text
Results the Public IP Address of given ec2 instance

Using we can prepare nice shell script to automate the instance start and stop and checking the status.

Once you get the INSTANCE_IP that is Public IP we can connect with ssh command as shown below:
  ssh -o "StrictHostKeyChecking=no" -i aws-key.pem centos@$INSTANCE_IP
  
Here option -i is used for identity file
and  option 
-o "StrickHostKeyChecking=no" indicates do not prompt for the SSH finger print value entry. You can understand without given this option see use of this.
running automation script output looks like this.

How to modify the security group for running EC2 instance?
There was a problem when I've ran the aws ec2 run command instance was created and able to see it is in Running state. But unfortunately the ssh connectivity failing with the error message "Port 22 refused connection". Here the solution could be the proper security group must be associated with the EC2 instance.

AWS CLI command to modify the security group which is already existing in my other EC2 instance that is Running state and connectivity also normal, from the AWS Console we can get the seurity-group id from the normal instance (node1) can be used in the Issue instance (node2). Two inputs required here node2 instance-id and node1 security group id.

 aws ec2 modify-instance-attribute --instance-id i-instanacenumber  --groups sg-securitygroupid
  
Example screenshot of execution:

 
AWS CLI to modify attribute for running EC2 isntance


Tuesday, May 12, 2020

Kubernetes (K8s) StatefulSet (sts)

Greetings of the day dear Orchestrator!! In this post, we will discuss exploring the Kubernetes StatefulSet(sts

What is the purpose of Stateful deployment?

Kubernetes' basic unit is Pod, which will be ephemeral in nature and it was designed in such a way that it cannot store the state. To store and maintain the state of the application, Kubernetes introduced a new type of deployment manifestation called it as StatefulSet.


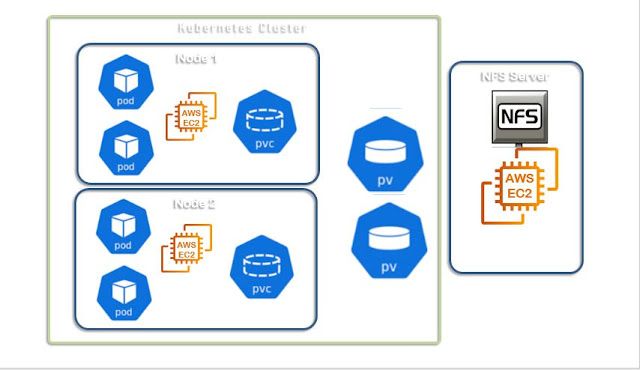
Here in this post, we will be experimenting with the most important deployment model that is StatefulSet which will be interconnected with the multiple storage related objects PersistantVolume(PV) and PersistentVolumeClaim (PVC).   

Assumptions

To work on this experiment you must have Kubernetes cluster running on single node or multi-node and it should have a NFS remote storage access that depends on your platform. Here I've EC2 instance having  NFS service configured and run:

Let's define the couple of PV(4) using the NFS server which will be consumed by the PVC. The Stateful deployment is going to have the Pod and PVC template manifestation.

Creating a YAML file for pvc :
apiVersion: v1
kind: PersistentVolume
metadata:
  name: nfs-pv0
spec:
  storageClassName: manual
  capacity:
    storage: 200Mi
  volumeMode: Filesystem
  accessModes:
    - ReadWriteOnce
  mountOptions:
    - hard
    - nfsvers=4.1
  nfs:
    path: /export/volume/pv0
    server: 172.31.46.253
---
apiVersion: v1
kind: PersistentVolume
metadata:
  name: nfs-pv1
spec:
  storageClassName: manual
  capacity:
    storage: 200Mi
  volumeMode: Filesystem
  accessModes:
    - ReadWriteOnce
  mountOptions:
    - hard
    - nfsvers=4.1
  nfs:
    path: /export/volume/pv1
    server: 172.31.46.253
---
apiVersion: v1
kind: PersistentVolume
metadata:
  name: nfs-pv2
spec:
  storageClassName: manual
  capacity:
    storage: 200Mi
  volumeMode: Filesystem
  accessModes:
    - ReadWriteOnce
  mountOptions:
    - hard
    - nfsvers=4.1
  nfs:
    path: /export/volume/pv2
    server: 172.31.46.253
---
apiVersion: v1
kind: PersistentVolume
metadata:
  name: nfs-pv3
spec:
  storageClassName: manual
  capacity:
    storage: 200Mi
  volumeMode: Filesystem
  accessModes:
    - ReadWriteOnce
  mountOptions:
    - hard
    - nfsvers=4.1
  nfs:
    path: /export/volume/pv3
    server: 172.31.46.253
Now, use the following command to create the PVC:
Syntax :
kubectl create -f nfs-pv.yaml
Output :
Checking the PVC are created or not with the simple ls command :
Syntax :
ls
Output :

Using another YAML file for creating PV files :
---
apiVersion: v1
kind: Service
metadata:
  name: nginx
  labels:
    app: nginx
spec:
  ports:
  - port: 80
    name: web
  clusterIP: None
  selector:
    app: nginx
---
apiVersion: apps/v1
kind: StatefulSet
metadata:
  name: web-sts
spec:
  serviceName: "nginx"
  replicas: 4
  selector:
    matchLabels:
      app: nginx
  template:
    metadata:
      labels:
        app: nginx
    spec:
      containers:
      - name: nginx
        image: gcr.io/google_containers/nginx-slim:0.8
        ports:
        - containerPort: 80
          name: web-sts
        volumeMounts:
        - name: www
          mountPath: /usr/share/nginx/html
  volumeClaimTemplates:
  - metadata:
      name: www
    spec:
      storageClassName: manual
      accessModes:
        - ReadWriteOnce
      resources:
        requests:
          storage: 100Mi 
Now, use the following command to create the PV:
Syntax:
kubectl create -f web-sts.yaml
Output :

Checking the PV are created or not with the following command :

Syntax :
kubectl get pv 
Output :

Ready to use Statefulsets now, you can watch all the running terms at one place by using the below command :
Syntax :
watch kubectl get all
Output :


Thursday, May 7, 2020

K8s Storage Volumes part 1 - EmptyDir

Hello, Dear DevOps enthusiasts, In this post, we are going to explore the emptyDir Volume, which is going to work as local data share between containers in a Pod.

I had read the book titled 'Kubernetes in action', from that book I want to understand Persistance Volumes and Persistence Volume Claims in detail. will run the following example for PV that uses emptyDir volume type.

Every new learning is like a game! if you take each trouble as a game level it will be a wonderful game. Once you finish the desired state it's winning the game! why to wait let's jump on this game

Kubernetes emptyDir Volume

Assumptions

  • Docker installed
  • Kubernetes Installed and configured Cluster
  • AWS access to EC2 instances


We need to create a Tomcat container and Logstash container in the Kubernetes pod. In the below diagram, it will share the log file using Kubernetes volume that is empty dir.


The tomcat and Logstash cant use the network via localhost and it will share the filesystem.
Creating a YAML file :

apiVersion: apps/v1
kind: Deployment
metadata:
  name: tomcat
spec:
  replicas: 1
  selector:
    matchLabels:
        run: tomcat
  template:
    metadata:
      labels:
        run: tomcat
    spec:
      containers:
      - image: tomcat
        name: tomcat
        ports:
          - containerPort: 8080
        env:
        - name: UMASK
          value: "0022"
        volumeMounts:
          - mountPath: /usr/local/tomcat/logs
            name: tomcat-log
      - image: docker.elastic.co/logstash/logstash:7.4.2
        name: logstash
        args: ["-e input { file { path => \"/mnt/localhost_access_log.*\" } } output { stdout { codec => rubydebug } elasticsearch { hosts => [\"http://elasticsearch-svc.default.svc.cluster.local:9200\"] } }"]
        volumeMounts:
          - mountPath: /mnt
            name: tomcat-log
      volumes:
        - name: tomcat-log
          emptyDir: {}

Output :


Now, creating the tomcat and logstash pods.
Syntax : 
kubectl create -f tomcat-longstash.yaml
Output :
Now, checking the tomcat and logstash pods are ready.
Syntax : 
kubectl get pods
Output :


Troubleshooting levels:
We have faced 2 levels of game-changers, when we tried to type the YAML file content it was a lot of indentations which matters a lot if you miss something it throughs error with hint as 'line numbers'. The most interesting thing when we define the two containers one after other, there is 'spec' should be handled properly.

In level 2 it is another adventurous journey, the Logstash image is no longer available in the docker hub. we have tweaked here and there to find what best repo gives this. With the googling reached to the elastic.co where ELK related images are published after replacing of Logstash image name. The second level of game over end entered into next level!


Finally, the last stage of the game, Connecting the logstash container and able to see the /mnt directory which contains logs that are generated from tomcat server. That concludes our experiment is successful.

Syntax : 
kubectl exec -it tomcat-646d5446d4-l5tlv -c logstash -- /bin/bash
ls /mnt

Output :

Hence this will conclude that we can define the manifestation for the inter container sharing the storage.

Enjoy this fun-filled learning on Kubernetes! contact us for support and help on the Infrastructure build and delivery.

Wednesday, May 6, 2020

K8s Storage NFS Server on AWS EC2 Instance

Hello DevOps enthuiast, In this psot we would like to explore the options available on Kubernetes Storage and Volume configurations. Especially in AWS environment if we have provisioned the Kubernetes Cluster then how we can use the storage effectively, need to know all the options. In the sequence of learning on 'Kubernetes Storage' experimenting on the NFS server on AWS EC2 instance creation and using it as Persistent Volume. In the later part, we would use the PVC to claim the required space from the available PV. That in turn used inside the Pod as specifying a Volume. 

Kubernetes Storage: NFS PV, PVC

Assumptions

  • Assuming that you have AWS Console access to create EC2 instances. 
  • Basic awareness of the Docker Container Volumes
  • Understand the need for Persistency requirements

Login to your aws console
Go to EC2 Dashboard, click on the Launch instance button
Step 1: Choose an AMI: "CentOS 7 (x86_64) - with updates HVM" Continue from Marketplace


Step 2: Choose instance type:


Step 3: Add storage: Go with default 1 vCPU, 2.5GHz and Intel Xeon Family, meory 1GB EBS, click 'Next'


Step 5: Add Tags: Enter key as 'Name' and Value as 'NFS_Server'


Step 6: Configure Security Group: select existing security group


Step 7: Review instance Launch: click on 'Launch' button


Select the existing key pair or create new key pair as per your need


 Now Let's use PUTTY terminal login as centos and switch to root user using 'sudo -i'
yum install nfs-utils -y
systemctl enable nfs-server
systemctl start nfs-server
 mkdir /export/volume -p
chmod 777 /export/volume
vi /etc/exports
write the following
  /export/volume *(no_root_squash,rw,sync)
Now save and quit from vi editor and run the following command to update the Filesystem.
  exportfs -r
  
Confirm the folder name by turning it to green colored by listing the folder.
  ls -ld /export/
  

Here the NFS volume creation steps completed! ready to use. # Kuernetes PersistentVolume, PersistentVolumeClaim
Create 'nfs-pv.yaml' file as:
apiVersion: v1
kind: PersistentVolume
metadata:
  name: nfs-pv
spec:
  capacity:
    storage: 5Gi
  volumeMode: Filesystem
  accessModes:
    - ReadWriteOnce
  mountOptions:
    - hard
    - nfsvers=4.1
  nfs:
    path: /export/volume
    server: 172.31.8.247
 
Let's create the PersistentVolume with NFS mounted on separate EC2 instance.
  kubectl create -f nfs-pv.yaml
Check the pv creation successful by kubectl command
  kubectl get pv
 

Create PersistenceVolumeClaim

Now create a pvc PersistentVolumeClaim with:
apiVersion: v1
kind: PersistentVolumeClaim
metadata:
  name: my-nfs-claim
spec:
  accessModes:
    - ReadWriteOnce
  volumeMode: Filesystem
  resources:
    requests:
      storage: 5Gi
      
Now use the create subcommand:
  kubectl create -f my-nfs-claim.yaml
Let's validate that PVC created
  kubectl get pvc
Now all set to use a Database deployment inside a pod, let's choose MySQL.
proceed with creating a file with name as mysql-deployment.yaml manifestation file:
apiVersion: apps/v1 # for versions before 1.9.0 use apps/v1beta2
kind: Deployment
metadata:
  name: wordpress-mysql
  labels:
    app: wordpress
spec:
  selector:
    matchLabels:
      app: wordpress
      tier: mysql
  strategy:
    type: Recreate
  template:
    metadata:
      labels:
        app: wordpress
        tier: mysql
    spec:
      containers:
      - image: mysql:5.6
        name: mysql
        env:
        - name: MYSQL_ROOT_PASSWORD
          value: welcome1
        ports:
        - containerPort: 3306
          name: mysql
        volumeMounts:
        - name: mysql-persistent-storage
          mountPath: /var/lib/mysql
      volumes:
      - name: mysql-persistent-storage
        persistentVolumeClaim:
          claimName: my-nfs-claim
  
Let's create the mysql deployment which will include the pod definitions as well.
kubectl create -f mysql-deployment.yaml
# Check the pod list
kubectl get po -o wide -w
>> Trouble in ContainerCreating take the name of the pod from the previous command.
kubectl logs wordpress-mysql-xx
check nfs mount point shared On the nfs-server ec2 instance
exportfs -r
exportfs -v

Validation of nfs-mount: Using the nfs-server IP mount it on the master node and worker nodes.
mount -t nfs 172.31.8.247:/export/volume /mnt
Example execution:
root@ip-172-31-35-204:/test
# mount -t nfs 172.31.8.247:/export/volume /mnt
mount: /mnt: bad option; for several filesystems (e.g. nfs, cifs) you might need a /sbin/mount.type helper program.
The issue is with nfs on master and cluster verified with:
ls -l /sbin/mount.nfs
Example check it...
root@ip-172-31-35-204:/test# ls -l /sbin/mount.nfs
ls: cannot access '/sbin/mount.nfs': No such file or directory
This confirms that nfs-common not installed on the master node. same thing required on worker nodes aswell. Fix: The client needs nfs-common:
sudo apt-get install nfs-common -y
Now you need th check that mount command works as expected.After confirming mount is working then unmount it.
umount /mnt
Check pod list, where the pod STATUS will be 'Running'.
kubectl get po
SUCCESSFUL!!! As Volume Storage is mounted we can proceed! Let's do the validation NFS volume Enter into the pod and see there is a volume created as per the deployment manifestation.
kubectl exec -it wordpress-mysql-newpod-xy /bin/bash

root@wordpress-mysql-886ff5dfc-qxmvh:/# mysql -u root -p
Enter password:
Welcome to the MySQL monitor.  Commands end with ; or \g.
Your MySQL connection id is 2
Server version: 5.6.48 MySQL Community Server (GPL)

Copyright (c) 2000, 2020, Oracle and/or its affiliates. All rights reserved.

Oracle is a registered trademark of Oracle Corporation and/or its
affiliates. Other names may be trademarks of their respective
owners.

Type 'help;' or '\h' for help. Type '\c' to clear the current input statement.

create database test_vol;


mysql> create database test_vol;
Query OK, 1 row affected (0.01 sec)

show databases
Test that persistant volume by deleting the pod
kubectl get po
kubectl delete po wordpress-mysql-886ff5dfc-qxmvh
kubectl get po
As it is auto healing applied and new pod will be created, inside the new pod expected to view the volume with
  kubectl exec -it wordpress-mysql-886ff5dfc-tn284 -- /bin/bash
Inside the container now
mysql -u root -p
enter the password 
Surely you could see that "test_vol" database accessible and available from this newly created pod.
show databases;
Hence it is proved that the volume used by pod can be reusable even when pod destroyed and recreated.
Go and check the nfs-server mounted path /export/volume you can see the databases created by the mysql database will be visible. 

Reference: https://unix.stackexchange.com/questions/65376/nfs-does-not-work-mount-wrong-fs-type-bad-option-bad-superblockx

Saturday, November 16, 2019

Best Performance DevOps interview Questions

I hope you all doing great with DevOps learnings! There is a huge demand for DevOps engineers, where people turning from the many freshers turning to DevOps Engineer roles and becoming experts after exploring. Here I would like to target the key DevOps tools as interview questions.

Here I'm collecting interesting DevOps interview questions out of my experiences and some of my friends who attended in various companies. And also made some of them collected from the most highly professional session delivered in the YouTube tutorials.

World-class DevOps Interview Questions

SCM Questions

  1. Can we build some code from SVN and some from the GIT repository in a single Jenkins job?
  2. Merging two branches merge conflicting? How do you resolve it?
  3. What is the difference between git clone, git fetch and git pull?
  4. How do you deal with git remote repository?

AWS Interview Questions

  1.  AMI instance took the snapshot from recently build instance, How can I create a new instance?
  2.  Can you change VPC? when you do that? What are the restrictions on VPC?
  3. What is S3 used for? 
  4. What is EC2 in AWS?
  5. What is Route53? Which situations you will use it?
  6. What are the storage options in AWS? Explain what are the advantages for each type?

Linux/Unix Shell scripting


  1. How do you find the number of files used by a particular user?
  2. How to find and replace the strings in vi editors?
  3. Can you tell the steps involved in the shell script to find the latest 5 days log files archive them, then remove them from the location?
  4. What are the options we have for filtering data using regular expression?
  5. What are the differences between Linux and UNIX?

Docker Interview Questions

  1. Can you write a simple Dockerfile where a webserver runs?
  2. What is the difference between ENTRYPOINT and CMD?
  3. How to parameterized the run time containers?
  4. How do Docker Host and Docker client communicate?
  5. What is Docker Swarm do?
  6. What do you understand about the image and containers in Docker?
  7. What are the types of Docker repositories?
  8. How do you provide Docker security?
  9. What are the differences between Docker EE and Docker CE?
  10. What is the default Docker network?
  11. What are the features of Docker Universal Control Plane (UCP)?
  12. Why do we need Docker Trusted Registry(DTR)?
  13. What is the best orchestration tool for Docker? Why?
  14. How do you store data for a container that runs a database?
  15. What is the best way to bring up/down the web server, application server and a database like MySQL in a sequence?


Kubernetes Interview Questions

  1. What is the Kubernetes architecture explain to me in detail?
  2. How does Master-Slave work in Kubernetes?
  3. What are the namespaces in Kubernetes?
  4. How does the persistant volume works in Kubernetes?
  5. What all possible networks available for Kubernetes?
  6. How do you deploy an application on Kubernetes Cluster?
  7. How do you scale the services in Kubernetes?
  8. What is a replica set in Kubernetes?
  9. What does configMap do in Kubernetes?
  10. What is a Pod? How many types of Pods used in Kubernetes?
  11. How do you integrate docker images to build and ship to a Kubernetes cluster?
  12. How do you allocate the resources for a Kubernetes cluster?

Prometheus Interview Questions


  1. What is Prometheus? explain the purpose.
  2. How do you install and configure Prometheus?
  3. How do you start Prometheus?
  4. Why should you select Prometheus, Grafana and Alertmanager stack used?
  5. How do Prometheus store TSDB data? explain configuration options.
  6. What are the recently encounter issues in Prometheus monitoring system?
  7. What are the features of PromQL?
  8. What are data types in PromQL 
  9. What are the binary operators in PromQL?
  10. What are the metrics types in PromQL?
  11. What is a counter in PromQL?
  12. How do you deal with a Histogram in PromQL?
  13. What is the difference between Gauge vs 


Grafana Interview Questions


  1. How do you integrate Prometheus with Grafana?
  2. How do you design a Grafana dashboard?
  3. How do you connect a Datasource in Grafana? Explain the example as Prometheus as Database.
  4. What are the attributes that need to be considered for developing the visualization in Grafana?
  5. What are the best features of Grafana? what you have implemented?
  6. What all the exporters required in Prometheus so that Grafana visualizations could give effective output?
  7. How do you parameterize the Dashboard where there is selective metrics outcome required.


Alert Manager Interview Questions

  • How do you install Alert Manager?
  • How do you configure an Alert manager?
  • Where does the Alert Manager best suites for?
  • How do you define Alert Rule?
  • How do you format the Alert messages in Slack or mail?


SRE interview Questions

Reference:

  1. Docker Image management
  2. Kubernetes Basic Installation

Categories

Kubernetes (25) Docker (20) git (15) Jenkins (12) AWS (7) Jenkins CI (5) Vagrant (5) K8s (4) VirtualBox (4) CentOS7 (3) docker registry (3) docker-ee (3) ucp (3) Jenkins Automation (2) Jenkins Master Slave (2) Jenkins Project (2) containers (2) create deployment (2) docker EE (2) docker private registry (2) dockers (2) dtr (2) kubeadm (2) kubectl (2) kubelet (2) openssl (2) Alert Manager CLI (1) AlertManager (1) Apache Maven (1) Best DevOps interview questions (1) CentOS (1) Container as a Service (1) DevOps Interview Questions (1) Docker 19 CE on Ubuntu 19.04 (1) Docker Tutorial (1) Docker UCP (1) Docker installation on Ubunutu (1) Docker interview questions (1) Docker on PowerShell (1) Docker on Windows (1) Docker version (1) Docker-ee installation on CentOS (1) DockerHub (1) Features of DTR (1) Fedora (1) Freestyle Project (1) Git Install on CentOS (1) Git Install on Oracle Linux (1) Git Install on RHEL (1) Git Source based installation (1) Git line ending setup (1) Git migration (1) Grafana on Windows (1) Install DTR (1) Install Docker on Windows Server (1) Install Maven on CentOS (1) Issues (1) Jenkins CI server on AWS instance (1) Jenkins First Job (1) Jenkins Installation on CentOS7 (1) Jenkins Master (1) Jenkins automatic build (1) Jenkins installation on Ubuntu 18.04 (1) Jenkins integration with GitHub server (1) Jenkins on AWS Ubuntu (1) Kubernetes Cluster provisioning (1) Kubernetes interview questions (1) Kuberntes Installation (1) Maven (1) Maven installation on Unix (1) Operations interview Questions (1) Oracle Linux (1) Personal access tokens on GitHub (1) Problem in Docker (1) Prometheus (1) Prometheus CLI (1) RHEL (1) SCM (1) SCM Poll (1) SRE interview questions (1) Troubleshooting (1) Uninstall Git (1) Uninstall Git on CentOS7 (1) Universal Control Plane (1) Vagrantfile (1) amtool (1) aws IAM Role (1) aws policy (1) caas (1) chef installation (1) create organization on UCP (1) create team on UCP (1) docker CE (1) docker UCP console (1) docker command line (1) docker commands (1) docker community edition (1) docker container (1) docker editions (1) docker enterprise edition (1) docker enterprise edition deep dive (1) docker for windows (1) docker hub (1) docker installation (1) docker node (1) docker releases (1) docker secure registry (1) docker service (1) docker swarm init (1) docker swarm join (1) docker trusted registry (1) elasticBeanStalk (1) global configurations (1) helm installation issue (1) mvn (1) namespaces (1) promtool (1) service creation (1) slack (1)