Showing posts with label create deployment. Show all posts

Saturday, May 11, 2024

Kubernetes Deployment

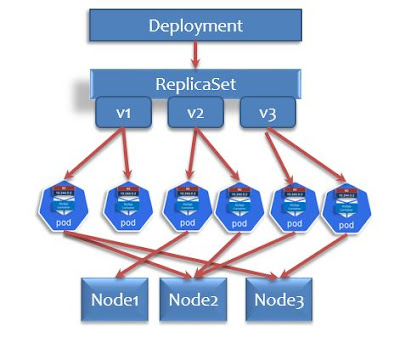
Hello DevSecOps, SRE or Platform Engineer or DevOps Engineers, In this post I want to discuss, Understanding of Kubernetes deployment it's hierarchy of kube objects. Declaratives and imperative ways to make deployment on kube clusters. 

How to deploy an application on  Kubernetes pods, just follow these steps as shown in this post. 

Here is new learning, I would like to share with you about Kubernetes deployment hierarchy, which internally calls the replication controller to make desired number of replicas of pod temple specified.

Kubernetes Deployment hierarchical Structure
Kubernetes Deployment hierarchy


Let's go to have a deep understanding about Kubernetes deployment hierarchy.

1. Generating Kubernetes Deployment Manifest file

We need to create a YAML file to define the deployment of the 'httpd' Apache Webserver. Here we are going to use the '--dry-run' option with client as value and '-o yaml' to generate the YAML file, to redirect the output we can use the greater than symbol to store in a file. e.g: httpd-deploy.yaml

Command : 
k create deploy httpd-deploy --image=httpd:alpine --dry-run=client -o yaml
k create deploy httpd-deploy --image=httpd:alpine --dry-run=client -o yaml >httpd-deploy.yaml

vi httpd-deploy.yaml
We can modify the httpd-deploy.yaml file as per our requirements such as changing the Image tag value so that we can reuse it for every new version available on the Docker Hub that is public repository.
apiVersion: apps/v1
kind: Deployment
metadata:
  labels:
    app: httpd-deploy
  name: httpd-deploy
spec:
  replicas: 1
  selector:
    matchLabels:
      app: httpd-deploy
  strategy: {}
  template:
    metadata:
      labels:
        app: httpd-deploy
    spec:
      containers:
      - image: httpd:alpine
        name: httpd
To create,confirm the deployment we can use the following commands
k create -f httpd-deploy.yaml #create
k get deploy,po #confirmation

Listing deployments

The 'kubectl' command will allow us to use the object either 'deployments' or 'deploy' or even singular word 'deployment' to list all the Deployments of default namespace 
kubectl get deployments
# or use alias name  
kubectl get deploy
# or use alternative name  
kubectl get deployment

Validate deployment history

We can describe the Deployment object details as follows:
kubectl describe deploy web-deployment  
Deployments contains Pods and its Replica information. 
To Show Rollout History of the given Deployment
kubectl rollout history deployment web-deployment 

4. Create/Update deployments using Image tags

Updates the existing deployment using update application new version. Do some R&D work here. Goto the Docker Hub find the Niginx tags consider the version tags to deploy. Currently I could see 1.22.0 and 1.23.1 versioned tags. So start with the new deployment with nginx:1.22.0 image after the pods up and application looks good we can update to the latest version that is nginx:1.23.1 versioned image.
k create deploy web-deploy --image=nginx:1.22 --replicas=2
k get deploy,po -o wide

# upgrade to new version 1.24
k set image deploy/web-deploy nginx=nginx:1.24 
k get deploy,po -o wide

5. Rollback/Rollforward Revisions

Rolls back or roll Forward to a specific revision versions can be done as follows:

Use the same strategy to create the app-deploy.yml file as given in the above; Do type the following commands to avoid the hyphenation issues.
Example app-deploy.yml as below:
apiVersion: apps/v1
kind: Deployment
metadata:
  labels:
    app: app-deploy
  name: app-deploy
spec:
  replicas: 1
  selector:
    matchLabels:
      app: app-deploy
  template:
    metadata:
      labels:
        app: app-deploy
    spec:
      containers:
      - image: httpd:2.4.59-alpine
        name: httpd
  
Now let's play for the the rollback option, where we will have some number of revisions recorded and we can navigate to the previous version using 'rollout undo' with '--to-revision' option.
kubectl create –f app-deploy.yml 
kubectl get deploy app-deploy
kubectl apply –f app-deploy.yml --record 
k rollout history deployment app-deploy 
k set image deploy/app-deploy httpd=httpd:2.4.59-bookworm --record
k rollout history deployment app-deploy 
k set image deploy/app-deploy httpd=httpd:2.4-bookworm --record
k set image deploy/app-deploy httpd=httpd:bookworm --record
k rollout history deployment app-deploy 
k rollout undo deploy/app-deploy --to-revision=3
k get deploy,po -o wide

The following image will shows the Rollback example clearly


Hope you got the bit taste of Kubernetes Deployment. Write back your comment with suggestion or what you learnt from this post.

Tuesday, March 1, 2022

Kubernetes installation on CentOS7 Vagrant boxes Manually

This page is updated in 2022 with new instructions which works for Rocky LInux as well!
As we have seen and had a setup that Docker EE installation on CentOS7. A year ago when I have worked on Kubernetes setup on the Ubuntu Linux that virtualization included all the steps involved in Docker installation to Kubernetes cluster configuration everything automated within Vagrantfile.


Kubernetes Cluster on your Desktop or Laptop or Mac book


In this post, I would like to share the manual steps that work to build a Kubernetes Cluster on CentOS7. We will be using the Docker EE installed nodes to install Kubernetes. So bringing up vagrant boxes the same thing that we had discussed earlier post proceed further.

Step 1: Check the System requirements

We have three nodes: master, node1, node2.

On ALL Nodes:
CPU Cores  2,
RAM size- 2GB Minimum 4GB good
Otherwise, Master node make it 3GB, Slave nodes with 1.5GB also a wise plan if you have limited resources.
Preparing the host mappings for master and worker nodes, Here I'm using sample names you can change as per your project needs.
   
hostnamectl set-hostname master-node
cat << EOF >> /etc/hosts
	10.128.0.27 master-node
	10.128.0.29 node-1 worker-node-1
	10.128.0.30 node-2 worker-node-2
EOF
Setup the firewall rules
 
  # master box run this
  sudo firewall-cmd --zone=public --permanent --add-port={6443,2379,2380,10250,10251,10252}/tcp
  
  # worker box firewall settings 
  sudo firewall-cmd --zone=public --permanent --add-port={10250,10251}/tcp
  
  #for both boxes
  firewall-cmd –reload
  modprobe br_netfilter
  echo '1' > /proc/sys/net/bridge/bridge-nf-call-iptables
  

Step 2: Why do we need to do swap disable?

All Kubernetes masters and nodes are expected to have swap disabled. This is recommended by Kubernetes community for deployments. If swap is not disabled, kubelet service will not start on the masters and nodes,

 
# check swap available 
free -m
# if exists then run the following commands
swapoff -a # must for gcloud and aws instances
# permanent swap off from fstab
vi /etc/fstab --> comment swap entry
(OR) 
sed -i '/ swap / s/^\(.*\)$/#\1/g' /etc/fstab

 
yum update -y
systemctl disable firewalld
systemctl stop firewalld
vi /etc/selinux/config ---> disabled

Restart all of the boxes
 
init 6

Now install Docker if you have not installed yet! this following will installs Docker-CE.
 
yum install docker -y
systemctl status docker #if it is inactive do the following
systemctl enable docker
systemctl start docker
systemctl start docker # make sure it is active state

Step 4: Add Kubernetes Repo 

This repo setting for CentOS boxes on ANY cloud env will works and same will work on vagrant box as well.
 
vi /etc/yum.repos.d/kubernetes.repo

Enter the following content into the file
 
[kubernetes]
name=Kubernetes
baseurl=https://packages.cloud.google.com/yum/repos/kubernetes-el7-x86_64
enabled=1
gpgcheck=1
repo_gpgcheck=1
gpgkey=https://packages.cloud.google.com/yum/doc/yum-key.gpg
        https://packages.cloud.google.com/yum/doc/rpm-package-key.gpg

Step 5: Install kubeadm, kubelet, kubectl and start

Now run the following yum installation commands on every node.
 
yum install kubeadm -y #This will includes kubectl, kubelet part of kubeadmin installation

systemctl enable kubelet
systemctl start kubelet
systemctl status kubelet # ensure kubelet is in active state

After starting kubeadm you will get the following:
Kubernetes Installation


output

Let's configure bridge network for Kubernetes
 
vi /etc/sysctl.d/k8s.conf
Enter the following lines
 
net.bridge.bridge-nf-call-ip6tables = 1
net.bridge.bridge-nf-call-iptables = 1

After file saving run the following command in the command shell.
 
sysctl --system

In the Master node execute the following command for Kubernetes Cluster initialization:

 
# NOTE: Please use your host IP address here
# This will do
kubeadm init

#alternatively try
kubeadm init --pod-network-cidr=192.148.0.0/16 --apiserver-advertise-address=192.168.33.100

(OR)

#To ignore preflight checks
kubeadm init --pod-network-cidr=192.148.0.0/16 --apiserver-advertise-address=192.168.33.100 --ignore-preflight-errors=Hostname,SystemVerification,NumCPU


On the Worker / Slave nodes:
 
kubeadm join 192.168.33.100:6443 --token h1ufen.hvs0nr49ua0my7u8 \
    --discovery-token-ca-cert-hash sha256:0bc179854b5c759333360737ff53ca2c4246b61823b033ecbac50593a9c334f6

Kubernetes Worker joining

On the master node do the following:
 
vi /etc/profile
export KUBECONFIG=/etc/kubernetes/admin.conf
Run the following: source /etc/profile
(OR)
 
 mkdir -p $HOME/.kube
 cp -i /etc/kubernetes/admin.conf $HOME/.kube/config
 chown $(id -u):$(id -g) $HOME/.kube/config

Now
flannel network
 
kubectl get nodes # all nodes NotReady state
kubectl get pods --all-namespaces
kubectl apply -f https://raw.githubusercontent.com/coreos/flannel/master/Documentation/kube-flannel.yml
kubectl get pods --all-namespaces
kubectl get nodes

Get the status of the node in the Kubernetes cluster, after all pods Running

Validate with Deployment 

Let us validate the Kubernetes Cluster Ready for deploy web application

Step 1 Let's take nginx image for deployment creation on the Kubernetes cluster
 
 kubectl create deployment mynginx --image=nginx

First Kubernetes deployment : create deployment

Now let's see the description of the above 'mynginx' deployment.

Describe Kubernetes deployment

Scale the 'mynginx' application deployment upto 3
 
 kubectl scale --replicas=3 deployment/mynginx

Scale deployment on Kubernetes Cluster

List of all pods in the Kubernetes cluster
 
 kubectl get po
 kubectl get po -o wide

get the list of pods in Kubernetes

Next step is Create service using 'mynginx' deployment.
 
kubectl create service nodeport mynginx --tcp=8080:80
kubectl get services

Service creation in Kubernetes Cluster
all set to go for checking in the browser
http://192.168.33.110:32286/


As our slave node running on 192.168.33.110 and the node port exposed as 32286.

Here I conclude our Kubernetes cluster working as expected! Please post your comments or suggestions to improve our learnings more useful to many other starters.

Categories

Kubernetes (25) Docker (20) git (15) Jenkins (12) AWS (7) Jenkins CI (5) Vagrant (5) K8s (4) VirtualBox (4) CentOS7 (3) docker registry (3) docker-ee (3) ucp (3) Jenkins Automation (2) Jenkins Master Slave (2) Jenkins Project (2) containers (2) create deployment (2) docker EE (2) docker private registry (2) dockers (2) dtr (2) kubeadm (2) kubectl (2) kubelet (2) openssl (2) Alert Manager CLI (1) AlertManager (1) Apache Maven (1) Best DevOps interview questions (1) CentOS (1) Container as a Service (1) DevOps Interview Questions (1) Docker 19 CE on Ubuntu 19.04 (1) Docker Tutorial (1) Docker UCP (1) Docker installation on Ubunutu (1) Docker interview questions (1) Docker on PowerShell (1) Docker on Windows (1) Docker version (1) Docker-ee installation on CentOS (1) DockerHub (1) Features of DTR (1) Fedora (1) Freestyle Project (1) Git Install on CentOS (1) Git Install on Oracle Linux (1) Git Install on RHEL (1) Git Source based installation (1) Git line ending setup (1) Git migration (1) Grafana on Windows (1) Install DTR (1) Install Docker on Windows Server (1) Install Maven on CentOS (1) Issues (1) Jenkins CI server on AWS instance (1) Jenkins First Job (1) Jenkins Installation on CentOS7 (1) Jenkins Master (1) Jenkins automatic build (1) Jenkins installation on Ubuntu 18.04 (1) Jenkins integration with GitHub server (1) Jenkins on AWS Ubuntu (1) Kubernetes Cluster provisioning (1) Kubernetes interview questions (1) Kuberntes Installation (1) Maven (1) Maven installation on Unix (1) Operations interview Questions (1) Oracle Linux (1) Personal access tokens on GitHub (1) Problem in Docker (1) Prometheus (1) Prometheus CLI (1) RHEL (1) SCM (1) SCM Poll (1) SRE interview questions (1) Troubleshooting (1) Uninstall Git (1) Uninstall Git on CentOS7 (1) Universal Control Plane (1) Vagrantfile (1) amtool (1) aws IAM Role (1) aws policy (1) caas (1) chef installation (1) create organization on UCP (1) create team on UCP (1) docker CE (1) docker UCP console (1) docker command line (1) docker commands (1) docker community edition (1) docker container (1) docker editions (1) docker enterprise edition (1) docker enterprise edition deep dive (1) docker for windows (1) docker hub (1) docker installation (1) docker node (1) docker releases (1) docker secure registry (1) docker service (1) docker swarm init (1) docker swarm join (1) docker trusted registry (1) elasticBeanStalk (1) global configurations (1) helm installation issue (1) mvn (1) namespaces (1) promtool (1) service creation (1) slack (1)