Million ways to share the knowledge, One place to find All-in-One for DevOps Hunters Git Ansible Automation Kubernetes Docker Jenkins
Friday, January 6, 2023
Manage Jenkins
Wednesday, June 29, 2022
Jenkins Seed Job using DSL Script to Generate Job
Hey Guys!! How are you? In this learning post I would like to share with you awesome Jenkins feature experiment - Infrastructure as a Code (IaC). The entire Jenkins Job or Project can be configured manually step-by-step in the regular fashion, when you click on the "new item" on the Jenkins Dashboard to create a project. But here story is different - with DSL script you could do the same thing that is dynamically creating a Job with a single flexible scalable durable way with Groovy script.
Jenkins DSL Groovy script generating dynamic Job |
Groovy is more like Shell scripting but totally executable on Java Virtual Machine. Those who know Java it will be easy to understand the Groovy syntax and its blocks. If you don't then no worries we will be coming up with easy to use DSL script in the following sections.
Prerequisite for DSL Job creation
- Jenkins master-slave installed up and running. SCM installed/github Up and running
- Jenkins must have plugins installed such as Copy to Archive, Archive Artifacts etc
- Jenkins "Global Tool Configuration" should have "Maven" , "JDK" specially needed for Java Build process
docker run --name jenkinsmaster -u root \ --rm -d -p 8081:8080 \ -v jenkins-data:/var/jenkins_home \ jenkins/jenkinsYou can check the docket hosting machine port open for Jenkins containers:
netstat -tupln|grep 8081 #To get the password from the logs docker logs jenkinsmaster
What Jenkins plugin need to be installed? Job DSL plugin
We need to install the 'Job DSL' plugin. This will enable you to write Groovy scripts. As regular plugin installation procedure - Navigate to Manage Jenkins -> Manage Plugins ->Go to the availability tab search for "Job DSL'. Once found select it and click on the 'Install without Restart' Button.How to write a Jenkins DSL groovy script?
- To use the Job DSL plugin, you first need to create a seed job. The seed job is a Jenkins job which runs newly created a DSL scripts, and then generates a new job name as "Maven-Project-DSL".
- In that job we can have a "Source Code Management" section with a git repo URL as given in the DSL script scm block.
- This dynamically created job can be chosen to trigger every 2 mins this can be modified as per your Project needs. This block is like in the Build Trigger section having Poll SCM
- In Build Step/section we use to select "Invoke Top level Maven Targets" option similar to it we can use steps block and mention it "clean package" targets and also provide where is your pom.xml that will create a war file. Note: look into the pom.xml file packaging line according use the artifact option
- Like our Post Build action here in the DSL script we can have a publisher block that calls archiveArtifacts with a parameter, here I've choose for **/*.war because same will be used in the deployment in the Tomcat server.
Parameters in DSL
The following is the example where you can use the parameterised project in DSL, we can use the following snippet in 'Build' step Groovy script can be used as following 'Job DSL'job('parameterized_dsl_job'){ description("This project is seeded with parameters") parameters{ stringParam('user_name',defaultValue = 'Vybhava", description = 'Please enter user_name') } setps { shell("echo Hello $user_name") } }
job('Maven-Project-DSL') { description("Maven job generated by the DSL on ${new Date()}, the project is a small Maven project hosted on github") // Source Code Management section equivalent block
scm { git("https://github.com/Bhavanishekhar/Jenkins_integrations.git", 'master') } // Build Trigger section equivalent triggers { scm('H/2 * * * *') // every 2 minutes SCM Polling is scheduled here } // Like Build having Invoke top-level Maven targets steps { maven('clean package', 'maven-samples/single-module/pom.xml') } publishers { //archive the jar/war/ear file generated archiveArtifacts '**/*.war' } }
Jenkins Seed Job FAILURE - script not set approval |
Jenkins Seed Job ScriptApproval action |
9. After seed job execution completes you will be getting a new Job with name "Maven-Project-DSL"
Thanks for your time if you like this post please share it with your friends and colleagues.
Reference:
Wednesday, June 22, 2022
Jenkins Continuous Delivery
👋 Warm Welcome 🤗 to my dear DevOps DevSecOps /SRE engineers here in this post we will exploring about Jenkins configured to run a full fledged CI/CD flow.
Preparation for CI/CD
- Install Tomcat server
- Using Jenkins CICD job deploy
Install Tomcat Server on a VM/Cloud instance
Step 1: Install JRE/Java
To install Tomcat on any Platform there should be JRE available. To have JRE we do install JDK which is suitable to the Tomcat. As an example I'm installing JDK8 with the following command.
sudo apt-get install openjdk8 -y; java -versionStep 2: Installing the latest version of Tomcat
sudo apt install -y unzip wget wget mirrorlink to download the latest version of tomcat.zip file sudo mkdir -p /opt/tomcat sudo unzip -d /opt/tomcat tomcat.zip ls -l /opt/tomcat #confirm the extractionStep 3: Change Tomcat server port, if your Tomcat is installed on the same machine where Jenkins runs. This is to avoid port conflict. Port value change by searching 'Connector' inside the /opt/tomcat/conf/server.xml file.
cd /opt/tomcat/bin sudo chmod +x *Step 5: start tomcat server from the bin directory run the following
./startup.sh less -f ../logs/catalina.out # output show Tomcat server started log message.
Jenkins Setup for Continuous Deployment(CD)
Jenkins automations makes lord of windows in DevOps world. If you want to enjoy that automations in your project please follow this post, here we are going to have the objective as Jenkins continuous integration and continuous deployment to a target environment. The target environment could be built based on the Tomcat server. Usually the environment can be for development, QA staging and production. if the automation flow begin from the development environment test success to QA and then staging we can do job chain or a pipeline automatic deployment stages including steps usage in a DSL file that is Jenkinsfile.
Install Jenkins plugins
On the Jenkins console in the dashboard navigate to the Manage Jenkins, then Manage plugins, go to the availability tab and search for the following plugins install them without restart
1. Copy Artifact
2. Deploy to Containers
Create Jenkins Jobs
In the first phase of this experiment you will Create Job to produce a Tomcat Deployable Artifacts. Meaning a servlet or JSP containing Java Web applications inside the deployable file. And it's extension can be w a r (web archive) file.
In the view page click on the plus + and Create a list View and name it as "QA Deploy".
1. Project name: package_app (Maven build)
a. Please enter in the Description : Generate artifacts to deploy on Java tomcat server
b. Under SCM section enter your own git URL : https://github.com/BhavaniShekhar/Jenkins_Integrations.git
c. Build Environment section - Please Check "Delete workspace before build starts" and "Add timestamps to the Console Output".
d. Build section - select "Invoke top-level Maven targets" from the dropdown options.
Choose Maven Version value as you configured it earlier in the Global tool configure name (in my example maven3 used)
Goals value can be choosen as - clean package
If pom.xml is not in the project start directory then go for "Advanced" option then provide the POM value as file path : java-tomcat-sample/pom.xml
e. In the Post-Build actions Add "Archive the artifacts"
Files to archive **/*.war
Now all the settings are done for the package_app job so now Save it, and run it by using "Build Now". Go to the Console Output which shows the full log build execution after confirming that "Build Successful".
Navigate to last build number for me it is first build so Build #1 there we can see the "Build Artifacts" shows the war file downloadable link.
Automated Deployment
2. Create Deploy application job in the same "QA deploy" view.
Select a Freestyle project.
Project Name: deploy_app
Description: This job will be used to deploy the artifact to QA Tomcat server.
Build logs settings to Max as : 3
Check the "Delete workspace before build starts" and "Add timestamps to the Console Output".
Build Section
Select from the dropdown of Add build Step as "Copy Artifacts from another project"
a. Project Name: Package_app
b. Which build : Latest successful build and also select "Stable build only
c. Artifacts to copy : **/*war
Post build Actions section
Select "Deploy war/ear to a container" from the "Add post-build action.
a. WAR/EAR Files:
b. context path: /
c. Add container: Tomcat 10 [if that is not available you can use Tomcat 9.x also fine]
i. Add Jenkins credentials: tomcat/tomcat_password which was configured on Tomcat server.
ii. Tomcat URL: http://PUBLICIP:8080
Now everything configured for this job. Save the "deploy_app" project configuration.
Now you can go to the dashboard and see the "QA Deploy" view where we added two Jobs that is package_app, deploy_app.
Trigger the "Build Now" for each Job for now do it for "deploy_app" job to test it to confirm it is working as expected.
Setup for Continuous Deployment
We can create upstream and downstream when they have dependency.
Go to the package_app project and
1. Poll SCM in the Build Trigger
Schedule : * * * * *
in the Post-build Actions section Add post-build action as "Build other projects"
a. Projects to build "Deploy_app"
b. Tick the choice - Trigger only if build is stable
You can observe the Downstream job to the "package_app" as "deploy_app" job.
Developer code push simulation - Do some line change in the GitHub repo then Continuous Integration and Continuous deployment will happen automatically. This is the complete solution we can provide to a Java based web application project.
Troubleshoot points
1. Tomcat user file access denied
cd TOMCAT_HOME/conf; vi tomcat-users.xml
change mange-gui if it is admin-gui.
after configuration changes you need to restart tomcat (stop and start).
2. text based tomcat error
Inside the TOMCAT_HOME/webapps/manger/META-INF/ there is a file context.xml comment out the 2 lines which have manger value.
After this action, restart the Tomcat (sudo /opt/tomcat/bin/shutdown.sh; sleep 3; sudo /opt/tomcat/bin/startup.sh)
Friday, June 10, 2022
Jenkins installation on Windows
Hello DevOps Guys, We will install the Jenkins Controller on the Windows machine.
How to install Jenkins on Windows machine?
Here in this post we will explore Step-by-Step installation instructions for Jenkins on Windows platform.
Jenkins installation on Windows |
Step 1: Install and set Java
Please visit the Oracle Java SE download page: http://www.oracle.com/technetwork/java/javase/downloads/index.html .
Oracle providing the new option on the download page, that is "JDK Script Friendly URLs" page. Choose the JDK for your operating system (Windows 10 or 11) 64bit to download. Double click downloaded file launches installer wizard, proceed with the agree and set up the installation location as per your disk/drive availability.
Verification of Java installation
Open a CMD prompt run "java -version" if Java installed correctly in the PATH you will get the installed version as output. if not set the PATH from the type ENVIRONMENT VARAIABLES search ->EDIT ENVIRONMENT VARAIABLES in the USER VARIABLES section add new variable as JAVA_HOME -> C:\Program Files\Java. and then set PATH with %JAVA_HOME%\bin;%PATH% and launch a fresh CMD prompt and re-test.
java -versionSetting JAVA_HOME path manually on your CMD
SET JAVA_HOME="C:\Program Files\Java\jdk-11.0.14" SET PATH= %JAVA_HOME%\bin;%PATH% java -versionshould return Java version as jdk-11.0.14.
Checking Java version on Windows Command Prompt |
Once Java all set then next we are good to go for Jenkins download.
Step 2: Download and install Jenkins
I believe that a Picture tells 1000 words of worth! visit jenkins download page link, you may be on Windows 10 or 11(At the time of this blog post Windows versions).
Jenkins download for Windows |
2.1 Welcome Screen
Jenkins completed setup |
Step 3: How to run Jenkins server on Windows?
cd "C:\Program Files\Jenkins" java -jar jenkins.war
Jenkins start using java jar command defender firewall protection |
java -jar jenkins.war --httpPort=9090
Step 4: Launch the Jenkins Controller on Browser
Jenkins console access on Windows machine |
Friday, December 24, 2021
Jenkins Active choices parameter - Dynamic input
Installation Active Choice parameter - Groovy Script |
Prerequisite:
Jenkins installed Up and running on your target master machine.Step 1: Install Active Choice plugin
On the Jenkins Dashboard, select the Manage Jenkins, Plugin- Manager, In the Available tab search for word 'Active', where you can see Active Choice plugin and choose installation option, and this will enables three different parameters in the "Add Paramters" list. They are :
1. Active choice parameter
2. Active Choice Reactive parameter
3. Active choice Reactive Reference parameter
Here In my example I will use two of them, Firstly Active Choice Parameter for "environment".
Create new item Name: active_project select a freestyle project click OK button.
In the General tab, select the checkbox for 'This project is parameterized'.
Step 2: Add Parameter - Active Choice Parameter
Please enter the following as per your project needs. Offcourse here we are starting Groovy code snippets which doesn't required any expert level coding.return[ 'Live', 'QA', 'Dev' ]Screen shot:
Adding Active Choice parameter adding Groovy list |
Step 3: Add Parameter - Active Choice Reactive Parameter
Let's define the "Active Choice Reactive Parameter" as sub_env, Here 'sub_env' parameter is depends on the 'environment' parameter which is defined in the previous step.
Name: sub_env
Script: Select Grovy script:
Add the following groovy code:
if (environment.equals("Live")){ return ["Prod","DR"] } else if (environment.equals("QA")){ return ["FT","UAT","Stage"] } else if (environment.equals("Dev")){ return ["Dev-Feature","Dev-Release"] } else{ return ["Please select environment"] }On the same parameter block "Single select" from the dropdown
Groovy fall back code:
return ["Select proper environment"]Now enter the environment as value for the 'Reference parameter'.
Adding Active choice reactive parameter |
Step 4: Add Parameter list - Active Choice Reactive Reference parameter
Select Active Choice Reactive Parameter Enter the following values
Name: datacenter
Add the following groovy code:
if(sub_env.equals("Prod")){ return ["Prod environment at HYD region"] } else if(sub_env.equals("DR")){ return["DR environment at GG region"] } else if(sub_env.equals("FT")){ return ["FT environment at HYD region"] } else if(sub_env.equals("UAT")){ return["UAT environment at GG region"] } else if(sub_env.equals("Stage")){ return["Stage environment at GG region"] } else if(sub_env.equals("Dev-Feature")){ return["Dev-Feature environment at GG region"] } else if(sub_env.equals("Dev-Release")){ return["Dev-Release environment at GG region"] } else{ return ["dont miss sub-env"] }Groovy fall back code: return ["Select proper sub-env"]
Reference parameter: sub_env
Finally save the configuration of the project.
Final step
Saturday, April 3, 2021
Jenkins integration with SonarQube Scanner
Prerequisites
- SonarQube Server installed, up and running state
- Jenkins installed and Master is up and running
- Sonar Scanner installed on same machine(container) where Jenkins build job executes
Important URLs
docker run -d --name sonarqube \ -e SONAR_ES_BOOTSTRAP_CHECKS_DISABLE=true \ -p 9000:9000 sonarqube:latest
Open the 9000 port if it is not open automatically.
SonarQube Login |
Reset the password for SonarQube |
SonarQube Web UI console |
Create User in SonarQube
SonarQube Administration tab select Security Create user |
SonarQube user token generation |
SonarQube User Token Generation |
Running Jenkins on Docker
docker run --name jenkins-master -u root --rm \ -d -p 8081:8080 -p 50001:50000 \ -v jenkins-data:/var/jenkins_home \ -v /var/run/docker.sock:/var/run/docker.sock \ jenkinsci/blueoceanOn the PWD automatically opens 8081 if not manually you can open that port, To view log files of Jenkins container you can run the following:
docker logs jenkins-masterOn the Jenkins Dashboard Sample credentials : SonarQube : admin/welcome1 Jenkins: ci-admin/welcome123
Jenkins Integration Setup for SonarQube
Step 1. Install plugin - SonarQube ScannerSonarQube Scanner plugin installation |
Configure System for SonarQube
Configure System on Jenkins for SonarQube Server |
Sonar scanner installation on Jenkins Container
$ docker exec -it jenkins-master bash cd /tmp wget https://binaries.sonarsource.com/Distribution/sonar-scanner-cli/sonar-scanner-cli-4.6.0.2311-linux.zip unzip sonar-scanner-cli-4.6.0.2311-linux.zip -d /opt cd /opt mv sonar-scanner-4.6.0.2311-linux sonar-scanner ls # confirmmodify the properties file present in the conf folder
vi /opt/sonar-scanner/conf/sonar-scanner.propertiesNow update the line as follows:
#----- Default SonarQube server #sonar.host.url=http://localhost:9000 sonar.host.url=http://192.168.0.28:9000update only the Default SonarQube server url line as shown above.
Global Tool Configuration
On the Global tool configuration page search for the "SonarQube Scanner" section under SonarQube Scanner Installation, Click on the "Add SonarQube Scanner" buttonCreate Jenkins FreeStyle project
1. Create Job - Name it as 'SonarCodeAnalysisJob'
2. Source Code management: Git Url where code resides to scan.
Example I've used: https://github.com/BhavaniShekhar/my-app.git
a. Please enter the Git repo URL : https://samsonawane@bitbucket.org/websym12/sampleweb.git
b. Add Credentials -> use Jenkins Credential provider on the pop-up window to enter the username and password for your git URL to access. then back select the newly created credentials. \
![]() |
Jenkins Credentials Provider for Jenkins |
Select the GitHub credentials [optional if GIT repo is Public not required]
![]() |
Git as SCM on Jenkins |
3. Go to the Build section
"Execute SonarQube Scanner" Task to run JDK to be used for the sonar analysis path to project properties Analysis properties
![]() |
Jenkins Build select Execute SonarQube Scanner |
#Required props as metadata sonar.projectKey=Vybhava sonar.projectName=Robotics sonar.projectVersion=1.0 #Path to source code sonar.sources=/var/jenkins_home/workspace/$JOB_NAME/srcAdditional arguments JVM Options Save the job Click on 'Build Now'. It should trigger SonarQube Server Report
Monday, March 29, 2021
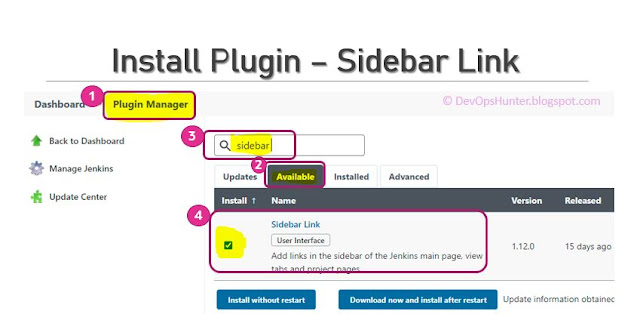
Sidebar Links in Jenkins Job
Hello Everyone! Here I will give some real use cases where the Jenkins integration with Sidebar Links requirement for a Jenkins Project.
Case 1: Your project might have a complete build strategy defined and it is shared on a Confluence page or common documentation platform. This document need to be linked to the Jenkins Job.
Case 2: Your QA team want to have all the jobs which they want to access on a single page. Even though you have placed all the QA-related jobs into a View. The solution is using Sidebar Link to the View from the Job.
Case 3: A QA team working on two different Product testings where you have the two separate Jobs, but in the Organization the jobs are grown where a listing of all jobs will make difficult to search for the second job. instead of searching for the second job if we have the second job on the first job page then QA team life will be easy.
How to use Sidebar Links in a Jenkins Job?
Sidebar link can be used for linking following:
- Documentation or External URLs
- Jenkins Views
- Jenkins Jobs
Jenkins Plugin manager install plugin - Sidebar Link |
Setting Sidebar Links with detailed steps |
Sidebar Link - icon setup options |
Sunday, March 14, 2021
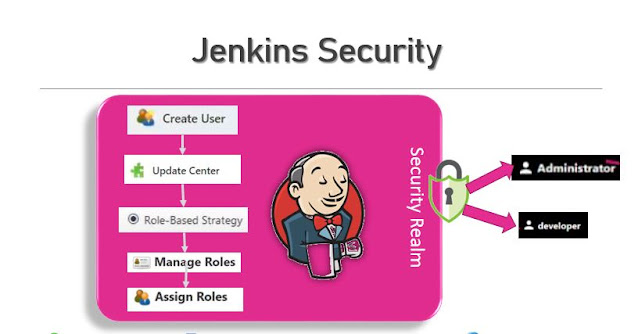
Jenkins Manage Assign Roles - Role based Strategy
To run the Jenkins inside docker container
- name: Jenkins-master
- run in detached mode -d
- Port forwarding from container port 8080 to host 8081 and 50000 to 50001
- Allocate disk space to run the Jenkins workspace use -v
- Docker image from Blue Ocean
docker run --name jenkins-master -u root --rm \ -d -p 8081:8080 -p 50001:50000 \ -v jenkins-data:/var/jenkins_home \ -v /var/run/docker.sock:/var/run/docker.sock \ jenkinsci/blueoceancheck Jenkins master logs from the container Jenkins-master
docker logs jenkins-masterCopy the encrypted InitalAdminPassword to start working on Jenkins
Jenkins Crate First Admin User |
How to create a User in Jenkins?
- Goto to 'Manage Jenkins'
- Select 'Manage Users'
- Select 'Create User'
- Enter Username
- Enter Password and Confirm Password same
- Enter Full name which will display the name on the top when you log in with this user
- In the organizations multi-user Jenkins, to track we must enter the email id
Create User on Jenkins |
How to install 'Role-based Authorization Strategy' plugin?
How to configure Global Security for Role-based?
- Manage Jenkins
- Under the Security section, Select Configure Global Security
- 'Role-based Autoriaztion' select the radio button
- Save the Configuration
Authorization - Role-based Strategy |
How to add Global Role in Jenkins?
Manage Global Roles |
Full Global Role picture
![]() |
Jenkins Manage Global Roles |
- DBA TEAM - dba
- DEVELOPER TEAM - developer
- TESTING TEAM - qa
Manage roles for Project item |
Assign Global roles for each user
Jenkins limited access to developer role |
.