Showing posts with label Jenkins Project. Show all posts

Thursday, September 3, 2020

Configuring Fresh Jobs in Jenkins

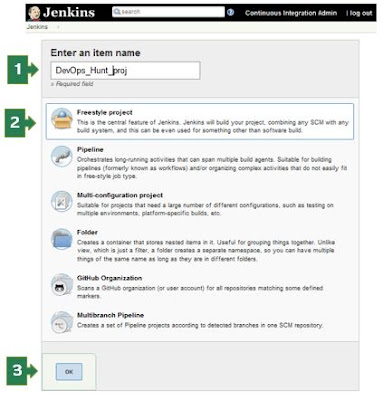
Hello, Dear DevOps Automation enthusiast! This post is intended targeted to those who have just started the journey in the Continuous Integration and Continuous Deployment on the Cloud Platforms or On-premises environments.

Pre-requisites

  • Latest Stable version of Jenkins installed 
  • Jenkins Master is in running state on your machine/VM/Cloud instance
  • Able to login to the Jenkins Console

In the left pane, you can click on 'New Item' or Click on the 'Start Using Jenkins' link. The welcome screen shows a link to create a new job!

Jenkins First Job Project creation


You need to enter the value for 
Name for the build project
Type of project
  1. Freestyle Project
  2. Pipeline
  3. Multi-configuration Project
  4. Folder
  5. GitHub Organization
  6. Multibranch Pipeline

Enter the name of the project, Select the 'Freestyle project' for the first time and click on the 'OK' button. New page loads with 6 sections/tabs for build project inputs.

Job Configuration Sections
In Jenkins console we have various Job Configuration types
Jenkins Job Configuration


  1. General - Description of the project, Enable project based security, change date pattern for BUILD_TIMESTAMP, Discard old builds enable will help you for easy migration of Jenkins master.
  2. Job Notification -  End points, You can enable notification mail when someone changed configuration. Rebuild without asking parameters or we can disable the rebuild for a particular job. You can choose the build requires lockable resources, which means other jobs not allowed when this job is in progress. This project is parameterized enabled then you can add different type Parameters such as String Parameter, Choice Parameter, Password Parameter, Node
  3. Jenkins job configuration allows us to use 5 different choices of 'Source code management' as:
a. None
b. CVS
c. CVS Projectset
d. Git
e. Subversion
                    Default it is selected as - None


            Build Trigger
            1. Jenkin's job will be triggered by a 'Build Triggers' section. Here we have Trigger build remotely from scripts, 
            2. Build after other projects are built when there is dependency are in the projects
            3. Build periodically - This choice asks you on what period you want to execute this job
            4. Enable Artifactory trigger - when docker image is pushed you want to run a job 
            5. GitHub hook trigger for GITscm polling - requires authentication for webhook accessing GitHub repository
            6. Poll SCM - for all types of source code repository updates can trigger the job.
            Build Environment

            Usually, when we run a build, Jenkins uses /tmp/somerandomnumber.sh in Linux machines as the automatically generated script will create workspace in the slave machine. 
            1. Delete workspace before build starts
            2. Use secret text(s) or file(s)
            3. Provide configuration files
            4. send files or execute commands over SSH before the build starts 
            5. send files or execute commands over SSH after the build runs
            6. Abort the build if it's stuck
            7. Add timestamps to the Console Output
            8. Ant/Ivy-Artifactory Integration
            9. Create a formatted version number
            10. Farm Repository
            11. Generic-Artifactory Integration
            12. Gradle-Artifactory Integration
            13. Inject environment variables to the build process
            14. Inject passwords to the build as environment variables
            15. Inspect build log for published Gradle build scans
            16. Maven3-Artifactory Integration
            17. Run Xvnc during build
            18. Setup Kubernetes CLI (kubectl)
            19. With Ant

            Build

            The build section will have an Execute shell with command text box. where you can enter the shell commands. which will become a shell script.


            2. Pipeline Project

            If you choose the Pipeline Project then it will have the following sections
            1. General
            2. Job Notifications
            3. Build Triggers
            4. Advanced Project options
            5. Pipeline 

            General 

            In the General section, you can see
            Enable project-based security

            Discard old builds when you check this -> Strategy where you have LogRotation based on - Days to keep builds or Max # of builds to keep 
            Advance option - 
            Days to keep artifacts - if not empty default 14, artifacts from builds older than this number of days will be deleted, but the logs, history, reports, etc for the build will be kept
            Max # of builds to keep with artifacts - if not empty, only up to this number of builds have their artifacts retained

            Do not allow concurrent builds
            Do not allow the pipeline to resume if the master restarts
            GitHub project

            Job Notifications


            Notify when Job configuration changes
            Pipeline speed/durability override
            Preserve stashes from completed builds
              Rebuild options: Rebuild Without Asking For Parameters
              Disable Rebuilding for this job
            Sidebar Links
            This project is parameterized selected then you are allowed to use following parameters:
            1. Node
            2. String
            3. Active Choices parameter -> 
              1. Name 
              2. Script option will have choice to enter the Groovy script
              3. Choice type:  Single select, Multi select, Radio button, Checkbox 
              4. Enable Filters
              5. The filter starts at 1

            Build Triggers

            1. Build after other projects are built
            2. Build periodically
            3. Build whenever a SNAPSHOT dependency is built
            4. Enable Artifactory trigger
            5. GitHub hook trigger for GITScm polling
            6. Poll SCM
            7. Disable this project
            8. Quiet period
            9. Trigger builds remotely (e.g., from scripts)

            Advanced Project Options

            Click on the 'Advanced' button

            Pipeline

            Definition - Pipeline script
                the script, Use Groovy sandbox.

            After you configured the Job, you have to Apply to save the configuration until now. 

            If you are working on the Visual Studio code as editor then you can install the Extention. 

            Groovy extension


            Jenkinsfile Extension


            Wednesday, August 28, 2019

            Jenkins Installation on CentOS7/RHEL/Fedora and Ubuntu

            Hello DevOps enthusiast, I'm here with another interesting article on one more DevOps automation tool that is Jenkins CI, where I've explored all possible new learnings which will be used by DevOps.

            Jenkins installation on CentOS or RHEL or Fedora

            Simple instructions I've made for reference, which I've used.

            What are the Pre-requisites for the Jenkins installation

            • Good speed of Internet
            • Either of the platforms will be working:
              • Vagrant installed VirtualBox installed to pull CentOS7 box
              • AWS RHEL instance up and running 

            Bring up the CentOS/7 box (optional)

            Note: Ignore this section if you have a Cloud instance ready.

            Step 1: Create your own CentOS7 vagrant box with the following DSL Vagrantfile:

            Vagrant.configure(2) do |config|
              config.vm.box = "centos/7"
              config.vm.boot_timeout=600
              config.vm.host_name = "mydev.devopshunter.com"
              config.vm.network "private_network", ip: "192.168.33.100"
              config.vm.synced_folder "C:/Softwares", "/u01/app/software"
              config.vm.provider "virtualbox" do |vb|
                vb.cpus = "2"
                vb.memory = "2048"
              end
            end
            

            Now based on the above Vagrantfile, bring up the vagrant CentOS box:

            vagrant up

            Now all set to go, Connect to the vagrant box using PuTTY, SSH-> Auth -> centos.ppk file. Create an aws instance and connect it with the putty or git bash client.

            Step 2: Switch to root user, download the Jenkins installer using wget, you can find the stable and latest version of Jenkins RPM File here you can see the latest at the bottom of the page. and the installation with rpm command as:
            sudo -s
            #install wget if not installed on cloud instances
            yum install wget epel-release daemonize -y
            
            # Latest version of Jenkins requires daemonize package dependency
            wget https://pkg.jenkins.io/redhat/jenkins-2.192-1.1.noarch.rpm
            rpm -ivh jenkins-2*.rpm
            
            Jenkins installation using rpm option

            Jenkins installation on Ubuntu

            Note: This section added in the year July 2022.
            Recent changes in the Ubuntu publick key authentication on the debain package manager.
            sudo apt update
            sudo apt install default-jre
            curl -fsSL https://pkg.jenkins.io/debian/jenkins.io.key | sudo tee   /usr/share/keyrings/jenkins-keyring.asc > /dev/null
            echo deb [signed-by=/usr/share/keyrings/jenkins-keyring.asc]   https://pkg.jenkins.io/debian binary/ | sudo tee   /etc/apt/sources.list.d/jenkins.list > /dev/null
            sudo apt-get update
            sudo apt-get install jenkins
            systemctl status jenkins
            

            How to install Open JDK on CentOS?


            Once the Jenkins installation completed we need to run with JRE, We have two choices - Open JRE, or Oracle JRE to run Jenkins CI. JRE is part of JDK so let's install Open JDK. Using `yum` repo we can install the OpenJDK which also includes Open JRE.

            yum install -y java 
            #Check Java installation successful
            java -version
            

            Now we are done with the installation part move to bring up the Jenkins CI service.

            Starting your Jenkins CI master on CentOS7

            Every RHEL flavor Linux versions support service command to run the service in the background and will be executed when a software added to the system, systemctl will help us to control it for start or stop or restart and to check the status of the service.

            service jenkins start
            chkconfig jenkins on


            Let's check the status of the Jenkins service:

            service jenkins status -l
            

            Check the Jenkins service status

            How to accessing your Jenkins CI URL?


            By default Jenkins runs on the 8080 port combination with the IP address as shown:

            http://<jenkins ip> :8080/

            On my Vagrant box I can access the Jenkins URL as an example:
            http://192.168.33.100:8080/


            Jenkins first-time UI
            Wow!! Lovely, We are ready to operate on Jenkins now you can set the value present Password in the given path and copy it and reset the user profile and password values which will be overrides the default/one time password.

            How to create First Admin user on Jenkins?

            Here is the sample user profile setting details:

            • User name: ci_admin
            • Password : welcome1 [you can provide much stronger one for your CI project]
            • Confirm Password : welcome1
            • Full name : Continuous Integration admin
            • Email:  ignore [optional]
            Create First Admin User sample


            Click on the '   Save and Continue  ' button then it navigates to 'Instance Configuration' page, shows Jenkins URL.

            How to configure Remote Agent using WebSocket?

            1. Please enter the "Name" that uniquely identifies an agent in the Jenkins domain.
            2. Enter Remote root directory such as /workspace
            3. Enter the "Label" value this is the hook to run remotely any build.
            4. Under Launching method 
            Launch agent by connecting it to the controller

            choose -> Use WebSocket tic the checkbox.

            Jenkins Slave WebSocket Configuration


            Save the configuration by hitting "save" button.

            Slave configuration you can use the following shell script:
            #!/bin/bash
            
            # Ensure JDK installed on the agent box
            AGENT_CMD='java -jar agent.jar -jnlpUrl http://mstr:8080/computer/node1/jenkins-agent.jnlp -secret 5650304d6aae3ebf424479e20978a7cd1408e3f539e243cbd309abbccd88a3 -workDir "/tmp/jenkins"'
            nohup $AGENT_CMD > node1-vt-agent.out 2>&1 &
            
            # print the log output
            tailf node1-vt-agent.out
              

            Executed on node1 example screenshot
            Enjoy the Continuous integration fun with Jenkins!!

            Categories

            Kubernetes (25) Docker (20) git (15) Jenkins (12) AWS (7) Jenkins CI (5) Vagrant (5) K8s (4) VirtualBox (4) CentOS7 (3) docker registry (3) docker-ee (3) ucp (3) Jenkins Automation (2) Jenkins Master Slave (2) Jenkins Project (2) containers (2) create deployment (2) docker EE (2) docker private registry (2) dockers (2) dtr (2) kubeadm (2) kubectl (2) kubelet (2) openssl (2) Alert Manager CLI (1) AlertManager (1) Apache Maven (1) Best DevOps interview questions (1) CentOS (1) Container as a Service (1) DevOps Interview Questions (1) Docker 19 CE on Ubuntu 19.04 (1) Docker Tutorial (1) Docker UCP (1) Docker installation on Ubunutu (1) Docker interview questions (1) Docker on PowerShell (1) Docker on Windows (1) Docker version (1) Docker-ee installation on CentOS (1) DockerHub (1) Features of DTR (1) Fedora (1) Freestyle Project (1) Git Install on CentOS (1) Git Install on Oracle Linux (1) Git Install on RHEL (1) Git Source based installation (1) Git line ending setup (1) Git migration (1) Grafana on Windows (1) Install DTR (1) Install Docker on Windows Server (1) Install Maven on CentOS (1) Issues (1) Jenkins CI server on AWS instance (1) Jenkins First Job (1) Jenkins Installation on CentOS7 (1) Jenkins Master (1) Jenkins automatic build (1) Jenkins installation on Ubuntu 18.04 (1) Jenkins integration with GitHub server (1) Jenkins on AWS Ubuntu (1) Kubernetes Cluster provisioning (1) Kubernetes interview questions (1) Kuberntes Installation (1) Maven (1) Maven installation on Unix (1) Operations interview Questions (1) Oracle Linux (1) Personal access tokens on GitHub (1) Problem in Docker (1) Prometheus (1) Prometheus CLI (1) RHEL (1) SCM (1) SCM Poll (1) SRE interview questions (1) Troubleshooting (1) Uninstall Git (1) Uninstall Git on CentOS7 (1) Universal Control Plane (1) Vagrantfile (1) amtool (1) aws IAM Role (1) aws policy (1) caas (1) chef installation (1) create organization on UCP (1) create team on UCP (1) docker CE (1) docker UCP console (1) docker command line (1) docker commands (1) docker community edition (1) docker container (1) docker editions (1) docker enterprise edition (1) docker enterprise edition deep dive (1) docker for windows (1) docker hub (1) docker installation (1) docker node (1) docker releases (1) docker secure registry (1) docker service (1) docker swarm init (1) docker swarm join (1) docker trusted registry (1) elasticBeanStalk (1) global configurations (1) helm installation issue (1) mvn (1) namespaces (1) promtool (1) service creation (1) slack (1)