Saturday, December 28, 2019

Docker Storage and Volumes


In this blog-post, I would like to discuss Docker Storage and storage drivers and Application data management using Docker Volumes. Every fact we explore in detailed experimented and collected and published here.

Docker Container Persistent Storage

When you see the word 'Storage' we get in mind that HARD disk, CD, DVD, pen drive, shared NFS, etc., For Docker storage that referred to the storage of images, containers, volumes and we need to store the data that belongs to an application. It may be an application code or database that referred to in the application service. Each one has its own isolation with others. 

Actual physical Storage deals with different devices. Linux got the Logical storage devices where you can make use of single disk into multiple disks drives called logical drives as we see in Windows (C: D:). Disk space can be shared across multiple containers partition of disks and a group of partitions. Docker uses this capability with special storage drivers.

Which bit is which part of the drive is known by using the filesystem. Docker uses the FUSE filesystem.

Docker persistence Storage Volume

 Manage Application data

Overlay2 is the default and preferred storage driver in most modern Linux platforms.
device-mapper is generally preferred when we want to take advantage of LVM.

 What is Docker CoW?

The secret of Docker is Unix COW(Copy on Write) is a key capability that helped to build Docker container storage. CoWs movement is pretty simple the content of the layers are moved between containers in gzip files copy-on-write is a strategy of sharing and copying for maximum efficiency it saves space and also reduces startup time.

The data appears to be a copy, but is only a link (or reference) to the original data the actual copy happens only when someone tries to change the shared data whoever changes the shared data ends up sharing their own copy instead.
 

 Why CoW?

The race condition challenge in Linux from COW is handled by kernel's memory subsystem with private memory mappings. Create a new process quickly using fork() even if is many GB of RAM
Changes are visible only to the current process, private maps are fast even on huge files it uses mmap() fr map files MAP_PRIVATE. How does it work? The answer is MMU ( Memory Management Unit) Here each memory access translates  to an actual physical location, alternatively a page fault

What happens without CoW?

  • It would take forever to start a container
  • The container would use up a lot of space
  • Without copy-on-write on your desktop
  • Docker would not be usable on your Linux machine
  • There is no docker at all


How do you know what Storage-Driver in use?

To know the docker storage driver information we can use the 'docker info' command one of the attributes that show 'Storage Driver' value. We can use JSON query tool 'jq' which is available in all Latest Linux platforms.

docker info -f '{{json .}}'|jq -r '.Driver'

or else you can use the -f or --format option as follows:
docker info -f 'Storage Driver: {{.Driver}}'
docker info --format '{{.Driver}}'

Let's run this commands
Docker Info JSON format extraction methods

Selecting Docker storage drivers

  • The storage driver handles the details about the way how to interact with each other layers.
  • The storage driver controls how images and containers are stored and managed on your Docker host.
  • To create data in the writable layer of the container
  • No persistence of data in containers
  • use stackable image layers and the copy-on-write (CoW) strategy

Docker Bind mount

Bind mounts can only be mounted inside the container in the read-only and read-write mode so they are flexible as per the need to prevent file corruption.

 Docker tmpfs mounts

tmpfs are only available for Linux platforms.
tmpfs Sample 1:
docker run -d -it \
 --name tmptest1 \
 --mount type=tmpfs,destination=/app \
  nginx:latest 

docker container inspect tmptest1
docker container stop tmptest1
docker container rm tmptest1
or 
docker container rm -v -f tmptest1

Sample tmpfs for a container

tmpfs Sample 2: If we don't mention the destination what will be considers as container path. let's see
docker run -d -it --name tmptest2 \
 --tmpfs /app \
 nginx:latest 
# Understand the source and destinations paths
docker container inspect --format '{{json .Mounts}}' tmptest2
docker container inspect -f '{{.HostConfig.Mounts}}' tmptest2
docker container stop tmptest2
docker container rm tmptest2

Sample 2  tmpfs in Docker


Docker Volume

The Docker Volumes are easier to backup or migrate than the bind mounts
The interesting feature of Volumes is that they work on both Linux and Windows container’s
New volumes can have their content pre-populated by a container.
Volumes can be managed with both CLI and API.

Create Docker Volumes
There are two methods to create a docker volume

  • Container creation does the local volume using –v option
  • Container creation using --mount option
Let's see both examples of how they work for containers.

Container and Volume Relationship

Docker containers are ephemeral as much as possible. By removing a container DOESN'T remove the volume attached to it. Let's experiment with it, As we know Volumes are persistent attachable storage that holds data in a folder on the Host machine and it has a mapping inside the docker container as a mounted volume.
#Check the available Volumes list
docker volume ls 

# Create a Volume name it as web-volume
docker volume create web-volume

# Use the newly created volume 'web-volume' with nginx container 'myweb'
docker run -d --name myweb \
--mount source=web-volume,destination=/usr/share/nginx/html nginx

# Stop the Container and remove container 'myweb'
docker container stop myweb && docker container rm myweb

# Validate the list of Volumes - still web-volume exists
docker volume ls 
The execution goes as shown below:
Docker volume persistent example 
Hence the experiment concludes that after the removal of the container, still, the volume exists which we can reuse further by creating new containers and attach to this volume.

  Storage and Volumes References

For Any kind of Docker Containerization support - please call us on +91 9618715457
Let's see the external storage how to use within container in another super exciting post


Sunday, December 22, 2019

Docker Trusted Registry (DTR) deep dive

This post is a continuous post of Docker Enterprise edition on CentOS7 usage.
Let's understand the usage of the DTR. How we can integrate it with Docker UCP? How the DTR help us to maintain the docker repository easy way. What benefits we can get with DTR?

As we had already installed docker-ee and UCP deployed on it with swarm cluster on a CentOS7.

What is new in Docker Trusted Registry?

Here I've collected some of the DTR Primary Usage Scenarios

CI/CD with Docker

• Image repository - Centrally located base images
• Simple upgrades - Store individual build images
• Scan and Pull tested images to production

Containers as a Service (CaaS)

• Deploy Jenkins executors or nodes
• Instant-on developer environment
• Selected curated apps from a catalog
• Dynamic composition of micro-services (“PAAS”)

General Features

• Organizations, Teams & Repositories permissions UI
• Search index, API & UI
• Interactive API documentation
• Image deletion from index
• Image garbage collection Experimental
• Docker Content Trust: View Docker Notary signatures in DTR
• Admin & Health UI
• Registry Storage Status
• LDAP/AD Integration
• RBAC API (Admin, R/W, R/O)
• User actions/API audit logs
• Registry v2 API & v2 Image Support
• One-click install/upgrade

Cloud Platform Features 

• Docker Storage drivers for the filesystem, AWS s3, and Microsoft azure 
• Support Tooling 
• Support for Ubuntu, RHEL, CentOS and Windows 10

Docker Trusted Registry DTR Flow

System Requirement for DTR


The RAM requirement is high which is 16 GB size to run the DTR in the production system.
DTR cannot be installed where UCP installed that is not on the Swarm master node. Because the UCP uses default ports 80 and 443 in the master node, where DTR also needs the same ports to run so other nodes are preferable. Hence I'm using node1 to have DTR.


  • DTR requires Docker Universal Control Plane UCP to run you need to install UCP on all swarm nodes where you plan to install DTR.

Install Docker Trusted Registry DTR

This is a simple docker container running the command with the latest DTR version to deploy on the docker enterprise engine.

 
#Installing Docker Trusted Registry (DTR)
docker run -it \
 --rm docker/dtr:2.4.12 install \
 --ucp-insecure-tls 

The installation will links to the UCP that we had installed already.
Get the DTR Connected from the UCP console. Go to the 'Admin Settings'

Admin Settings on UCP Console to view Docker Trusted Registry installed


Access the DTR console

Let's login to the DTR console, From the UCP Console, we got that where the DTR installed successfully that URL. Because we have not used trusted certs it will proceed only after accepting the Security Exception in the browser.

docker trusted registry (DTR) login 
Here the user credentials are the same as given for UCP.


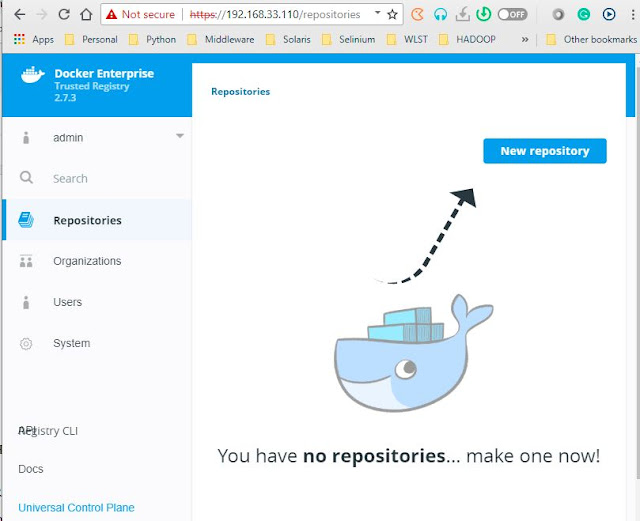
DTR Console looks almost similar to UCP console, You can proceed to create the new repository, where the pointer showing!

Extra bite

Where this DTR container is running let's see what all those containers created

docker trusted registry containers list

DTR Backup Notes


When you do backup DTR following will be taken care:

  • Configurations are backed up
  • Certificate and keys are backed up
  • Repository metadata are backed up


User, Orgs, and teams are not backed up with DTR backup.


References


Official Document on DTR
Slide on DTR Features
DTR Back up


Saturday, December 21, 2019

Docker Security

Hey, dear Docker DevOps enthusiast! In this post we will discuss about docker security, docker service security, docker engine-level security, etc.

SELinux is Security-Enhanced Linux

it provides a mechanism for supporting access control security policies
SELinux is a set of kernel modifications and user-space tools that have been added to various Linux distros.

The 'root' user by default owns the processes spawned by a container are run.

secgroup limits the disk quota.

Security Issue


Rotate your join-token for both worker and manager when there is a suspicion that someone might have got access to the token for adding managers to the cluster.

Secretes are immutable in a docker swarm cluster. They cannot be updated sof if you want to modify the secret then you have to create a new secret file and update that to the existing service.
step 1: First we need to Create new secret,
step 2: Attach the newly created secret with an update option the service to use this new secret.
step 3: The Service resart may require - docker swarm cluster would take car of that
step 4: and delete the old secret


 docker service update --help |grep secret

      --secret-add secret                  Add or update a secret on a service

      --secret-rm list                     Remove a secret


secrets and configs are encrypted during transit and at rest in a docker swarm.
Configs operate in a similar way to secrets, except that they are not encrypted at rest and are mounted directly into the container’s filesystem without the use of RAM disks. Configs can be added or removed from a service at any time, and services can share a config.


The default location of secrets inside a Docker container '/run/secrets/'. The default locaiton of a config file when using Docker config '/'.

References:


Install and setup for the Docker Compose

Hello DevOps enthusiast, In this post, We will discuss docker-compose why we need and how it can resolve the multi-container application issues. What is it's limitations?

How Docker-compose works?


What is Docker-compose? why?

If we are working on multi-container apps then it is a hassle because we would be doing repeatedly the following tasks:

  • Build images from Dockerfiles 
  • Pull images from the Hub or a private registry 
  • Configure and create multiple containers for each service required to run the application
  • Start and stop containers individually each one
  • Stream their logs to check the status and troubleshoot

In contrast to all the above hassles, The Docker compose developed as best tool for defining & running multi-container docker applications. We can use YAML files to configure application services (docker-compose.yml) Simplified control for multi-container applications - we can start all services with a single command: docker compose up and can stop all services with a single command: docker compose down

Docker-compose can be used to scale up selected services when required

Features of docker-compose


  • We can define and run multi-containerized Docker applications where it could be database, web server, proxy containers to run the complete application.
  • Docker-compose uses single YAML file to configure all applications dependent services
  • The docker-compose is powerful with a single command, we can create and start all the services from the configuration.
  • Mainly for dev and test environments can be used for repetitive tasks which deals with Docker containers 
  • We can build multiple isolated environments on a single host
  • It preserves volume data when containers are created using docker-compose.yaml file.
  • Docker-compose has a wonderful feature that, Only recreate containers that have changes
  • We could define the variables and moving a composition between environments such as development to test or staging.


Installing Docker-compose

There are two ways to install the docker-compose :
  1.  Using GitHub
  2.  Using pip install 

Using GitHub download 

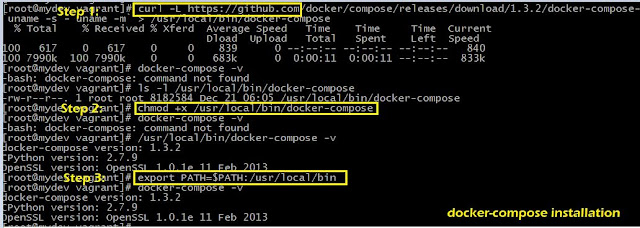
Step 1: Run the following curl command to download from the GitHub the current stable release of Docker-compose
Old compose worked! But it don't support all compose versions.
sudo curl -L https://github.com/docker/compose/releases/download/1.3.2/docker-compose-`uname -s`-`uname -m` > /usr/local/bin/docker-compose 
Better option to use latest version always! take the stable version from the GitHub
sudo curl -L https://github.com/docker/compose/releases/download/v2.2.3/docker-compose-`uname -s`-`uname -m` > /usr/local/bin/docker-compose 
Step 2: Apply executable permissions to the docker-compose binary:
ls -l /usr/local/bin/docker-compose #You must be in root user
chmod +x /usr/local/bin/docker-compose 
ls -l /usr/local/bin/docker-compose #Ensure the docker-compose file have execute permissions
Step 3: set the ENV var with the latest path in the bashrc or .bashprofile
echo "export PATH=$PATH:/usr/local/bin" >> .bashrc
Step 4: Check the version of docker-compose command
docker-compose -v

Install docker-compose using GitHub download

Best References for docker-compose:


Friday, December 13, 2019

Docker Networking

Hello, dear DevOps enthusiast, welcome back to DevOpsHunter learners site! In this post, we would like to explore the docker networking models and different types of network drivers and their benefits.

What is Docker Networking?

Understanding docker networking

Docker provided multiple network drivers plugin installed as part of Library along with Docker installation. You have choice and flexibilities. Basically the classification happen based on the number of host participation. SinbleHost WILL 

Let's see the types of network drivers in docker ecosystem.

docker network overview

Docker Contianers are aim to built tiny size so there may be some of the regular network commands may not be available. We need to install them inside containers.

Issue #1 Inside my container ip or ifconfig not working, How to resolve 'ip' command not working?

Solution:
  apt update;  apt install -y iproute2  


Issue #2: ping command not working how to resolve this ?? Solution: Go inside your container
  apt update;  apt install -y iputils-ping  
  

What is the purpose of Docker Network?


  • Containers need to communicate with external world (network)
  • Reachable from external world to provide service (web applications must be accessable)
  • Allow Containers to talk to Host machine (container to host)
  • inter-container connectivity in same host and multi-host (container to container)
  • Discover services provided by containers automatically (search other services)
  • Load balance network traffic between many containers in a service (entry to containerization)
  • Secure multi-tenant services (Cloud specific network capability)
Features of Docker network
  • Type of network-specific network can be used for internet connectivity
  • Publishing ports - open the access to services runs in a container
  • DNS - Custom DNS setting Load balancing - allow, deny with iptables
  • Traffic flow - application access Logging - where logs should go # check the list of docker networking

To explore docker network object related commands you can use --help

docker network help output

Listing of docker default networks. It also shows three network driver options ready to use :
docker network ls 

# There are 3 types of network drivers in Docker-CE Installation with local scoped(Single host) which are ready to use - bridge, host, null. There is the significance in each type of driver.

docker network create --driver bridge app-net
docker network ls
# To remove a docker network use rm
docker network rm app-net
Let's experiment
docker run -d -it --name con1 alpine
docker exec -it con1 sh
# able to communicate with outbound responses
ping google.com

To check the network route table entries inside a container and on your Linux box where Docker Engine hosted:
ip route
or 
ip r

we are good to go for validate that from con1 container able to communicate other container con2 ping con2 # Bridge utility if it is not found then install
yum -y install bridge-utils
# check the bridge and its associated virtual eth cards brctl show

The 'brctl' show command output

There is the mapping of IP address shows the bridge attached to container

Default Bridge Network in Docker

The following experiment will let you understand the default bridge network that is already available when the docker daemon is in execution.


docker run -d -it --name con1 alpine
docker run -d -it --name con2 alpine

docker ps
docker inspect bridge

default bridge network connected with con1, con2
After looking into the inspect command out you will completely get the idea how the bridge works.

Now let's identify the containers con1 and con2
docker exec -it con1 sh
ip addr show
ping -c 4 google.com
ping -c 4 ipaddr-con2
ping -c 4 con2        --- should not work means dns will not work for default bridges
exit
# remove the containers which we tested docker rm -v -f con1 con2

User-defined Bridge Network


docker network create --driver bridge mynetwork
docker network ls
docker inspect mynetwork

docker run -d -it --name con1 --network mynetwork alpine
docker run -d -it --name con2 --network mynetwork alpine

docker ps
docker inspect mynetwork

Now let's see inside the container with the following:
docker exec -it con1 sh
ip addr show
ping -c 4 google.com
ping -c 4 ipaddr-con2
ping -c 4 con2        --- should WORKS, that means dns is avaialable in mynetwork
exit 

Clean up of all the containers after the above experiment
docker rm -v -f con1 con2 #cleanup
Now we can check the connection between two user defined bridge networks.

docker network create --driver bridge mynetwork1
docker network create --driver bridge mynetwork2

docker run -d -it --name con1 --network mynetwork1 alpine
docker run -d -it --name con2 --network mynetwork1 alpine

docker run -d -it --name con3 --network mynetwork2 alpine
docker run -d -it --name con4 --network mynetwork2 alpine

docker inspect mynetwork1
docker inspect mynetwork2

Now we can get the IP Address of containers of both the networks, using the 'docker inspect' command
docker exec -it con1 sh
ping -c 4 ipaddr-con3 #get the ip address using docker container inspect con3
ping -c 4 con3 # This will not work because two bridges isolated

Docker Host networking diriver

Now in the experiment of Host Network example


 docker run --rm -d --network host --name my_nginx nginx
 curl localhost
Now you know about how to run a container attached to a network, But now a container created already with default bridge network that can be attach to a custom bridge network is it possible ? is that have same IP address?

How to connect a user-defined network object with running Container?

We can move a docker container from default bridge network to a user defined bridge network it is possible. When this change happen the container IP address dynamically changes. 

docker  network connect command is used to connect a running container to an existing user-defined bridge. The syntax as follows:
 docker network connect [OPTIONS] NETWORK CONTAINER

Example my_nginx already running container.
docker run -dit --name ng2 \
  --publish 8080:80 \
  nginx:latest 

docker network connect mynetwork ng2

Observe after connecting to User defined bridge network check the IP Address of the container.

To disconnect use the following:
docker network disconnect mynetwork ng2
Once the disconnected check the IP Address of the container ng2 using 'docker container inspect ug2'. This will concludes that container can be migrated from one network to other without stopping it. There is no errors while performing this.

Overlay Network for Multi-host


Docker overlay network will be part of Docker swarm or Kubernetes where you have Multi-Host Docker ecosystem.
docker network create --driver overlay net-overlay
# above command fails with ERROR
docker network ls
The overlay networks will be visible in the network list once you activate the Swarm on your Docker Engine. and for network overlay driver plugins that support it you can create multiple subnetworks. #if swarm not initialized use following command with the IP Address of your Docker Host
docker swarm init --advertise-addr 10.0.2.15
Overlay Network will serve the containers association with Docker 'service' object instead of 'container' object. # scope of the overlay shows swarm
docker service create --help
# Create service of nginx 
docker service create --network=net-overlay --name=app1 --replicas=4 ngnix
docker service ls|grep app1 
docker service inspect app1 |more # look for the VirtualIPs in th output

Docker Overlay driver allows us not only multi-host communication, the overlay driver plugins that support it you can create multiple subnetworks.
docker network create -d overlay \
                --subnet=192.168.0.0/16 \
                --subnet=192.170.0.0/16 \
                --gateway=192.168.0.100 \
                --gateway=192.170.0.100 \
                --ip-range=192.168.1.0/24 \
                --aux-address="my-router=192.168.1.5" --aux-address="my-switch=192.168.1.6" \
                --aux-address="my-printer=192.170.1.5" --aux-address="my-nas=192.170.1.6" \
                my-multihost-network
docker network ls
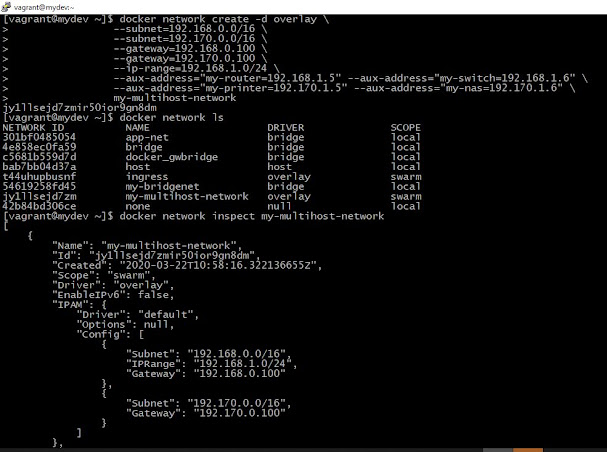
docker network inspect my-multihost-network # Check the subnets listed out of this command
The output as follows:
 

Docker doc has an interesting Network summary same as it says --

  • User-defined bridge networks are best when you need multiple containers to communicate on the same Docker host.
  • Host networks are best when the network stack should not be isolated from the Docker host, but you want other aspects of the container to be isolated.
  • Overlay networks are best when you need containers running on different Docker hosts to communicate, or when multiple applications work together using swarm services.
  • Macvlan networks are best when you are migrating from a VM setup or need your containers to look like physical hosts on your network, each with a unique MAC address.

Reference:


  1. Docker Networking: https://success.docker.com/article/networking 
  2. User-define bridge network : https://docs.docker.com/network/bridge/ 
  3. Docker Expose Ports externally: https://bobcares.com/blog/docker-port-expose/

Thursday, November 28, 2019

Docker Image Management

In this post, we will be discussing docker image creation, management and before jumping into this article if you do not yet install Docker? then, I also recommend you to go through my previous post where I've discussed how to install Docker-CE or Docker EE. I would like to expose most of the things related to Docker Images.

Assuming that now you have everything ready! that means Docker engine up and running.

What is all about Docker Image?

According to docker docs --

An image is an executable package that includes everything needed to run an application -- the code, runtime, libraries, environment variables and configuration files.

The runtime of a docker image is called a Docker container.

In simple words, an Image is nothing but a stopped container! Let me put my understanding into a picture first and then we explore all these possible syntax and examples.

Docker Image Life cycle

Let us talk about the docker image that was built with multiple layers.

Docker Images are Layered structure

The docker images in the layered structure make simple, very flexible and easy to built. Docker images are made up of multiple read-only layers(images). New images will be created from the existing set of images. Hundreds or thousands of containers can be spin up as per the need, they are typically based on the same image. When an image is instantiated into a container, a top writable layer is created where an application will be going to run and which will be deleted when the container removed. Docker accomplishes this by using storage drivers. Each storage driver manages the writeable layers and handles the implementation differently, but all storage drivers use the stackable image layer and the copy-on-write(CoW) strategy.


The docker image build will start on top of bootfs filesystem. Layer 0 which we call it as a base image that contains the root filesystem (rootfs). On top of Layer-0 are the read-only layers (1 .. n-1) which may contain the desired new configuration changes on the base image. Perhaps you may have a layer to install the application. Upon some more changes related to the application may be required that could be another layer. This forms layer cake which docker union file system to create docker image. If these configuration changes overlap each other (conflicts) the change on the top layer overrides.

Each image layer will be associated with unique UUIDs.

Docker Image stacked layers in Image and a container

Docker images are read-only, But how do we change inside the Image?


  • We don't really need to do changes in an image that is already existing, instead -
  • We create a container from that image and then
  • Do the required changes on top of it in the container layer and when we satisfied with those changes then, transform into a new layer in the image stack that is using 'docker save' container as image.

What are the differences between Docker image vs docker container?

Differences between Docker Image vs Container

Docker Images - CLI

Docker search command


All the docker search commands will be refer to the Docker public repository content only. Simple search you could do for Jenkins Docker image like :
docker search jenkins

To get top 5 jenkins images out of search list use --limit optoin
docker search jenkins --limit 5

To filter out only the Official images, use the flag value as 'true'. This images will be called "Official" because they were scanned for vulnerabilities check inside the Image done by Docker Inc. This could be helpful when you selecting the Image for your project ensuring they are safe by selecting this option.
docker search jenkins --limit 5  --filter "is-official=true"
Note: There could be multiple images as Official for the same software image.

Docker search for Jenkins Image with limit official options

docker search nginx --filter "is-official=true"
In a contrary we can also use the flag value as 'false'. when we prepare similar kind of image and searching for it.
  docker search nginx --filter "is-official=false"

The default limit is 25 lines default there will be hunders of Public Images but will show only top 25 lines which are sorted with the "stars" count high.
docker search nginx --filter "is-official=false" --limit 10

You should aware of all the help options that are associated with 'docker image'

Manage images

Commands:
  build       Build an image from a Dockerfile
  history     Show the history of an image
  import      Import the contents from a tarball to create a filesystem image
  inspect     Display detailed information on one or more images
  load        Load an image from a tar archive or STDIN
  ls          List images
  prune       Remove unused images
  pull        Pull an image or a repository from a registry
  push        Push an image or a repository to a registry
  rm          Remove one or more images
  save        Save one or more images to a tar archive (streamed to STDOUT by default)
  tag         Create a tag TARGET_IMAGE that refers to SOURCE_IMAGE

Run 'docker image COMMAND --help' for more information on a command.

Remove Image

docker image rm --help
Usage:  docker image rm [OPTIONS] IMAGE [IMAGE...]
Remove one or more images
Aliases:
  rm, rmi, remove
Options:
  -f, --force      Force removal of the image
      --no-prune   Do not delete untagged parents

Examples:
docker rmi flask:1.0
docker image rm top-img -f
docker image remove sri-flask:1.0 -f

Image Inspect

To get multiple images information in one go you can use this.
$ docker image inspect --help
Usage:  docker image inspect [OPTIONS] IMAGE [IMAGE...]
Display detailed information on one or more images
Options:
  -f, --format string   Format the output using the given Go template

Example:
vagrant@dockerhost:~/samples$ docker image inspect python:3
[
    {
        "Id": "sha256:a6a0779c5fb25f7a075c83815a3803f9fbc5579beb488c86e27e91c48b679951",
        "RepoTags": [
            "python:3"
        ],
        "RepoDigests": [
            "python@sha256:f265c5096aa52bdd478d2a5ed097727f51721fda20686523ab1b3038cc7d6417"
        ],
        "Parent": "",
        "Comment": "",
        "Created": "2021-05-12T15:27:54.005567496Z",
        "Container": "0bf84fa1b959359a29c7fa92d2c9e5fc4159c2e3092efda39e9f070d8c3f0017",
        "ContainerConfig": {
            "Hostname": "0bf84fa1b959",
            "Domainname": "",
            "User": "",
            "AttachStdin": false,
            "AttachStdout": false,
            "AttachStderr": false,
            "Tty": false,
            "OpenStdin": false,
            "StdinOnce": false,
            "Env": [
                "PATH=/usr/local/bin:/usr/local/sbin:/usr/local/bin:/usr/sbin:/usr/bin:/sbin:/bin",
                "LANG=C.UTF-8",
                "GPG_KEY=E3FF2839C048B25C084DEBE9B26995E310250568",
                "PYTHON_VERSION=3.9.5",
                "PYTHON_PIP_VERSION=21.1.1",
                "PYTHON_GET_PIP_URL=https://github.com/pypa/get-pip/raw/1954f15b3f102ace496a34a013ea76b061535bd2/public/get-pip.py",
                "PYTHON_GET_PIP_SHA256=f499d76e0149a673fb8246d88e116db589afbd291739bd84f2cd9a7bca7b6993"
            ],
            "Cmd": [
                "/bin/sh",
                "-c",
                "#(nop) ",
                "CMD [\"python3\"]"
            ],

Image tagging

This is like versioning your docker image build that is used by a dockerfile or another docker image for rename.
$ docker tag --help
Usage:  docker tag SOURCE_IMAGE[:TAG] TARGET_IMAGE[:TAG]
Create a tag TARGET_IMAGE that refers to SOURCE_IMAGE
Example:
docker tag nginx localhost:5000/nginx
https://docs.docker.com/engine/reference/commandline/image_tag/

Image push

docker image push  --help
Usage:  docker image push [OPTIONS] NAME[:TAG]
Push an image or a repository to a registry
Options:
      --disable-content-trust   Skip image signing (default true)

List images

Usage:  docker image ls [OPTIONS] [REPOSITORY[:TAG]]
Aliases:
  ls, list
Options:
  -a, --all             Show all images (default hides intermediate images)
      --digests         Show digests
  -f, --filter filter   Filter output based on conditions provided
      --format string   Pretty-print images using a Go template
      --no-trunc        Don't truncate output
  -q, --quiet           Only show image IDs
Examples: 1. Filtering dangling images
vagrant@dockerhost:~/samples$ docker image list  --filter dangling=true
REPOSITORY   TAG       IMAGE ID       CREATED        SIZE
           fc54bebe79ee   17 hours ago   57.1MB
           2878761c8f4d   34 hours ago   57.1MB

2. List of imaage ids which are dangling using
--quite
option
vagrant@dockerhost:~/samples$ docker image list --quiet --filter dangling=true
fc54bebe79ee
2878761c8f4d
3. Find all latest images
vagrant@dockerhost:~/samples$ docker images --filter=reference='*:latest'
REPOSITORY   TAG       IMAGE ID       CREATED       SIZE
namaste_py   latest    44ef94c791ae   2 days ago    895MB
cassandra    latest    132406477368   11 days ago   402MB
busybox      latest    c55b0f125dc6   2 weeks ago  
  

Image History

Docker history command will gives you how this Docker image is build with what instructions. We can compare the the dockerfile content of any of the image with the docker image history command output.  
$ docker image history --help
Usage:  docker image history [OPTIONS] IMAGE
Show the history of an image
Options:
      --format string   Pretty-print images using a Go template
  -H, --human           Print sizes and dates in human readable format (default true)
      --no-trunc        Don't truncate output
  -q, --quiet           Only show numeric IDs

Example for the docker image history
$ docker image history hello-world
IMAGE               CREATED             CREATED BY                                      SIZE                COMMENT
fce289e99eb9        11 months ago       /bin/sh -c #(nop)  CMD ["/hello"]               0B                  
<  missing >         11 months ago       /bin/sh -c #(nop) COPY file:f77490f70ce51da2…   1.84kB              
We can use the history subcommand with --format option to display only the "CREATED BY" column containing lines.


docker image history hello-world –format {{ .CreatedBy }}
  docker image history hello-world –format {{ .CreatedBy }}={{size}}
  
Example of Tomcat image format with CreatedBy
  docker image history tomcat –format {{ .CreatedBy }}
  
Tomcat docker image history 
Docker Tomcat image history format with "CreatedBy"


Check more Docker commands executions : 

Sunday, November 17, 2019

DevOps Troubleshooting Tricks & tips

Here in this post, I would like to collect all my daily challenges in my DevOps learning operations and possible workarounds, fixes links. I also invite you please share your experiences dealing with DevOps operations.

DevOps Troubleshooting process


Issue #1: Vagrant failed to reload when Docker installed in CentOS


The following SSH command responded with a non-zero exit status.
Vagrant assumes that this means the command failed!

chmod 0644 /etc/systemd/system/docker.service.d/http-proxy.conf

Stdout from the command:


Stderr from the command:

chmod: cannot access ‘/etc/systemd/system/docker.service.d/http-proxy.conf’: No such file or directory


Here it is actually starting the vagrant box but it is not able to find a file called http-proxy.conf file. I would like to suggest for this issue, create the file and grant the permission as given:

Now restart the vagrant box. usually it is blocker when you are starting couple vagrant boxes with single vagrant up command where it will be stopped after first instance creation only. You need to do these changes to all nodes one after the other started.


Issue #2 Docker daemon not running


[vagrant@mstr ~]$ docker info
Client:
 Debug Mode: false
 Plugins:
  cluster: Manage Docker clusters (Docker Inc., v1.2.0)

Server:
ERROR: Cannot connect to the Docker daemon at unix:///var/run/docker.sock. Is the docker daemon running?
errors pretty printing info


Workaround

start the docker daemon
sudo systemctl start docker
sudo systemctl status docker
Fix

References:

  1. Control docker with systemd
  2. Post steps for Docker installation

Issue #3 : Snap package unable to install helm


error: cannot communicate with server: Post http://localhost/v2/snaps/helm: dial unix /run/snapd.socket: connect: no such file or directory

Fix is :
Check the snapd daemon running
[root@mstr ~]# systemctl status snapd.service
● snapd.service - Snappy daemon
   Loaded: loaded (/usr/lib/systemd/system/snapd.service; disabled; vendor preset: disabled)
   Active: inactive (dead)

If not running and tells you Inactive (dead) then give the life by start it and check again!!!
[root@mstr ~]# systemctl start snapd.service
[root@mstr ~]# systemctl status snapd.service
● snapd.service - Snappy daemon
   Loaded: loaded (/usr/lib/systemd/system/snapd.service; disabled; vendor preset: disabled)
   Active: active (running) since Sun 2019-11-17 05:27:28 UTC; 7s ago
 Main PID: 23376 (snapd)
    Tasks: 10
   Memory: 15.2M
   CGroup: /system.slice/snapd.service
           └─23376 /usr/libexec/snapd/snapd

Nov 17 05:27:27 mstr.devopshunter.com systemd[1]: Starting Snappy daemon...
Nov 17 05:27:27 mstr.devopshunter.com snapd[23376]: AppArmor status: apparmor not enabled
Nov 17 05:27:27 mstr.devopshunter.com snapd[23376]: daemon.go:346: started snapd/2.42.1-1.el7 (...6.
Nov 17 05:27:28 mstr.devopshunter.com snapd[23376]: daemon.go:439: adjusting startup timeout by...p)
Nov 17 05:27:28 mstr.devopshunter.com snapd[23376]: helpers.go:104: error trying to compare the...sk
Nov 17 05:27:28 mstr.devopshunter.com systemd[1]: Started Snappy daemon.

Now go on for the
[root@mstr ~]# snap install helm --classic
2019-11-17T05:30:10Z INFO Waiting for restart...
Download snap "core18" (1265) from channel "stable"                               88%  139kB/s 50.3s

Issue #4: K8s nodes not able to list out


$ kubectl get nodes
The connection to the server localhost:8080 was refused - did you specify the right host or port?
Solution:
systemctl enable kubelet
systemctl start kubelet

vi /etc/sysctl.d/k8s.conf
net.bridge.bridge-nf-call-ip6tables = 1
net.bridge.bridge-nf-call-iptables = 1

sysctl --system


Issue 5: k8s issue unable to proceed to start the kubeadm

[root@mstr ~]# kubeadm init --pod-network-cidr=192.148.0.0/16 --apiserver-advertise-address=192.168.33.100
[init] Using Kubernetes version: v1.16.3
[preflight] Running pre-flight checks
        [WARNING IsDockerSystemdCheck]: detected "cgroupfs" as the Docker cgroup driver. The recommended driver is "systemd". Please follow the guide at https://kubernetes.io/docs/setup/cri/
        [WARNING SystemVerification]: this Docker version is not on the list of validated versions: 19.03.4. Latest validated version: 18.09
[preflight] Pulling images required for setting up a Kubernetes cluster
[preflight] This might take a minute or two, depending on the speed of your internet connection
[preflight] You can also perform this action in beforehand using 'kubeadm config images pull'
error execution phase preflight: [preflight] Some fatal errors occurred:
        [ERROR ImagePull]: failed to pull image k8s.gcr.io/kube-apiserver:v1.16.3: output: Error response from daemon: Get https://k8s.gcr.io/v2/: dial tcp: lookup k8s.gcr.io on [::1]:53: read udp [::1]:35272->[::1]:53: read: connection refused
, error: exit status 1
        [ERROR ImagePull]: failed to pull image k8s.gcr.io/kube-controller-manager:v1.16.3: output: Error response from daemon: Get https://k8s.gcr.io/v2/: dial tcp: lookup k8s.gcr.io on [::1]:53: read udp [::1]:40675->[::1]:53: read: connection refused
, error: exit status 1
        [ERROR ImagePull]: failed to pull image k8s.gcr.io/kube-scheduler:v1.16.3: output: Error response from daemon: Get https://k8s.gcr.io/v2/: dial tcp: lookup k8s.gcr.io on [::1]:53: read udp [::1]:48699->[::1]:53: read: connection refused
, error: exit status 1
        [ERROR ImagePull]: failed to pull image k8s.gcr.io/kube-proxy:v1.16.3: output: Error response from daemon: Get https://k8s.gcr.io/v2/: dial tcp: lookup k8s.gcr.io on [::1]:53: read udp [::1]:48500->[::1]:53: read: connection refused
, error: exit status 1
        [ERROR ImagePull]: failed to pull image k8s.gcr.io/pause:3.1: output: Error response from daemon: Get https://k8s.gcr.io/v2/: dial tcp: lookup k8s.gcr.io on [::1]:53: read udp [::1]:46017->[::1]:53: read: connection refused
, error: exit status 1
        [ERROR ImagePull]: failed to pull image k8s.gcr.io/etcd:3.3.15-0: output: Error response from daemon: Get https://k8s.gcr.io/v2/: dial tcp: lookup k8s.gcr.io on [::1]:53: read udp [::1]:52592->[::1]:53: read: connection refused
, error: exit status 1
        [ERROR ImagePull]: failed to pull image k8s.gcr.io/coredns:1.6.2: output: Error response from daemon: Get https://k8s.gcr.io/v2/: dial tcp: lookup k8s.gcr.io on [::1]:53: read udp [::1]:53803->[::1]:53: read: connection refused
, error: exit status 1
[preflight] If you know what you are doing, you can make a check non-fatal with `--ignore-preflight-errors=...`
To see the stack trace of this error execute with --v=5 or higher
[root@mstr ~]#

Solution:
You need to initialize the Kubernetes master in the cluster
kubeadm init --pod-network-cidr=192.148.0.0/16 --apiserver-advertise-address=192.168.33.100 --ignore-preflight-errors=Hostname,SystemVerification,NumCPU

Issue #6: K8s Unable to connect with server

[root@mstr tmp]# kubectl apply -f https://raw.githubusercontent.com/coreos/flannel/master/Documentation/kube-flannel.yml
Unable to connect to the server: dial tcp: lookup raw.githubusercontent.com on 10.0.2.3:53: server misbehaving
[root@mstr tmp]#

Workaround: When I've stried to run the above kubectl command at office network got that error. Once I'm at home able to run it perfectly. So please check your Company VPN network proxy settings before your run that kubectl command.

Issue #7: Docker Networking : Error response from daemon

[vagrant@mydev ~]$ docker network create -d overlay \
>                 --subnet=192.168.0.0/16 \
>                 --subnet=192.170.0.0/16 \
>                 --gateway=192.168.0.100 \
>                 --gateway=192.170.0.100 \
>                 --ip-range=192.168.1.0/24 \
>                 --aux-address="my-router=192.168.1.5" --aux-address="my-switch=192.168.1.6" \
>                 --aux-address="my-printer=192.170.1.5" --aux-address="my-nas=192.170.1.6" \
>                 my-multihost-network
Error response from daemon: This node is not a swarm manager. Use "docker swarm init" or "docker swarm join" to connect this node to swarm and try again.

Basic Analysis: Check the 'swarm' line in the docker info command output.
docker info

Here from the error line, you can understand the there is an issue due to Swarm inactive state. To turn it on 'active' Workaround:
docker swarm init --advertise-addr 192.168.33.200

Issue #8: Kubernetes join command timeout on AWS ec2 instance

There were 3 ec2 instances created to provision the Kubernetes cluster on them. Master came up and Ready state. But when we run the join command on the other nodes, it was timed out with the following error:
root@ip-172-31-xx-xx:~# kubeadm join 172.31.xx.204:6443 --token ld3ea8.jghaj4lpkwyk6b38     --discovery-token-ca-cert-hash            sha256:f240647cdeacc429a3a30f6b83a3e9f54f603fbdf87fb24e4ee734d5368a21cf
W0426 14:58:03.699933   17866 join.go:346] [preflight] WARNING: JoinControlPane.controlPlane settings will be ignored when            control-plane flag is not set.
[preflight] Running pre-flight checks
        [WARNING IsDockerSystemdCheck]: detected "cgroupfs" as the Docker cgroup driver. The recommended driver is "systemd           ". Please follow the guide at https://kubernetes.io/docs/setup/cri/
error execution phase preflight: couldn't validate the identity of the API Server: Get https://172.31.35.204:6443/api/v1/na           mespaces/kube-public/configmaps/cluster-info?timeout=10s: dial tcp 172.31.35.204:6443: i/o timeout
To see the stack trace of this error execute with --v=5 or higher

Solution for such issue is Understand that the AWS Security Group PORT open for inbound rules. Kubernetes uses API service which internally call the HTTP protocol this should be open to all(0.0.0.0/0) inbound connections. And also the Kubernetes master-worker communications may need other TCP inbound connections as well so let it be open. 
Security Group settings in AWS for Kubernetes

Issue # VirtualBox issue (VERR_VMX_NO_VMX) code E_FAIL (0x80004005) gui headless

Stop hyper-v service running by default in Windows 8/10, since it blocks all other calls to VT hardware.

Additional explanation here: https://social.technet.microsoft.com/Forums/windows/en-US/118561b9-7155-46e3-a874-6a38b35c67fd/hyperv-disables-vtx-for-other-hypervisors?forum=w8itprogeneral

Also as you have mentioned, if not already enabled, turn on Intel VT virtualization in BIOS settings and restart the machine.


To turn Hypervisor off, run this from Command Prompt (Admin) (Windows+X):

bcdedit /set hypervisorlaunchtype off

and reboot your computer. To turn it back on again, run:

bcdedit /set hypervisorlaunchtype on

If you receive "The integer data is not valid as specified", try:

bcdedit /set hypervisorlaunchtype auto


The worked solution.

Help required or Support on your project issues?

Jenkins Build Failure

Problem in Console Output

Started by user BhavaniShekhar
Running as SYSTEM
Building remotely on node2 in workspace /tmp/remote/workspace/Test-build-remotely
[Test-build-remotely] $ /bin/sh -xe /tmp/jenkins681586635812408746.sh
+ echo 'Executed from BUILD REMOTELY Option'
Executed from BUILD REMOTELY Option
+ echo 'Download JDK 17'
Download JDK 17
+ cd /opt
+ wget https://download.oracle.com/java/17/latest/jdk-17_linux-x64_bin.tar.gz
/tmp/jenkins681586635812408746.sh: line 5: wget: command not found
Build step 'Execute shell' marked build as failure
Finished: FAILURE

Solution: To fix this you need to install wget on that node2 or you can use alternative as curl command.

Issue with sending mail on the Linux System

Solution investigate the mail can be sent from the command line or not. us the following command:

 echo "Test Mail" | mailx -s "test" "Pavan@gmail.com"
 
Replace the mail id with your company mailid and run that command. Hello guys if you need any support on Docker and DevOps do let us know in comments!

Saturday, November 16, 2019

Best Performance DevOps interview Questions

I hope you all doing great with DevOps learnings! There is a huge demand for DevOps engineers, where people turning from the many freshers turning to DevOps Engineer roles and becoming experts after exploring. Here I would like to target the key DevOps tools as interview questions.

Here I'm collecting interesting DevOps interview questions out of my experiences and some of my friends who attended in various companies. And also made some of them collected from the most highly professional session delivered in the YouTube tutorials.

World-class DevOps Interview Questions

SCM Questions

  1. Can we build some code from SVN and some from the GIT repository in a single Jenkins job?
  2. Merging two branches merge conflicting? How do you resolve it?
  3. What is the difference between git clone, git fetch and git pull?
  4. How do you deal with git remote repository?

AWS Interview Questions

  1.  AMI instance took the snapshot from recently build instance, How can I create a new instance?
  2.  Can you change VPC? when you do that? What are the restrictions on VPC?
  3. What is S3 used for? 
  4. What is EC2 in AWS?
  5. What is Route53? Which situations you will use it?
  6. What are the storage options in AWS? Explain what are the advantages for each type?

Linux/Unix Shell scripting


  1. How do you find the number of files used by a particular user?
  2. How to find and replace the strings in vi editors?
  3. Can you tell the steps involved in the shell script to find the latest 5 days log files archive them, then remove them from the location?
  4. What are the options we have for filtering data using regular expression?
  5. What are the differences between Linux and UNIX?

Docker Interview Questions

  1. Can you write a simple Dockerfile where a webserver runs?
  2. What is the difference between ENTRYPOINT and CMD?
  3. How to parameterized the run time containers?
  4. How do Docker Host and Docker client communicate?
  5. What is Docker Swarm do?
  6. What do you understand about the image and containers in Docker?
  7. What are the types of Docker repositories?
  8. How do you provide Docker security?
  9. What are the differences between Docker EE and Docker CE?
  10. What is the default Docker network?
  11. What are the features of Docker Universal Control Plane (UCP)?
  12. Why do we need Docker Trusted Registry(DTR)?
  13. What is the best orchestration tool for Docker? Why?
  14. How do you store data for a container that runs a database?
  15. What is the best way to bring up/down the web server, application server and a database like MySQL in a sequence?


Kubernetes Interview Questions

  1. What is the Kubernetes architecture explain to me in detail?
  2. How does Master-Slave work in Kubernetes?
  3. What are the namespaces in Kubernetes?
  4. How does the persistant volume works in Kubernetes?
  5. What all possible networks available for Kubernetes?
  6. How do you deploy an application on Kubernetes Cluster?
  7. How do you scale the services in Kubernetes?
  8. What is a replica set in Kubernetes?
  9. What does configMap do in Kubernetes?
  10. What is a Pod? How many types of Pods used in Kubernetes?
  11. How do you integrate docker images to build and ship to a Kubernetes cluster?
  12. How do you allocate the resources for a Kubernetes cluster?

Prometheus Interview Questions


  1. What is Prometheus? explain the purpose.
  2. How do you install and configure Prometheus?
  3. How do you start Prometheus?
  4. Why should you select Prometheus, Grafana and Alertmanager stack used?
  5. How do Prometheus store TSDB data? explain configuration options.
  6. What are the recently encounter issues in Prometheus monitoring system?
  7. What are the features of PromQL?
  8. What are data types in PromQL 
  9. What are the binary operators in PromQL?
  10. What are the metrics types in PromQL?
  11. What is a counter in PromQL?
  12. How do you deal with a Histogram in PromQL?
  13. What is the difference between Gauge vs 


Grafana Interview Questions


  1. How do you integrate Prometheus with Grafana?
  2. How do you design a Grafana dashboard?
  3. How do you connect a Datasource in Grafana? Explain the example as Prometheus as Database.
  4. What are the attributes that need to be considered for developing the visualization in Grafana?
  5. What are the best features of Grafana? what you have implemented?
  6. What all the exporters required in Prometheus so that Grafana visualizations could give effective output?
  7. How do you parameterize the Dashboard where there is selective metrics outcome required.


Alert Manager Interview Questions

  • How do you install Alert Manager?
  • How do you configure an Alert manager?
  • Where does the Alert Manager best suites for?
  • How do you define Alert Rule?
  • How do you format the Alert messages in Slack or mail?


SRE interview Questions

Reference:

  1. Docker Image management
  2. Kubernetes Basic Installation

Wednesday, November 6, 2019

User Management on Universal Control Plane (UCP)

This is a quick tutorial on Docker UCP usage for User Management. Docker UCP provides us multiuser management and Role-based user control. which allows us to create and manage users and teams in an organization. Let's take a look over this user management in detail in this post.

First, we create Organization then we associate a couple of teams then after that add users to those teams.

Login to your UCP management console.

Create an Organization on UCP


Click on the 'user management' in the left side pane.

User Management on UCP

Now in the right pane work area, you can click on the 'Create Organization' top right button.

Enter your organization name a single word without any spaces. even though you enter the name in Capitals it will convert into lower case and store it.

Create Organization on UCP
To complete it click on the 'Create' button.
Once Organization is created it will be listed in the work area. Click on the newly created organization it will give us the option to create the teams.

Create a Team on UCP


Let's prepare the list of commonly required teams for any organization. Then, create them so the list as  following teams:

  • dev - Development team
  • QA - Quality Assurance team
  • prod - Production team
Create Team on UCP

Create User

There will be 'admin' User already created by UCP. we can create new users with 'admin' roles or without it. We would like to create a user with 'admin' access and another without 'admin' access role.

Let's explore this user creation process now.

Create User on docker UCP


The same way we can create another user that having the 'Docker EE Admin' role.
After creating users the summary looks as:
Users created on UCP summary

Add Users to Team

Go to the organization that you have already created. select it. Choose the team to which you will add the user. Here I am adding user to 'qa' team.

Add user to organization/team in UCP

I hope you enjoyed this post about user management on UCP for Docker EE


Next, let us explore the Docker Trusted Registry (DTR).

Categories

Kubernetes (24) Docker (20) git (13) Jenkins (12) AWS (7) Jenkins CI (5) Vagrant (5) K8s (4) VirtualBox (4) CentOS7 (3) docker registry (3) docker-ee (3) ucp (3) Jenkins Automation (2) Jenkins Master Slave (2) Jenkins Project (2) containers (2) docker EE (2) docker private registry (2) dockers (2) dtr (2) kubeadm (2) kubectl (2) kubelet (2) openssl (2) Alert Manager CLI (1) AlertManager (1) Apache Maven (1) Best DevOps interview questions (1) CentOS (1) Container as a Service (1) DevOps Interview Questions (1) Docker 19 CE on Ubuntu 19.04 (1) Docker Tutorial (1) Docker UCP (1) Docker installation on Ubunutu (1) Docker interview questions (1) Docker on PowerShell (1) Docker on Windows (1) Docker version (1) Docker-ee installation on CentOS (1) DockerHub (1) Features of DTR (1) Fedora (1) Freestyle Project (1) Git Install on CentOS (1) Git Install on Oracle Linux (1) Git Install on RHEL (1) Git Source based installation (1) Git line ending setup (1) Git migration (1) Grafana on Windows (1) Install DTR (1) Install Docker on Windows Server (1) Install Maven on CentOS (1) Issues (1) Jenkins CI server on AWS instance (1) Jenkins First Job (1) Jenkins Installation on CentOS7 (1) Jenkins Master (1) Jenkins automatic build (1) Jenkins installation on Ubuntu 18.04 (1) Jenkins integration with GitHub server (1) Jenkins on AWS Ubuntu (1) Kubernetes Cluster provisioning (1) Kubernetes interview questions (1) Kuberntes Installation (1) Maven (1) Maven installation on Unix (1) Operations interview Questions (1) Oracle Linux (1) Personal access tokens on GitHub (1) Problem in Docker (1) Prometheus (1) Prometheus CLI (1) RHEL (1) SCM (1) SCM Poll (1) SRE interview questions (1) Troubleshooting (1) Uninstall Git (1) Uninstall Git on CentOS7 (1) Universal Control Plane (1) Vagrantfile (1) amtool (1) aws IAM Role (1) aws policy (1) caas (1) chef installation (1) create deployment (1) create organization on UCP (1) create team on UCP (1) docker CE (1) docker UCP console (1) docker command line (1) docker commands (1) docker community edition (1) docker container (1) docker editions (1) docker enterprise edition (1) docker enterprise edition deep dive (1) docker for windows (1) docker hub (1) docker installation (1) docker node (1) docker releases (1) docker secure registry (1) docker service (1) docker swarm init (1) docker swarm join (1) docker trusted registry (1) elasticBeanStalk (1) global configurations (1) helm installation issue (1) mvn (1) namespaces (1) promtool (1) service creation (1) slack (1)