Sunday, September 17, 2023

Control group [cgroup] limit the system resources

Hello DevOps team, in this post I will be exploring the CGroup usage in docker engine.


How check CGroup in the Linux file system supporting?
To check all types of cgroups that are allowed in Linux system we can check at /sys/fs/cgroup directory

What's the default memory limit for docker containers?
Interestingly, when you don't define any control group on the memory limits, the docker engine will allocate the full memory of the VM as the maximum memory limit.

How do we impose the container memory limits?
When you run the container with the 100m upper memory limit for the tomcat image. You can see the limit value docker stats command.

Can we control of CPU load per container? How?
Yes it is possible to control the CPUs usage to container.
Control group helps us in define the limit, this can be decimal values that indicate CPU cycles - example here with 0.1

We can apply both the control group limits on the same container.

How to get the version of Cgroup
 We can get the control group version and Driver value using `docker info` command.
We can have CPU Sets for creating new containers where we can share it with the other container as well. Here is an example, container lopri can be used with --cpuset-cpus=0 and share percentage using --cpu-shares=20 for busybox image. note that when no other container is running the whole CPU % will be alloted to the single container. When we have multiple container shares then it will be distributed the CPU as per the shares defined.
--cpu-shares int option will be used to define the CPU shares (relative weight) 

 --cpuset-cpus string option will be used for CPUs in which to allow execution (0-3, 0,1) 

 -cpu-quota int option will be used to set the Limit CPU CFS (Completely Fair Scheduler) quota Here the CPU cfs quota can not be less than 1ms (i.e. 1000).
using --cpu-quota option container creation

Thursday, August 10, 2023

SonarQube installation on Redhat Linux

11
As of my last update in August 2023, SonarQube 10 already re.1leased. However, I can provide you with general steps to install SonarQube on CentOS/Rocky 8. Please note that the steps might need adjustments based on the specific versions you are using.
Prerequisites:
System requirements:
RAM 4GB
CPU 1vCPU works, better performance 4 cores
Ensure you have the following prerequisites installed on your CentOS 8 server:
Create a Vagrant CentOS/8 box forSonarQube installation:

 
Vagrant.configure(2) do |config|
  config.vm.box = "centos/8"
  config.vm.boot_timeout=600
  config.vm.define "sonarqube" do |sonarqube|
    sonarqube.vm.network "private_network", ip: "192.168.33.150"
    sonarqube.vm.hostname = "sonarqube.devopshunter.com"
    sonarqube.vm.provider "virtualbox" do |vb|
        vb.cpus = "4"
        vb.memory = "4096"
    end
  end
end
Bring up the box using `vagrant up`. In the PuTTY / SSH terminal do the following repo changes steps.
 
sudo cd /etc/yum.repos.d/
sudo sed -i 's/^mirrorlist/#mirrorlist/g' /etc/yum.repos.d/CentOS-*
sudo sed -i 's|#baseurl=http://mirror.centos.org|baseurl=http://vault.centos.org|g' /etc/yum.repos.d/CentOS-*
  
Create sonar user
A dedicated user 'sonar' can be used for operations taken care by this user.

 
 sudo useradd sonar -c "SonarQube user" -d /opt/sonarqube -s /bin/bash;
 sudo passwd sonar
Enter New, confirm password. 

To tune increasse the vm_max_map_count kernal, file descriptor and limits add permanently use the following steps:
 
sudo vi /etc/sysctl.conf 
#Enter the following lines at end
vm.max_map_count=262144
fs.file-max-65536
 
sudo  vi /etc/security/limits.conf 
# Add the following lines a the end of the file:
sonar - nofile 65536
sonar - noproc 4096
After changes above `reboot` system.


Software requirements


Java JDK 17 (SonarQube Latest version typically requires Java 17)
PostgreSQL database

Install Java 17:
If you don't have Java 11 installed, you can do so with the following commands:

 
sudo yum install java-17-openjdk  -y
java -version
# If multiple version exists then you can map right Java with this:
sudo update-alternatives --config java 
Install PostgreSQL:
SonarQube requires a database to store its data. You can use PostgreSQL as the database backend. Install it using the following commands:


=
 
sudo dnf install postgresql-server postgresql-contrib
sudo postgresql-setup --initdb
sudo systemctl start postgresql
sudo systemctl enable postgresql
sudo systemctl status postgresql # Check it is active

This may create 'postgres' user, you can set passwd for it by
 
su - postgres 
psql 
Create a PostgreSQL Database:
Create a PostgreSQL database and user for SonarQube. Replace sonarqube_db, sonarqube_user, and your_password with your desired values.


sudo -u postgres psql
CREATE DATABASE sonarqube_db;
CREATE USER sonarqube_user WITH ENCRYPTED PASSWORD 'your_password';
ALTER USER sonarqube_user WITH SUPERUSER;
ALTER DATABASE sonarqube_db OWNER TO sonarqube_user;
\q
You can check the postgres running on which port :
netstat -tulpn |grep postgres 

Download and Install SonarQube

:
Download the SonarQube distribution and install it on your system:
sudo yum install wget unzip -y
wget https://binaries.sonarsource.com/Distribution/sonarqube/sonarqube-<version>.zip

 unzip sonarqube-<version>.zip
For example: 
sudo wget https://binaries.sonarsource.com/Distribution/sonarqube/sonarqube-10.1.0.73491.zip
sudo unzip sonarqube-10.1.0.73491.zip -d /opt/
sudo mv /opt/sonarqube-10.1.0.73491 /opt/sonarqube

Configure SonarQube:

Edit the SonarQube configuration file to set up the database connection and listen on the appropriate IP address:
sudo vi /opt/sonarqube/conf/sonar.properties
Update the following properties with your PostgreSQL database information:
 
sonar.jdbc.url=jdbc:postgresql://localhost/sonarqube_db
sonar.jdbc.username=sonarqube_user
sonar.jdbc.password=your_password
Start SonarQube:
Start the SonarQube service:
/opt/sonarqube/bin/linux-x86-64/sonar.sh start
/opt/sonarqube/bin/linux-x86-64/sonar.sh status
To check the sonarqube logs navigate to the /opt/sonarqube/logs/ and the file sonar.log 
Troubleshoot point:
Modify sonar.sh script to handle user related issues 
sudo vi /opt/sonarqube/bin/linux-x86-64/sonar.sh you canf ind RUN_AS_USER= blank
set that line RUN_AS_USER=sonar
Access SonarQube:
Open a web browser and access SonarQube using the URL http://your_server_ip:9000. The default credentials are 'admin' for both the username and password.
Finally we have reached the end of this topic, successfully installed and configured SonarQube on CentOS/8.
Remember to check the official SonarQube documentation for any specific instructions related to SonarQube 10 or any updates beyond my knowledge cutoff date.

Tuesday, June 13, 2023

Bitbucket Server installation on Linux

Bitbucket installation 

Bitbucket is most widely used in the IT industry to provide team collaborative work for short size of teams. Its greater ability is to have integration with Jira and other DevOps tools. Bitbucket encourages private repository creation by default. So they are mostly not available for search engines to discover these projects! So startup projects will do better here.

Prerequisites

JRE/JDK: To run the web UI Java is required, Your system must have the JRE/JDK, we can go with the Open JDK as you know that Oracle JDK is now not open to everyone to download!
Git: To run the Bitbucket we need Git as a source-code management tool.

Ensure the default port 7990 is available on the system. If you are running on the Cloud ensure the TCP port /7990 allows inbound traffic. On the AWS you need to update the Security Group that associated with the EC2 instance.

Option of Vagrant box 
 
Vagrant.configure(2) do |config|
    config.vm.box = "centos/8"
    config.vm.boot_timeout=600
    #config.landrush.enabled = true

    config.vm.define "mstr" do |mstr|
    mstr.vm.host_name = "mstr.devopshunter.com"
    mstr.vm.network "private_network", ip: "192.168.33.100"
     mstr.vm.provider "virtualbox" do |vb|
     vb.cpus = "4"
     vb.memory = "4096"
     end  
    end
      config.vm.define "node1" do |node1|
      node1.vm.network "private_network", ip: "192.168.33.110"
      node1.vm.hostname = "node1.devopshunter.com"
        node1.vm.provider "virtualbox" do |vb|
         vb.cpus = "2"
         vb.memory = "1024"
         end
     end
    
    config.vm.define "node2" do |node2|
    node2.vm.network "private_network", ip: "192.168.33.120"
    node2.vm.hostname = "node2.devopshunter.com"
        node2.vm.provider "virtualbox" do |vb|
        vb.cpus = "2"
        vb.memory = "1024"
        end
    end
 
  end
  

1) Bitbucket supports git version 2.31 to 2.39 currently 
2) Minimum ram required is 3GB. So need to modify the below line in vagrant file
vb.memory = "4096" then run vagrant reload mstr to get working.

If you want to install on CentOS/8

 
sudo yum remove git* -y

 sudo yum install java wget -y
 sudo yum groupinstall -y 'Development Tools';
 sudo yum install -y autoconf curl-devel expat-devel gettext-devel openssl-devel perl-CPAN zlib-devel gcc make perl-ExtUtils-MakeMaker cpio perl-CPAN vim
 
 wget https://mirrors.edge.kernel.org/pub/software/scm/git/git-2.39.3.tar.gz
 tar zxvf git-2.39.3.tar.gz
 cd git-2.39.3/
 ./configure
 make
 sudo make install prefix=/usr install
	

 wget https://product-downloads.atlassian.com/software/stash/downloads/atlassian-bitbucket-8.11.0-x64.bin
 sudo chmod +x atlassian-bitbucket-8.11.0-x64.bin
 ./atlassian-bitbucket-8.11.0-x64.bin
  

Bitbucket Setup configuration

Product: Bitbucket
License type: Bitbucket (server)
Organization: vybhavatechnologies
your instance is up and running
server-id: BDFG-ZKCQ-RWTR-YOXP [changes for you!]

click on the "Generate License" Button
pop-up confirmation please confirm it so that you can see the evaluation 90 days license key will be shown in the gray text box.

come to set up 
next Administrator account setup 
Username: admin
full name pavan devarakonda
email address pavan.dev@devopshunter.com
Please enter the strong password, enter same in the confirm password 

Goto bitbucket 


Login with a newly created admin account. Enjoy your Project creation and each Project can have multiple repositories. The repository which you create on the Bitbucket Web-UI is an empty bare repository. 


For Windows
- GitBash
- BitBucket 

How to add a project to git repo to the remote server.

On your local have a project directory and have some code.

Create a repo on the bitbucket say 'demo-repo1'
On your client VM or from your Personal Laptop Gitbash navigate to the folder and run the following command sequence to push the code to remote repository :
cd demo-local
git init 

git remote add origin https://url-demo-repo1.git  
git add .
git commit -m "update"
git push -u origin master
all the files in the demo-local will be added to remote repo.
Check the changes on the browser on the remote repo.

Thursday, February 9, 2023

Ansible Automations Designing & Implementation | Best Practices | Tricks and Tips

Hey DevOps, DevSecOps Engineers, SRE new bees here I am going to share the Learnings which I've executed every day found that this the best and new tip to improve the performance of ansible playbook executions sorted out and listed here.


Planning and designing automation with Ansible

  • Most common DevOps tool used for Planning and Designing is Confluence page
  • Design document must contain a  clear "Objective" - where you will be describe why you wish to do automation on what area
  • Tracking purpose always use a ticketing tool entry preferred tool Jira
  • The design can be breakdown into two levels
    • High level design where we will detail about what each task need to be covered
    • Low level design where we discuss in-depth ideology on each task along with the possible constraints
    •   Usage of global variables (AWX UI use extra vars, host_vars, group_vars etc) discuss their necessity
    • AWX/Tower Job template construct possible options as input to handle overall objective, if not sufficient then chain with Workflow constructs
    • The execution of Job template every possible option that is a valid to consider it as Test Case
    • References Each design document may have some researching requirements that may include your internal company confluence pages or external specific Ansible/AWX technical knowledge articles to help the overall objective.

Playbook Tricks and tips

  1. Ansible playbook directory the directory layout always have the playbooks in the Project directory preferable because Ansible/AWX tower can read the vars from that path to parallel directories such as group_vars, vars etc. 
  2. Playbook description : First thing fist always add a description comment and in that please mention how this playbook works. Other SRE/DevOps engineer should be able to run without asking you how to run this. 
    • In the description also include extra variable in order to execute the playbook in happy path also give clarity on mandatory or optional variables.
    • While defining the extra variables first list all mandatory variables and then go for optional
    • Better to include tags used in the playbook and their purpose so that end user can easily select for task execution or skip the tasks under certain conditions
    • Please add comment before every newly introduced task, that should be highlight the detail process task will do.
  3. Writing your Task always have named task, that should give brief understanding about what you will be doing in that task, 
    • Task name must have title cased
    • Sometime you might be copying the task from other playbooks re-check that name is appropriate or not. 
    • If a task have some critical logic must add comment on top of the task the purpose should be described
  4. Manage Facts : Ansible's gather_facts directive implies time consuming operations so it is a good practice to disable it, when it is not specifically needed in your play.
  5. Don'ts during execution: Do not use LIMIT option as much as possible there could be some plays which will skipped if you use LIMIT option on AWX templates. To resolve this, better option is to use hosts: value assigned to a define variable like targets and have a default value as 'all' or 'localhost as per your play need. When you use the hostvars in a play this limit value could be causes an issue to collect facts from the hostvars.
  6. I also recommend to specifically set "any_errors_fatal: true" in all the plays where we can expect/catch the ERRORs during the execution. 
  7. If you already defined a play with any_errors_fatal: false then DON'T define the ignore_errors to the same play.
  8. When you build the email notification logic in a play for successful flow,  always ensure that you must have failure email as well. You can limit the target audience in case of failure
  9. Encrypt the sensitive data content inside a playbook with ansible-vault command
  10. Always double check your inventory list with ansible-inventory command with list, graph options
  11. In production if all possible use cases tested in non-production then better to reduce the verbose level or suppress the logs this can be done from the task level by using `no_log: "{{ log_suppression| default(true) }}"` at the end of the task definition. Here log_suppression is an Ansible variable  this can be changed at the time of execution the value can be either 'true' or 'false'.
  12. While dealing with the when condition in Ansible number validation use the int filter, do not use character value comparisons ( x == '0' ) instead provide the numerical value( x == 0 ).
  13. While working with the lineinfile module, if same playbook is triggered from multiple AWX Consoles there could be a race condition and it can be fixed with throttle option.  use Ansible's setting "throttle" set to 1 in the task where lineinfile is executed "The throttle keyword limits the number of workers for a particular task. It can be set at the block and task level. Use throttle to restrict tasks that may be CPU-intensive or interact with a rate-limiting API" Example:
              - name: Updating hostname and uptime in days in file CSV
              lineinfile:
                path: /tmp/uptime-report.csv
                line: "{{ inventory_hostname }},{{ box_uptime }}"
              throttle: 1
              delegate_to: localhost

AWX Admins Tricks

  • When you install AWX BETTER version always prefer to use latest -1 version that could be stable and consistent during your installation process.
  • If you ae using existing AWX/Ansible job templates to test various Automations requirements/enhancements that we work on:
  • We usually need to alter the Job Templates temporarily to performing testing (i.e. we change the Projects, and besides we may add some Limits or Skip tags, or we may use some EXTRA Variables like 'block_reboot' or 'log_suppression') 
  • AWX Smart Inventory creation is simple to use only thing you need to know how to use the regex (regular expression) that will bring the combination that satisfies to the existing host list and then it will create the new inventory out of existing inventory hosts. To get all hosts
    name.regex:.*
    To get hosts that start with ec2
    name.regex:^ec2
    To get hosts that contains 'prod'
    name.regex:prod
  • Problem: there are good chances, that we may forget to undo all/some of these temporary changes, resulting in broke jobs or incomplete runs 
  • Solution(Best Practice): Always create a copy of the job you want to use for testing and alter that copy according to the needs, then just delete the temporary job once test finished 
  • making a copy of a job is trivial and will ensure we are not breaking anything in the existing system.
  • The latest AWX versions have different weird behavior! AWX 17.1.0 inventory creation from the source control is allowed only when the inventory yaml file-permissions have executable! 
    ## To set the permission in git
    git ls-files --stage
    git update-index --chmod=+x 'name-of-shell-script'
    git commit -m "made a file executable"
    git push
        
AWX Workflow flow control better to use "On Success" because we usually want to stop remaining actions/(in my scenario reboots) when there is a failure encountered (this may cause the affect to multiple/all remaining servers).

Best References:

  1. Change file permissions while running 
  2. Multi-line Strings in YAML
  3. In-memory inventory


Tuesday, February 7, 2023

Ansible Jinja2 Templates - ansible template module

Here I'm starting this post with famous ARISTOTLE quote.

"We are what we repeatedly do. Excellence, then is not an act, but a Habit"


Welcome back Ansible Automations and who are habituated as Ansible automation specialists this post for them to give boosted walk through, In this post, I would like to share my experiments with Jinja2 templates usage on the Ansible playbook. Of-course Jinja is from Japan it is world famous for templatization capabilities by integrating with multiple languages such as Python, Ruby, Salt talk etc.

In this post we will be cover the following topics:
  1. What is Jinja2 template do?
  2. Template with filters
  3. Template with Lists and sets
  4. Template module in Ansible
  5. Template with Flow Control
  6. Template using Looping
  7. Template inheritance**

What is Jinja template do?
Jinja2 is another Python library created for Flask web framework, that comes part of Ansible installation. It is special ability as interpolate or put stuff into YAML Variables(other strings). Those variables can be part of HTML document putting stuff at run-time.

A template is any string of text that contains placeholders {{ }} for the template language, to be able to replace those placeholders by some values. The syntax used for the placeholders and the whole syntax of the template as a whole is known as a template language and the underlying code that evaluates the template and puts the new values in is called a template engine Ansible comes with powerful Jinja2 template language.
 
Let's explore more about Ansible Jinja templates experiments with examples.


Prerequisites

Firstly you must have Ansible installed and the ssh-key authorized for all the managed nodes those are configured inside your targeted environment in the Ansible inventory host list.

How to use string filters in a playbook?

This is common requirement where we can use the different string filters such as: upper, lower, title, replace, default value in the following example.


---
- name: test string values
  hosts: localhost
  vars:
    my_name: 'Pavan Deverakonda the great'
  tasks:
    - name: String filter examples
      debug:
        msg: 
        - "The name is {{ my_name }}"
        - "The name is {{ my_name |upper }}"
        - "The name is {{ my_name |lower }}"
        - "The name is {{ my_name |title }}"
        - "The name is {{ my_name |replace('Pavan','Raghav') }}"
        - "The name is {{ title |default('Mr.') }}{{ my_name }}"
  
After the execution of the string filters the output :

Applying string filters on text in a Ansible playbook


How to play with Jinja2 lists and sets in Ansible?

It is very simple to understand about the Lists and Sets in Jinja2 they can be operated similar to Python Lists and Sets here in the Ansible we need to use them in the YAML as follows:

---
- name: test aggregate values
  hosts: localhost
  vars:
    mylist: [10,20,30]
    x: [8,3,9,5,1]
    y: [44, 5,5]
    words: ["Learning","by","doing"]
  tasks:
    - name: aggregate filter examples
      debug:
        msg: 
        - "The max {{ mylist|max }}"
        - "The min {{ mylist|min }}"
        - "The last {{ mylist|last}}"

    - name: set filters 
      debug:
        msg:
        - "The unique: {{ [2,5,2,9,7,5]|unique }}"
        - "The union: {{ x|union(y) }}"
        - "The another union: {{ [10,3.4]|union([4,2])}}"
        - "The intersect: {{ x|intersect(y) }}"
        - "The intersect: {{ [10,20,30,10]| intersect ([40,30])}}"
        - "The joining words: {{ words|join(' ') }}"
The execution on the lists and sets goes here as output:
Jinja2 Lists and Sets in Ansible playbooks

How to write an Ansible playbook using templates?

It's so simple to use the Jinja2 templates in the Ansible playbooks. To know all the available default ansible variables at the runtime, you can inspect with the following command:
ansible -m setup localhost
It will give you the facts about the localhost. To filtering out to get all the facts which starts with 'ansible_'
ansible -m setup db |grep ansible_


Ansible setup module
ansible_user details using ansible command setup module


Now, Let's move on to our main goal to playing with the templates in playbook and experiment to know how the template engine helps our examples.
 

Writing Simple Ansible playbook using templates module

Ansible uses Jinja2 templates where it can be lookup inside 'templates' folder, where your playbook runs. All the values of variables will replaced at the time of running the playbook. Runtime value replaces at the time of remote execution.
cat templates/sample-conf.j2
env = {{ env }}
remote_ip = {{ ansible_host }}
remote_user = {{ ansible_user_id}}
remote_hostname = {{ (ansible_fqdn|default(ansible_host)) }}
To test the template values in the playbook write it as :
# File: mytemplate-test.yaml
---
- name: test template values
  hosts: web
  vars:
    env: dev
  tasks:
    - name: template module runs on remote
      template:
        src: sample-conf.j2
        dest: /etc/sample.conf
      become: true
Advanced settings for templates adding the user, group, file permissions with mode attributes.
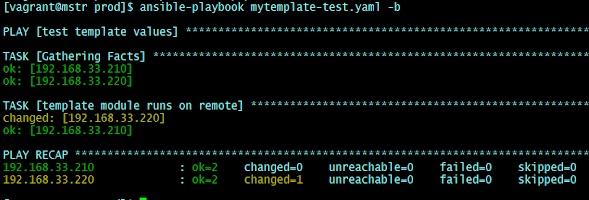
 ansible-playbook mytemplate-test.yaml -b
 

setup the permissions on the templated files.


Ansible Jinja template experiment

Now connect to the Node1 or Node2 where this hosts are in the play, and check that file content of /etc/sample.conf

Execution of Ansible template sample
Jinja2 template execution with ansible playbook

How to specify "if else" statements in Ansible Jinja2 (.j2) templates? 

Assuming that you are assigning somewhere in the playbook or at the time of launching the Ansible in the extra_vars, in AWX here we go with the "test_var" value with some bool value and you want to test the following is the Jinja syntax to test
- debug:
	msg: "{% if test_var == true %} Good to go!{% else %} Not operational!{% endif %}"
You can also include the ansible facts in the message content.
controlplane $ cat condition1.yml 
- name: Condition test
  hosts: localhost
  gather_facts: no
  vars:
    test_var: yes
  tasks:
    - name: checking if-condition
      debug:
        msg: "{% if test_var == true %} Good to go!{% else %} Not operational!{% endif %}"
	
Simple if-else Jinja template syntax in Ansible playbook

Looping with Jinja templates

Here is a fun looping playbook which will be using a list variable 'myex' that stored all my experiances in the IT industry.
---
- name: Testing Jinja templates with loops
  hosts: localhost
  vars:
    myex: ['Teleparadigm','IBM Global Services','BirlaSoft','Virtusa','Rubicon Red', 'Oracle Corporation','Garmin']
  tasks:
    - name: extracting my experiance
      template:
        src: myex.j2
        dest: /tmp/experiance.txt
  
Jinja template you can store in a file called myex.j2
This is my experience list:

{% for e in myex %}
 
{{loop.index}}. {{ e }}

{% endfor %}
 
When we run the playbook we could see a nice output as:
Loops in Jinja templates in Ansible playbook

Nested loops in Jinja template 

Many Thanks! to Mr. Tim Fairweather RedHat Solution Architect, who shared crazy and funny post "Mastering loops with Jinja templates in Ansible" with this inspiration I've created following nested loop section, where I would like to experiment with the template usage and that too the role created with the ansible-galaxy command as shown:
ansible-galaxy init jinja-templates
  tree jinja-templates/
  jinja-templates/
|-- README.md
|-- defaults
|   `-- main.yml
|-- files
|-- handlers
|   `-- main.yml
|-- meta
|   `-- main.yml
|-- tasks
|   `-- main.yml
|-- templates
|-- tests
|   |-- inventory
|   `-- test.yml
`-- vars
    `-- main.yml
Here is template using playbook my flow of developing code as follows:
  1. Create variables which will contain a map/dictionary
  2. Define a task that uses template module and generates output
  3. Create template that will referring to the variables defined in the step 1
  4. Add a configuration to work with the do statement in template
  5. Create main playbook to test the nested loop in Jinja Template
Create variables 
Let's create the variables which have dictonaries in a yaml format `vi jinja-templates/vars/main.yml`
---
    inspiring_people:
    - name: Nielgogte
      fav_colour: Blue
    - name: Siva
      fav_colour: Blue
    - name: RanjanShee
      fav_colour: Orange
    - name: Sanjeet
      fav_colour: Orange
    - name: Pankaj
      fav_colour: Yellow
    - name: Prateek
      fav_colour: Blue

  colours:
    - name: Blue
      thinks:
        - Sky is The Limit
        - See as sea into the Depth
    - name: Yellow
      thinks:
        - Expressive
        - Task Oriented
        - Brainstroming
    - name: Orange
      thinks:
        - Proactive
        - Extreme
        - Cares a lot
  
Create task using template module 
Now what we want to perform with this role contained task, we will define under the tasks folder where we can define multiple task `vi jinja-templates/tasks/main.yml`
  - name: Create the Jinja2 based template
	template:
	  src: inspiring.j2 
	  dest: /tmp/impactingMe.out
  
Create template with nested for-loop
See here is the logic that goes fantastic for the nested loops in a Jinja Template `jinja-templates/templates/inspiring.j2`

  • Some variable names modified to test how they are working
  • Inside the template I've used Jinja filter ' | upper'.
 
---
{% for colour in colours %}
Colour number {{ loop.index }} is {{ colour.name }}.
  {% set colour_count = 0 %}
{% for person in inspiring_people if person.fav_colour == colour.name %}
{{ person.name | upper }}
{% set colour_count = colour_count + 1 %}
     {% do colour.update({'inspiring_people_count':colour_count}) %}
{% endfor %}
Currently {{ colour.inspiring_people_count }} inspiring_people choose color {{ colour.name }} as their favourite.
And the following are their thoughts for {{ colour.name }} :
  {% for item in colour.thinks %}
  -> {{ item }}
  {% endfor %}
{% endfor %}
  
All set to test our new learning that is nested loop within Jinja2 templates in Ansible
---
- name: Demonstrating variables in Jinja2 Loops
  hosts: localhost
  connection: local
  gather_facts: no
  roles:
        - jinja-templates

  tasks:
    - name: display file
      shell: cat /tmp/impactingMe.out
      register: output

    - debug:
        msg: "{{ output.stdout.split('\n') }}"	
  
Here we go... that nice output of-course I've worked on it to get it working almost half day :)

Ansible nested loops in Jinja Templates

Template inherence


Ansible Jinja template inheritance allows you to create the building blocks that you can combine use them. Here is an example of an Ansible playbook that uses Jinja2 templates with inheritance to create an index.html page. As The head template implementation can be 'included' and the body template is extendes in the final index template to generate the complete index.html page.
---
- name: Create index.html page
  hosts: localhost
  gather_facts: false
  vars:
    title: My Ansible experiment Website
    description: A sample website created with Ansible and Jinja2 templates
    keywords: sample, website, Ansible, Jinja2
  tasks:
    - name: Create head template
      template:
        src: templates/head.j2
        dest: head.html

    - name: Create body template
      template:
        src: templates/body.j2
        dest: body.html

    - name: Create index.html
      template:
        src: templates/index.j2
        dest: index.html  
  

The head template, created with templates/head.j2, sample might look like this:
  
  
    {{ title }}


The body template, created with templates/body.j2, sample might look like this:


Welcome to {{ title }}

{{ description }}

Finally, here's an example of the index.j2 template, which extends the body.j2 and includes head.html that was generated with `head.j2` templates:
  
{% include "head.html" %}
{% extends "body.j2" %}
  

H A P P Y !!    Template using A U TO M A T I O N S !!

Good Document References:

Hope you enjoyed this post, Keep sharing your comments on this post.

Friday, January 6, 2023

Manage Jenkins

How do I use "Manage Jenkins" page? 

Here I'm with all of the screenshots of each section of the Manage Jenkins page. this might contain "Monitors" that alert you when a new version of the Jenkins software or a security update is available. Each monitor includes links to the changelog that describes the new update as well as instructions to download and install the update. The Manage Jenkins page displays a series of tiles for common task areas, arranged in logical groupings: 

System Configuration — This section is designed for general system configuration, managing nodes and clouds, global tool configuration, and plugin management.
Security —  This section is designed to configure global security (authentication, authorization, and global settings that protect your Jenkins instance from intrusions) and screens to manage the credentials that provide secure access third-party sites and applications that interact with Jenkins.
Status Information —  This section is that display system information, information about disk usage, the Jenkins system log, "about Jenkins" information, and load statistics for the instance.
Troubleshooting —  This section is for Jenkins Administrators to help you resolve configuration issues.
Tools and Actions —  This section is designed for common management tasks (reloading the configuration from disk, preparing for shutdown) and management tools that enable you to administer Jenkins from the command line (Jenkins CLI and the Script Console a
Uncategorized — Screens for monitoring the Jenkins controller and agents and for launching build agents as Docker containers.
Additional tiles may be added by plugins that you install.


Significant changes are being made to Jenkins to improve the user interface and to address technical debt that has accumulated. Differences that directly affect administration include:

Configuration screens now use HTML div tags rather than HTML table tags. This provides a more attractive user interface for all users and a much better experience for users on narrow devices such as tablets and phones.

The tiles displayed on the Manage Jenkins page are now grouped logically rather than as the long list of tasks in somewhat random order that characterizes earlier Jenkins releases.

Some configuration fields have been moved or added in the latest versions.


Categories

Kubernetes (24) Docker (20) git (13) Jenkins (12) AWS (7) Jenkins CI (5) Vagrant (5) K8s (4) VirtualBox (4) CentOS7 (3) docker registry (3) docker-ee (3) ucp (3) Jenkins Automation (2) Jenkins Master Slave (2) Jenkins Project (2) containers (2) docker EE (2) docker private registry (2) dockers (2) dtr (2) kubeadm (2) kubectl (2) kubelet (2) openssl (2) Alert Manager CLI (1) AlertManager (1) Apache Maven (1) Best DevOps interview questions (1) CentOS (1) Container as a Service (1) DevOps Interview Questions (1) Docker 19 CE on Ubuntu 19.04 (1) Docker Tutorial (1) Docker UCP (1) Docker installation on Ubunutu (1) Docker interview questions (1) Docker on PowerShell (1) Docker on Windows (1) Docker version (1) Docker-ee installation on CentOS (1) DockerHub (1) Features of DTR (1) Fedora (1) Freestyle Project (1) Git Install on CentOS (1) Git Install on Oracle Linux (1) Git Install on RHEL (1) Git Source based installation (1) Git line ending setup (1) Git migration (1) Grafana on Windows (1) Install DTR (1) Install Docker on Windows Server (1) Install Maven on CentOS (1) Issues (1) Jenkins CI server on AWS instance (1) Jenkins First Job (1) Jenkins Installation on CentOS7 (1) Jenkins Master (1) Jenkins automatic build (1) Jenkins installation on Ubuntu 18.04 (1) Jenkins integration with GitHub server (1) Jenkins on AWS Ubuntu (1) Kubernetes Cluster provisioning (1) Kubernetes interview questions (1) Kuberntes Installation (1) Maven (1) Maven installation on Unix (1) Operations interview Questions (1) Oracle Linux (1) Personal access tokens on GitHub (1) Problem in Docker (1) Prometheus (1) Prometheus CLI (1) RHEL (1) SCM (1) SCM Poll (1) SRE interview questions (1) Troubleshooting (1) Uninstall Git (1) Uninstall Git on CentOS7 (1) Universal Control Plane (1) Vagrantfile (1) amtool (1) aws IAM Role (1) aws policy (1) caas (1) chef installation (1) create deployment (1) create organization on UCP (1) create team on UCP (1) docker CE (1) docker UCP console (1) docker command line (1) docker commands (1) docker community edition (1) docker container (1) docker editions (1) docker enterprise edition (1) docker enterprise edition deep dive (1) docker for windows (1) docker hub (1) docker installation (1) docker node (1) docker releases (1) docker secure registry (1) docker service (1) docker swarm init (1) docker swarm join (1) docker trusted registry (1) elasticBeanStalk (1) global configurations (1) helm installation issue (1) mvn (1) namespaces (1) promtool (1) service creation (1) slack (1)