Tuesday, December 28, 2021

Jenkins integration with GitHub and build with Maven

 Git integration with Jenkins the main objective here is how GitHub connects with Jenkins, once build tool maven works and then Java artifacts generated ready for deploy the application (.war file).

This post is 2 mins read.

Jenkins integration with GitHub Code repo build with maven


Prerequisites:

You should have been Signup either on GitHub or Bitbucket

GitHub repo url: https://github.com/BhavaniShekhar/my-app

Global Tool configuration

To configure the following we have installed on the Jenkins Master here I've used CentOS box. And while configuring these we need to provide the installed location for each.

  1. Java - defined name as LocalJDK8 or JDK8 /JDK11/JDK18
  2. Maven - defined name can be as LocalMaven or maven3
  3. Git - name defined as LocalGit or default 

How to configure JDK as Global tool in Jenkins?

You need to navigate in the Jenkins Dashboard select Manage Jenkins and from the options select Configure Global tools. In the Configure Global tool  page goto the JDK section where we have two choices the one we can use existing JDK by providing the JAVA_HOME path. And the other option is we can install JDK automatically as per you project needs select the JDK version.

update-alternatives --display java

LocalJDK8 configuration
You can also install latest JDK as per your project requirements and use that installed path.
You can also either use OpenJDK or Oracle JDK with desired version.

How to Install and Configure Maven as tool in Jenkins?

We can install on the target build server that could be Jenkins controller machine or a dedicated machine for build process, where Maven must be installed. 

Install Maven on CentOS
This is simple process using yum we can install for latest we can use dnf before that, switch to root user and run the following commands:

java -version # to confirm Java installed
yum install -y maven
mvn --version # To confirm that Maven installed successfully
Note that Maven installation prerequisite is JDK. that is you must have JAVA_HOME defined.
Configuring LocalMaven


The latest version maven can be used here.

How to configure Git as global tool on Jenkins?
Git is by default installed on most of the Linux VMs. But on the cloud free instances we don't see so we need to install it with the package manager command utilities w.r.t operating system.

LocalGit configuration on Jenkins Global Tool Configuration

Once all prerequisites are installed and configured we are good to go for the Jenkins integration with GitHub project and use the Maven to build and deliver the artifacts.

How to Setup a Jenkins Maven Project?

Step 1: Configure new item with Freestyle project 

Let's create Freestyle project with the following 

Name: github-integration

In the General section enter

  • Description: This is first java project will be build with maven.
  • Discard old builds checked
  • Max # of builds to keep: 1


Step 2: Source Code Management section select Git 

  • a. Repository URL value entry that uses Git clone https protocol.
  • b. GitHub project will be mostly free and public repos, there is no need to create credentials. Go with 'none' option. If it's organization project it will be private repo you need to create credentials.
  • Branch: You need to specify the branch name as master or main branch will be used as default. For testing purposes we have to change to feature or relative to the environment (dev,QA, prod etc).

Jenkins integration with GitHub - Source Control Management tab setup

When you work on the real time project you may need to work on test/feature branch instead of master branch.

Step 3: Delete workspace before build

In the 'Build Environment' section, select the check box the 'Delete workspace before build starts'. There are more advanced options available but for now we can go with default.

Jenkins Build Environment - delete workspace before build starts


Step 4: Build using Invoke top-level Maven targets

In the 'Build' section, add build step -> invoke top-level Maven targets.

  • a. Maven version : LocalMaven
  • b. Goals : test install or clean package
  • c. POM : If it is available in the root directory nothing to mention if some other location then you need to specify the location example: maven-samples/single-module/pom.xml
  • d. Now Save the project and all set to run it, 

Jenkins Build - invoke top-level Maven targets

All configurations are completed, Go to the top of the Jenkins menu, Trigger the "Build now"  observe the console output.


* If the build executed on the Jenkins controller then, You can see the package created in the workspace directory 
 /var/lib/jenkins/workspace/github-integration/target/myweb-0.0.1.war

* If the build executed remotely then, You can see the workspace location then followed by the target SNAPSHOT file location

References

Friday, December 24, 2021

Jenkins Active choices parameter - Dynamic input

Hello DevOps team!! Today I've revisited the experiment with the Jenkins ACTIVE CHOICE Parameter  to get the Dynamic parameters effect on the Build Job parameters.

Installation Active Choice parameter - Groovy Script


Prerequisite:

Jenkins installed Up and running on your target master machine.
Jenkins URL accessible  

Step 1: Install Active Choice plugin


On the Jenkins Dashboard, select the Manage Jenkins, Plugin- Manager, In the Available tab search for word 'Active', where you can see Active Choice plugin and choose installation option, and this will enables three different parameters in the "Add Paramters" list. They are :
1. Active choice parameter
2. Active Choice Reactive parameter
3. Active choice Reactive Reference parameter

Here In my example I will use two of them, Firstly Active Choice Parameter for "environment".
Create new item Name: active_project select a freestyle project click OK button.
In the General tab, select the checkbox for 'This project is parameterized'.

Step 2: Add Parameter - Active Choice Parameter

Please enter the following as per your project needs. Offcourse here we are starting Groovy code snippets which doesn't required any expert level coding.

Name: environment 
Script: Groovy Script

Add the following groovy code:
return[
'Live',
'QA',
'Dev'
]
Screen shot: 

Adding Active Choice parameter adding Groovy list


Step 3: Add Parameter - Active Choice Reactive Parameter


Let's define the "Active Choice Reactive Parameter" as sub_env, Here 'sub_env' parameter is depends on the 'environment' parameter which is defined in the previous step.
 
Name: sub_env
Script: Select Grovy script:
Add the following groovy code:
if (environment.equals("Live")){
	return ["Prod","DR"]
}
else if (environment.equals("QA")){
	return ["FT","UAT","Stage"]
}
else if (environment.equals("Dev")){
	return ["Dev-Feature","Dev-Release"]
}
else{
	return ["Please select environment"]
}
On the same parameter block "Single select" from the dropdown
Groovy fall back code:
return ["Select proper environment"]
Now enter the environment as value for the 'Reference parameter'.

Adding Active choice reactive parameter


Step 4: Add Parameter list - Active Choice Reactive Reference parameter


Select Active Choice Reactive Parameter Enter the following values
Name: datacenter 
Script: Select Groovy script:
Add the following groovy code:
if(sub_env.equals("Prod")){
	return ["Prod environment at HYD region"]
	}
else if(sub_env.equals("DR")){
	return["DR environment at GG region"]
	}
else if(sub_env.equals("FT")){
	return ["FT environment at HYD region"]
	}
else if(sub_env.equals("UAT")){
	return["UAT environment at GG region"]
	}
else if(sub_env.equals("Stage")){
	return["Stage environment at GG region"]
	}
else if(sub_env.equals("Dev-Feature")){
	return["Dev-Feature environment at GG region"]
	}
else if(sub_env.equals("Dev-Release")){
	return["Dev-Release environment at GG region"]
	}	
else{
	return ["dont miss sub-env"]
}	
Groovy fall back code: return ["Select proper sub-env"]
Reference parameter: sub_env
Finally save the configuration of the project.

Final step
Verify saved script in Jenkins UI by clicking “Build with Parameters”.


Document References https://plugins.jenkins.io/uno-choice/

Wednesday, December 22, 2021

Ansible variables, Lists, Dictionaries

 There are many boring tasks in your daily job which can be automated easily if you know some of the tools like here, Ansible. Let's explore more on how to use the variables in the playbooks.

In this post we will be covering :

  1. Basic datatypes
  2. List variables and using them
  3. Dictionary variable and accessing them

Variables and Datatypes in Ansible

In Ansible variables can be defined under global tasks or they can be defined at local to a task level. support all the Python supported datatypes.
---
# Filename: varibles_datatypes.yml
 - name: varibles in ansible
   hosts: localhost
   gather_facts: false
   vars:
     a: "Vybhava Technologies"
     b: yes
     n: 100
     m: 500.99
   tasks:
     - debug:
         msg:
           - "a= {{ a }} a type: {{ a |type_debug }}"
           - "b= {{ b }} b type: {{ b |type_debug }}"
           - "n= {{ n }} n type: {{ n |type_debug }}"
           - "m= {{ m }} m type: {{ m |type_debug }}"
The execution output is :
ansible-playbook varibles_datatypes.yml
 
Screenshot


Ansible Lists

In Ansible List object is similar to the Python list. Which can be assigned alist variable within a single line or lease it can be represented in the column which will start by using "-" for each element. Here I've experimented with two options.
# File: hello.yml
 - name: List variables from ansible playbook
   hosts: localhost
   gather_facts: no
   vars:
     mylearning_list: ['Linux','git','Jenkins','Docker','Kubernetes','Ansible']
   tasks:
     - name: printing list
       debug:
         msg:
         - "mylearning_list:"
         - "{{  mylearning_list  }}"

     - name: Concatenate a list to string
       set_fact:
         my_string: "{{ mylearning_list | join(',') }}"
     - name: Print the String
       debug:
         msg: "{{ my_string }}"

     - name: printing list element
       debug:
         msg: "mylearning_list: {{  mylearning_list[1] }}"
     - name: printing list range of elements
       debug:
         msg:
         - "mylearning_list[3:5]:"
         - "{{  myle
Ansible list of element usage 
Ansible  list example 02

 hosts: localhost
  gather_facts: no
  vars:
    devops_team:
      - srinu
      - rajshekhar
      - arun
      - charan
      - suresh
      - elavarsi

  tasks:
  - name: Display all elements of List
    debug:
      msg: "{{ devops_team }}"

  - name: Display a elements of List
    debug:
        msg: "{{ devops_team[3] }}"

  - name: Display rage of elements from List
    debug:
        msg: "{{ devops_team[3:6] }}"
~


Ansible Dictionaries


The python dictionaries can be used in the Ansible plays. The representation is within {} when we have few key:value
The data item will be stored with key and value

We can dfine a dictionary variable as two forms : 1. single line
osfam_web: {"el": "httpd", "ubuntu": "apache2"}

2. multiline form
osfam_web:
  el: httpd 
  ubuntu: apache2
Example Execution
[ansible@master qa]$ cat mydict.yml
---
# Filename: mydict.yml
 - name: Dictionaries in ansible
   hosts: localhost
   gather_facts: false
   vars:
     osfam: {"el":"httpd","ubuntu":"apache2"}
   tasks:
     - debug:
         msg:
           - "osfam.keys {{ osfam.keys() }}"
           - "osfam {{ osfam }}"
           - "osfam type {{ osfam |type_debug }}"
           - "osfam[el] {{ osfam['el'] }}"
Execution output
ansible-playbook mydict.yml

More variable stories on Ansible Automations are share:

Monday, December 20, 2021

Ansible packages and service modules

Ansible packages and service modules In this post I would like to take you to the most important Linux administration tasks which can be used regularly in their daily activities that can be automated with Ansible. 

How do Linux Package Managers works?

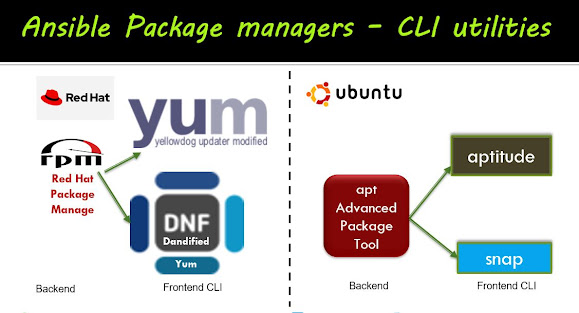
Every Linux Operating system allow us to install any software using package managers such as yum, dnf, apt, deb or apk any other option. 

Here I've explored more details about this package mangers how they are working. If we take RedHat flavor Linux systems such as CentOS, SuSe, RHEL uses actually RPM as package manager. But the CLI clients are available such as yum(Yellowdog updater modified) and in the latest versions using improved yum that is dnf command utility which is known as "Dandified Yum". 

The service or systemctl commands

After installation we need to start, stop or restart or check status that service using systemctl or service command as per the System availability.

Ansible package manager modules connection with front-backend utilities


First we will experiment with package managers dnf usage in Ansible. We can target simple two playbooks where you should have inventory groups defined for webserver, database.

Prerequisite:

The inventory file content with the webserver and database groups as following
[ansible@master qa]$ cat hostqa.yml

all:
  children:
    qa:
      children:
        qawebserver:
          hosts:
            node[1:2]-vt:
        qadbserver:
          hosts:
            node3-vt:
        qalb:
          hosts:
            node4-vt:


How to install packages using ansible yum module?

The Ansible yum module is allow us to install the packages on the target hosts. where you can tell the action using state.


---
# File: nginx_yum_installation.yml

- name: install and start nginx
  hosts: "{{ targets | default ('webserver') }}"
  become: yes
  tasks:
    - name: install nginx
      yum:
        name: nginx
        state: present
        update_cache: true

    - name: start nginx
      service:
        name: nginx
        state: started

  
The execution of the above playbook output as:
ansible-playbook nginx_yum_installation.yml
  

Ansible yum module for install nginx and start the service

How to uninstall package using ansible yum module?

The following ansible playbook code will stop the service and remove the package from the target box.
  ---
# Filename: nginx_stop_yumremove.yml
- name: stop and remove nginx
  hosts: "{{ targets | default('localhost') }}"
  become: yes
  gather_facts: no
  tasks:
    - name: stop nginx server
      service:
        name: nginx
        state: stopped

    - name: remove nginix
      yum:
        name: nginx
        state: absent

  
Execution outcome
   ansible-playbook -e targets=qawebserver nginx_stop_yumremove.yml --check
   ansible-playbook -e targets=qawebserver nginx_stop_yumremove.yml 
  
Ansible yum module to remove nginx package


How to install packages using ansible apt module?

The Ansible apt module is allow us to install the packages on the target hosts. where you can tell the action using state.


  ---
# Filename: nginx_apt_installation.yml

- name: install and start nginx
  hosts: "{{ targets | default ('loadbalancer') }}"
  become: yes
  tasks:
    - name: install nginx
      apt:
        name: nginx
        state: present
        update_cache: false

    - name: start nginx
      service:
        name: nginx
        state: started
  
The execution of the above playbook output as:
ansible-playbook nginx_apt_installation.yml
  

How to install a package with ansible dnf module?

If you are working on CentOs8 or Oracle Linux 8 or RHEL 8 then you can use dnf module. The web group target to install nginx webserver, and database target to install with mysql database.
---
- hosts: webserver
  tasks:
    - name: install nginx
      dnf: name=nginx state=present update_cache=true
  
Package manager module can be executed on the target machine with ansible user generally, but it requires sudo access so we need to use become parameter value as 'yes'. In adhoc command execution we can use -b or --become option.
ansible webserver -m yum -a "name=httpd state=latest" -b

How to list out the package is installed?

The yum module can be used to determine if a package is available and installed on the managed node (e.g. the target VM). This ansible module execution is similar to the `yum info` command in CLI. Let's examine "nginx" installed on the web boxes with the followng playbook.
- name: List out the yum installed packages
  hosts: "{{ targets | default ('loadbalancer') }}"
  gather_facts: false
  #remote_user: root
  become: yes
  tasks:
    - name: determine if a package is installed
      yum:
        list: "{{ package }}"
      register: out

    - debug:
        msg:
          - "package: {{ package }}"
          - "yumstate: {{ out.results[0].yumstate }}"
          - "yumstate: {{ out.results[1].yumstate }}"
          - "version: {{ out.results[1].version }}"

		
Executed with the following command :
ansible-playbook -e targets=node1-vt -e package=nginx yum_list.yml
The screen screen will look like this:
Ansible yum module listing out about a package


  To check already httpd is installed on a machine:
rpm -qa|grep httpd 

Important Note:

The name very first you defined used hyphen, here hyphen is only used when you want general information for the playbook reader to indicate about the task. when we use module attribute with name should not with hyphen.

References Ansible documentation:

1. Package manger - dnf  

Monday, December 6, 2021

Ansible Configuration and inventory

In this post I would like to explain about what I had explored on the Ansible Configuration changes at different scopes. Also see the impact of different parameter customizations related to the ansible host inventories.

Working with Ansible Configuration - ansible.cfg 


This ansible.cfg file will be available in the default location (ANSIBLE_HOME/ Ansible.cfg) when you install with yum. It is not available when you use pip installation.

To get a copy of the ansible.cfg you can see a 'rpmsave' file in the default ANSIBLE_HOME location /etc/ansible.

The ANSIBLE_HOME can be changed as per the requirements we can defined in the configuration file.

Ansible inventory  

Learning about the inventory setup for Ansible controller, first it will look into the ansible.cfg about where is the inventory location defined. If no line mentioned in the configuration file then default inventory location will be used as  /etc/ansible/hosts in the default configuration. If you wish to use the configuration per Project environments such as dev, test/qa, stage, prod separated then you can define the host list for each environment into an individual inventory file in the Project.

Ansible inventory and interconnection with ansible.cfg


Ansible inventory can be created in multiple file formats but Ansible understand the two format files as a common format they are : 
  • .INI 
  • .YAML

Ansible inventory in INI format

You can create INI file based inventory, sections are groups or group related with special :modifiers . The host entries in a sections forms a group, This group namem should be relavent to what they are going to run on these hosts. 


How do we setup Ansible inventory in INI format?

Simple inventory creation where we just include the host list into the example inventory file.
mkdir test-project; cd test-project; vi inventory 

node01
node02


Here is interesting experiment, We can have hostnames and IP addresses or their combination of both also can be entered as inventory file and it works.

Updating above created inventory file with an IP4 address as entry!

node01
192.168.1.210
node02
  

Grouping in inventory

We can create grouping of hosts which will running some service or specific software as shown below all the httpd service running VMs are grouped as 'web-server':

[web-server]
node01
node02
 

Sub-groups in Ansible inventory

We can make inventory of group of sub-groups, in the below you can see 3 groups defined web-nodes, db-nodes, lb-node all these become sub-groups for the hyd group. This kind of representation is most common need where we can have different categories of nodes and they all run under different regions or availability zones on your cloud platforms.

[web_nodes]
node01
node02

[db_nodes]
192.168.1.210

[lb_node]
loadbalancer

[hydi:children]
web_nodes
db_nodes
lb_node 
The execution output as follows:

Default groups in Ansible inventory

Ansible also makes some built-in groups once you create an inventory, such groups are as follows:
  • all
  • ungroupped
Here is the interesting logic - every host defined in a group belongs to 'all' group. If a host defined not into any group that belongs to 'ungroupped' default group. For our example we can get 'mailserver.hyd.in' fall into the 'ungroupped' group!

Ansible inventory in YAML format


The ansible inventory defining in the YAMAL format need to care about the following:
1. Top or root for the inventory will be "all" keyword
2. Every next level can be defined with "children" keyword
3. We can define number of groups under the a common group. (Observe qa is example common group)
4. Host can be defined under "hosts" keyword
5. We can define the range of hosts names with [:] (check the qawebserver)
6. Every line shold be ending with a colon 

We can define the inventory file in YAML file format as well. You can see

echo "
all:
  children:
    qa:
      children:
        qawebserver:
          hosts:
            node[1:2]:
        qadbserver:
          hosts:
            localhost:
            
">qa-inventory.yml

#Validate file created
cat qa-inventory.yml   
Enter the ansible.cfg file with the following configuration:
    [defaults]
    inventory = ./qa-inventory.yml
To get the list of hosts from the all groups using the above created qa-inventory.yml file.
ansible --list-hosts all
  
ansible-inventory --graph
ansible-inventory --list
Ansible inventory using YAML file

Here also we can do all those filters on host list extractions as discussed above with ini file.

Ansible inventory parameters

You can define the inventory file in 'ini' format, where we can have aliases to the hosts vms it is similar to Linux configuration file /etc/hosts but is more readable and we can add more ansible_ variables in a line for that host related information such as username, password etc.
# Sample inventory with host aliases  

web1 ansible_host=web1.hyd.in
web2 ansible_host=web2.cmb.in
db1 ansible_host=db1.dli.in 
We can use the following common ansible inventory parameters :
  • ansible_host this can be IP address or DNS of a VM
  • ansible_connection You can specify how to connect to the remote host
  • ansible_user you can use a dedicated user like 'ansibleuser' or else 'root' for Linux machines
  • ansible_ssh_pass will be used for Linux Remote machines
  • ansible_password is used for Windows Remote machines

Usually Ansible controller will be connects with Linux remote hosts using SSH protocol and that too with port 22. When we store some file in the Ansible controller to access them we can skip connecting with SSH, instead of that we can use local cetonnection option. The ansible_connection inventory parmeter can be used to establish a local connection instead of ssh in Ansible.

In a project you may have Linux, Windows combination of remote machines. If we want to connect with Windows remote host then the 'ansible_connection' parameter must be set with the 'winrm' as value.

# Sample Inventory File with Linux, Windows VMs

# Web Servers
web1 ansible_host=node01.devopshunter.com ansible_connection=ssh ansible_user=root ansible_ssh_pass=Secre7@in
web2 ansible_host=node02.devopshunter.com ansible_connection=ssh ansible_user=root ansible_ssh_pass=Secre7@in
web3 ansible_host=node03.devopshunter.com ansible_connection=ssh ansible_user=root ansible_ssh_pass=Secre7@in

# db servers
db1 ansible_host=sqldb01.devopshunter.com ansible_connection=winrm ansible_user=administrator ansible_password=WinVM@09!
Custom inventory file can be defined as per Project or environment type. Generally these custom inventories can be used on single Ansible Controlller multiple Projects or nonprod environments, For best practices they will be pushed to any of the SCM tools like Git/BitBucket.
Let's explore all the inventory accessing experiments related to development environment in dev directory is dedicated 
mkdir dev; cd dev
Create a file with the following inventory file in dev, it is in a alternative locaiton other than default path:
echo "
mailserver.hyd.in

[lb]
lb01

[web]
web01
web02

[db]
db01
db02
">dev
#confirm the dev file content
cat dev

Understanding the inventory accessing filter options

To list 'all' hosts from the dev inventory file. 
ansible -i dev --list-hosts all

We can display the desired group to list the hosts in each of the given group such as db or web from the above created dev inventory file.
ansible -i dev --list-hosts db
ansible -i dev --list-hosts web 
The ansible host list with different options


Creating the local inventory for dev project we create the ansible.cfg file as:
echo "
[defaults]
inventory = ./dev 
">ansible.cfg
#validate
cat ansible.cfg
Now we can run the commands without informing with -i flag. That is
ansible --list-hosts db 
There is a possible option to use regular expressions "*" is same as "all".
ansible --list-hosts "*"
ansible --list-hosts "web0*"
To list out multiple groups for hosts you can select with colon separation as shown here.
ansible --list-hosts web:db
Index out the host from the inventory using the square brackets [] with a number of group name
ansible --list-hosts web[1]
We can also un-select using except indicators the "!" symbol before host or group name.
ansible --list-hosts \!web #except web servers
ansible list of hosts with different options as input


FAQ on Ansible Inventory files

1. Can I pass multiple ansible inventories to run a playbook? Yes it is possible to run a playbook with multiple inventories.
ansible-playbook get_logs.yml -i dev -i qa

2. Is it possible to have a host in multiple groups? Yes it is possible to have this usecase, a host can be present in dbservers group as well as in webservers.
References: 

Categories

Kubernetes (24) Docker (20) git (13) Jenkins (12) AWS (7) Jenkins CI (5) Vagrant (5) K8s (4) VirtualBox (4) CentOS7 (3) docker registry (3) docker-ee (3) ucp (3) Jenkins Automation (2) Jenkins Master Slave (2) Jenkins Project (2) containers (2) create deployment (2) docker EE (2) docker private registry (2) dockers (2) dtr (2) kubeadm (2) kubectl (2) kubelet (2) openssl (2) Alert Manager CLI (1) AlertManager (1) Apache Maven (1) Best DevOps interview questions (1) CentOS (1) Container as a Service (1) DevOps Interview Questions (1) Docker 19 CE on Ubuntu 19.04 (1) Docker Tutorial (1) Docker UCP (1) Docker installation on Ubunutu (1) Docker interview questions (1) Docker on PowerShell (1) Docker on Windows (1) Docker version (1) Docker-ee installation on CentOS (1) DockerHub (1) Features of DTR (1) Fedora (1) Freestyle Project (1) Git Install on CentOS (1) Git Install on Oracle Linux (1) Git Install on RHEL (1) Git Source based installation (1) Git line ending setup (1) Git migration (1) Grafana on Windows (1) Install DTR (1) Install Docker on Windows Server (1) Install Maven on CentOS (1) Issues (1) Jenkins CI server on AWS instance (1) Jenkins First Job (1) Jenkins Installation on CentOS7 (1) Jenkins Master (1) Jenkins automatic build (1) Jenkins installation on Ubuntu 18.04 (1) Jenkins integration with GitHub server (1) Jenkins on AWS Ubuntu (1) Kubernetes Cluster provisioning (1) Kubernetes interview questions (1) Kuberntes Installation (1) Maven (1) Maven installation on Unix (1) Operations interview Questions (1) Oracle Linux (1) Personal access tokens on GitHub (1) Problem in Docker (1) Prometheus (1) Prometheus CLI (1) RHEL (1) SCM (1) SCM Poll (1) SRE interview questions (1) Troubleshooting (1) Uninstall Git (1) Uninstall Git on CentOS7 (1) Universal Control Plane (1) Vagrantfile (1) amtool (1) aws IAM Role (1) aws policy (1) caas (1) chef installation (1) create organization on UCP (1) create team on UCP (1) docker CE (1) docker UCP console (1) docker command line (1) docker commands (1) docker community edition (1) docker container (1) docker editions (1) docker enterprise edition (1) docker enterprise edition deep dive (1) docker for windows (1) docker hub (1) docker installation (1) docker node (1) docker releases (1) docker secure registry (1) docker service (1) docker swarm init (1) docker swarm join (1) docker trusted registry (1) elasticBeanStalk (1) global configurations (1) helm installation issue (1) mvn (1) namespaces (1) promtool (1) service creation (1) slack (1)