Thursday, August 26, 2021

Ansible Comparison Membership Operators

Hello everyone are you working on Ansible Automations?!! 

This is post is for you to help, In this post you will find more interesting variable usages and their operations with different options such as comparison operators and membership operators.
  1. Comparison operators

  2. This is an example for Comparison operators
    ---
    # Filename: test_compare.yml
    
     - name: Comparison Operator example
       hosts: localhost
       gather_facts: false
       vars:
         a: "Vybhava"
         b: "Technologies"
         n: 100
         m: 500
       tasks:
       - debug:
           msg:
             - "This will compare numbers {{n}} and {{m}} "
             - " n == m: {{ n == m }}"
             - " n != m: {{ n != m }}"
             - " n > m: {{ n > m }}"
             - " n >= m: {{ n >= m }}"
             - " n <= m: {{ n <= m }}"
             - " n < m: {{ n < m }}"
             - "Compare Strings : a {{a}} and b {{b}}"
             - " a == b: {{ a == b }}"
             - " a != b: {{ a != b }}"
             - " a > b: {{ a > b }}"
             - " a >= b: {{ a >= b }}"
             - " a <= b: {{ a <= b }}"
             - " a < b: {{ a < b }}"
             - " not a == b: {{ not a == b }}"


    Testing
    ansible-playbook test_compare.yml
    Execution Image
    
    Ansible comparison operator examples
    Ansible boolean operators their execution outputs
  3. Membership operators

Learning new things make me more stronger!! Now we will see how to use the two more operators 'in' and 'not in', these are also called membership operators. which will operates on the lists in Python language. In the same fashion here in Ansible we can use the in and not in operators on list variable or facts.
---
 - name: membership operators
   hosts: localhost
   gather_facts: no
   vars:
     i: 5
     arrlist: [10, 5, 8,25]
     s: "web1"
     servers:
     - "app1"
     - "app2"
     - "web01"
     - "web1"
     f: 7.80
     my_seq: [9, 8, "Vybhava",7.80, 'app1']
   tasks:
   - name: Testing possible options with membership operator
     debug:
       msg:
         - "i = {{i}} and arrlist = {{ arrlist }}"
         - "check  i in arrlist : {{ i in arrlist }}"
         - "check  100 in arrlist : {{ 100 in arrlist }}"
         - "check  100 not in arrlist :  {{ 100 not in arrlist }}"
         - "check  i not in arrlist : {{ i not in arrlist }}"
         - "Testing membership with number list done!"
         - "s = {{s}} and servers={{servers}}"
         - "Check s in servers : {{ s in servers }}"
         - "Check s not in servers : {{ s not in servers }}"
         - "Check web2 in servers : {{ 'web2' in servers }}"
         - "Check app2 in servers : {{ 'app2' in servers }}"
         - "Testing membership with strings list done!!"
         - "f = {{f}} and my_seq = {{my_seq}}"
         - "Check 9 in my_seq : {{ 9 in my_seq }}"
         - "Check i not in my_seq : {{ i not in my_seq }}"
         - "Check 'app1' in my_seq : {{ 'app1' in my_seq }}"
         - "Check s not in my_seq : {{ s not in my_seq }}"
         - "Check f in my_seq : {{ f in my_seq }}"
         - "Testing membership with sequance done!!!"
You know how to run the this playbook
The execution output is as follows:

Ansible membership operator example
Ansible membership operators in, not in example


We will share it soon another new experiment soon.
 
Keep watching for the new Ansible learning updates...

Saturday, August 21, 2021

Ansible 11 The uri module with examples

 Hey DevSecOps Automation specialist, Welcome back to the DevOps Hunter blog. In this post, I made it for learning more about all possible parameters that we can use when an application validation is done with the Ansible 'uri' module. 

Why uri module?

Web Application returns status HTTPCode 200 for success, 404 for failures, and also for 503 for Server internal issues. When you work on the restart of a web application we need to know the status of the application to proceed with the next move. So this uri module is most important for reboot and restart of web applications using ansible.


The uri module parameters

Supported parameters include: attributes, backup, body, body_format, client_cert, client_key, content, creates, delimiter, dest, directory_mode, follow, follow_redirects, force, force_basic_auth, group, headers, http_agent, method, mode, owner, regexp, remote_src, removes, return_content, selevel, serole, setype, seuser, src, status_code, timeout, unix_socket, unsafe_writes, url, url_password, url_username, use_proxy, validate_certs

The Ansible uri module return the following parameters while working with given URL


headers add headers to your requests

body - insert a body in your request 

body_format - format of the body in JSON or raw

creates - doesnot run the task if a file exists

dest: where to create the new file 

follow_redirects - when https redirects to http returns 301 

force_basic_auth - you need to provide username, password to chedk url

method - REST api possible methods it will supports GET POST DELETE PUT HEAD PATCH TRACE 

Prerequisites

Ansible installed and managed nodes with application up and running

Alternatively, application test URL we can take this blog URL as well.

Usecase 1: Let's check out blog URL does the Ansible uri module can test?

- name: Check public domain URL
  hosts: localhost
  gather_facts: no
  tasks:
  - name: uri
    uri:
      url: https://devopshunter.blogspot.com
      method: GET
      validate_certs: False
Execute the playbook as
ansible-playbook urlcheck.yml

Ansible uri module with GET method


Usecase 2: Now we can test our project related application urls with the following playbook

- name: test apache url
  hosts: web
  gather_facts: no
  tasks:
  - name: uri
    uri:
      url: http://{{ansible_host}}
      method: GET
      validate_certs: False
      status_code: 200
Testing the above web application testing test run as follows:
Image

Ansible uri module with GET method and status_code checking

Usecase 3: Checking for the multiple status code values 200, 201, 301
- name: Check status code public domain URL
  hosts: localhost
  gather_facts: no
  tasks:
    - name: Check uri in 200,201,301
      uri:
        url: https://httpbin.org/status/500
        method: POST
        status_code: [200,201,301]
        validate_certs: False
Execute the play and check what does 
ansible-playbook uri_multi_status_code.yml

Image: 

Ansible uri module check for multiple HTTP codes
Ansible uri module multiple status code


Usecase 4: Getting the content of the given url

- name: Check content
  hosts: db
  gather_facts: no
  tasks:
  - name: Show content of a given uri
    uri:
      url: http://httpbin.org/get
      return_content: yes
      method: GET
    register: __content

  - name: debug
    debug:
      var: __content.content

Execute play as follows:
ansible-playbook check_content.yml
Image
Ansible uri module content
Content of given url usibng ansible uri module

Usecase 5: HTTP Application return body
# Filename uri_body.yml
- name: Get the body of the url
  hosts: db
  gather_facts: false
  tasks:
  - name: Get the status, url from body from uri
    uri:
      url: http://httpbin.org/get
      method: GET
      return_content: yes
      validate_certs: False
      body_format: json
    register: __body
  - name: debug status, url
    debug:
      var: __body.status, __body.json.url
  - name: debug json block
    debug:
      var: __body.json
Execute play as follows:
ansible-playbook uri_body.yml
Note that URL passed here is the test URL, whereas in projects we need to pass this value of web applications that provide the REST service that can be used with the HTTP Get request object.

Ansible uri module body parameter
Ansible uri module example to get body parameter


Usecase 6: Basic authentication with user and password  parameters passing

# File: uri_basic_auth.yml
- name: Get the body of the url
  hosts: localhost
  gather_facts: false
  tasks:
  - name: uri module using user password
    uri:
      url: https://httpbin.org/basic-auth/vybhava/technologies
      user: "vybhava"
      password: "technologies"
      method: GET
      validate_certs: False  
  
Execution

ansible-playbook uri_basic_auth.yml
Image
Ansible uri basic auth
Ansible uri module basic auth parameters user, password

interesting facts:

Basic auth testing on browser 


Have fun and enjoy experimenting with this uri module.

Good references on the get_url module
 

Tuesday, August 17, 2021

Ansible 10 Shell vs Command module

Hello DevSecOps Automation learners!! You can do wonders by learning Ansible Automations along with me.

The Ansible can run the command module as default that is you don't need to mentioned with -m option for command. That means when you don't mention any module then it is working with the 'command module'

Ansible Shell vs Command module


Here we will execute in details of experiment with 4 different use cases which could be part of your automation playbook construct:

  1. Both operate similarly
  2. When redirect operator used
  3. When pipes used between commands
  4. Multiple commands need to run

Let's examine these use cases

1. Both operate similarly

If we need to run single Linux command to be executed then both shell, commands modules operates same way there is no difference. Here I'm using "who -r" command to be run. If we don't mention any module name then command module by default.


# Using default command module
ansible web -a "who -r"

#or
ansible web -m command -a "who -r"

# trying with localhost also fine
ansible localhost -m command -a "who -r"

# using shell module here	
ansible web -m shell -a "who -r"
Image
Ansible Shell vs Command module usage


2. When the redirection operator used

when we need to store the command execution stdout to a file we will be either using redirection operator such as greater-than or double greater-than operators. Let's see the execution of whoami command output store to user.dat file.
# Using shell module creating a redirecting file
ansible localhost -m shell -a "whoami >user.dat"


3. When pipe used between commands

Command has its limitation to execute single Linux command and output it. whereas, shell can be used for multiple commands with pipe operator allowed. let's see how it works here:
# Using shell module with pipe
ansible web -m shell -a "who -r|awk -F' ' '{print $3}'"

# pipe is not allowed in the command module ...  so fails 
ansible web -m command  -a "who -r|awk -F' ' '{print $3}'"

Image:

Ansible Shell vs Command module example
Ansible Shell vs Command module using pipe


4. When multiple commands to be run


If you need to run the multiple Linux commands, where we can use either double-ampersand && or semi-colon ; operators in between those Linux commands, This can works good with Shell module but doesn't works with command module. Hence we need to understand the limitations of command module.
# works good with shell
ansible web -m shell -a "who -r && uptime"

# fails to output with command module 
ansible web -m command -a "who -r && uptime"

# command fails when ; used
ansible web -m command -a "who -r; uptime"

# It is okay for shell module for ; separate multiple commands
ansible web -m shell -a "who -r; uptime"
The execution of the above commands output Image:
Shell vs command modules using && and ;
Ansible Shell vs Command module using && and ;

Conclusion: 

If you want to run a command securely and predictably, it may be better to use the 'command module'.

Ansible 'shell module' can run most commands that can run from bash script or CLI. They are powerful, but also opens up the doors for attachers so be careful.

 There is no file storage and usage of the process to process piped for connecting one command with other in command module not possible. You can see the error when you use '>' or '|; with com

Saturday, August 7, 2021

Ansible 5: Commands and their examples

Hello Automation specialists, This post is for trying all the Ansible Command-line tools,  it's like a cheat sheet for ansible CLI with executed examples to better understand their usage.


Ansible command-line utilities can be executed only on the box where the Ansible engine is installed and running.

ansible 

ansible command is used for define and run a single task 'playbook' against a set of hosts. ansible command is an extra-simple tool/framework/API for doing 'remote operations'. 

 Case 1:
ansible -i inventory.yml all  --list-hosts # all 
   ansible -i inventory.yml dbserver  --list-hosts  #Specific group
   ansible -i inventory.yml common  --list-hosts # same as all if inventory is yml
   
The ansible command list-host optoin
Listing host using ansible command


Case 2:
   # inventory set in the ansible.cfg
    ansible all --list-hosts
    # a group specific
    ansible web --list-hosts
    # checking for a specific host in a group
    ansible web --list-hosts -l 192.168.33.220
  

Listing inventory host using ansible command
The ansible command list host option with limiting

 ansible-config 

Ansible uses configuration definations in the ansible.cfg file located in the /etc/ansible/ansible.cfg
ansible-config --help show help
The state of your Ansible configuration settings
ansible-config view


The list of variables we can retrieve using the following command:
ansible-config list 
Ansible configuration list

You can see another list of configurations but you can also store it in a file
ansible-config dump 
ansible configuration dump


You can get the list of overloaded variable values using :
ansible-config dump --only-change 
Custom configurations
ansible-config command on awx docker container

 ansible-console 

This command allows for running ad-hoc commands or tasks against a chosen inventory from a shell with built-in tab auto-completion. It will supports several Linux like commands and you can modify its configuration at the runtime. You can get full help about some of the modules which is very simple in this shell.

ansible-console help for 'copy' command


ansible-console root@all ansibleprompt$ copy /tmp/hello.txt /home/ansibleuser

Task like copying files from the remote managed clients is simple.

You may be confused some commands same as in Linux, but the meaning is different in Ansible. Example 'cd' which change the hosts instead of changing the directory.

ansible-console help of cd command

You can explore any module from ansible-console and then you can add that into your playbook as task.

ansible-doc 

To get help on the plug-ins and modules you can use this ansible-doc command.

 ansible-doc modulename
Example1:
ansible-doc stat 
 
ansible-doc command applied against stat module

Example 2: To get the list of all modules
    ansible-doc -l 
 
ansible-doc for list of modules

ansible-galaxy 

The ansible-galaxy command will be used to create roles directory structure offline, you can also download community provided roles from the Galaxy website in online mode


ansible-galaxy search elk Searching for a module is similar to the search for image in docker cli. For example search for 'elk' role on Galaxy
ansible-galaxy search elk

searching for elk roles on galaxy

Let's try to install a module from Galaxy now:
ansible-galaxy search elk
elk installation using ansible-galaxy


 ansible-inventory 


If there are any host specific variable used then you can use --vars option against a host.
ansible-inventory --host 192.168.33.220 --vars
Which doesnot returns empty because the default inventory having only hosts and groups. # When you define inventory file as:
[vagrant@mstr prod]$ cat prod_inv_host_group
[prod]
localhost
[db]
192.168.33.200
[web]
192.168.33.210 ansible_user=vagrant
192.168.33.220 ansible_user=devadmin
then you can see the host vars as follows:
ansible-inventory -i prod_inv_host_group --host 192.168.33.220 --vars
# to get the graph which is similar to linux tree command to show the connection between groups and their host association
ansible-inventory --graph
ansible-inventory vars and  graph
ansible-inventory vars and  graph


ansible-playbook 

The actual Ansible automation will be happen with this command. You need to write task in a play then we can execute it by providing the playbook yaml file as argument.

Sample playbook 

  ---
 - name: Hello from DevOpsHunter
   hosts: localhost
    
   tasks:
   - name: Greeting message
     debug:
       msg: "Welcome to DevOps Jungle... Start Hunting..."
       
Execution command

ansible-playbook /root/welcome.yaml


 ansible-pull 


Tuesday, August 3, 2021

Ansible 6 Understanding host_vars and group_vars

In this post, we will discuss the possible options for ansible variables precedence, Experiment with few host_vars, group_vars, and their variable precedence. You can specify the variables along with the host inside your inventory itself. 

Ansible host_vars and group_vars and usage options


The command-line variable will be the highest priority.


To test the variable precedence, top priority extra vars
ansible -i "node1," all \
  -e "var1=VybhavaTechnologies" \
  -m debug -a 'msg={{ var1 }}'

Here -i use the target host and the group name to define an extra variable that will have the highest priority. Using debug module we can get the var1 value using jinja format to print.

Ansible extra_vars
ansible extra variables highest precedence 
Let's see the following example:

  Create the inventory.yml file in "dev" directory. inventory.yml
all:
  children:
    common:
      children:
        webserver:
          hosts:
            node[1:2]:
          vars:
            var1: "webserver"
        dbserver:
          hosts:
            localhost:
              var1: "node3"
          vars:
            var1: "VybhavaTechnologies"

    
Host_vars and Group_vars in Ansible
Ansible host_vars and group_vars

Now run the following command to know how the var1 will work at each group level and host level from the inventory variables.
 
ansible -i inventory.yml all -m debug -a 'msg={{ var1 }}'
#Try 2
ansible -i inventory.yml webserver -m debug -a 'msg={{ var1 }}'
ansible -i inventory.yml dbserver -m debug -a 'msg={{ var1 }}'
The output of the above execution is :
Ansible debug command
Ansible variable precedence test using inventory variables

Let's use clean inventory file now, that is remove all the variables values 
inventory.yml
all:
  children:
    common:
      children:
        webserver:
          hosts:
            node[1:2]:
        dbserver:
          hosts:
            localhost:

Now let us use the group_vars and host_vars for the same purpose testing var1 value!
     mkdir group_vars hosts_vars 
     mkdir group_vars/all
     vim group_vars/all/variables.yml
     var1: "I'm in group_vars all"
     tree
     ansible -i inventory.yml all  -m debug -a 'msg={{ var1 }}'
     #try dbserver target
     ansible -i inventory.yml dbserver -m debug -a 'msg={{ var1 }}'
     
The variable defined under the group_vars directory where you can use 'all' folder to use the variable in all playbooks and roles. if you want to use a specific variables for a specific group you need to define them separately, for db, web groups you may need some variable value will be executed from the dedicated folder

group_varrs example in ansible

That concludes the group_vars will be defined for all as shown above. but we can override them with host_vars, let's see how it is possible now.

specific group variable overrides all group


Let's quickly check how the host_vars are defined and have their precedence with the following experiment


Here we have tested with 'var1', but in real-time project different variables are required. There could be multiple variables need to be defined at each level which will play importance as per the project requirements. For example developers want notifications for webserver group, you can define 'email_to' variable with developers direct group. similar DBA team want to see mails notification when something happen on dbservers.

all:
  children:
    common:
      children:
        webserver:
          hosts:
            node[1:2]:
          vars:
            email_to: "webdeveloper@vybhavatechnologies.com"
        dbserver:
          hosts:
            localhost:
              email_to: "dba@vybhavatechnologies.com"
    vars:
      email_to: "allteams@VybhavaTechnologies"
   
Execution will be as follows:
 
    #try with all: 
    ansible -i inventory.yml all -m debug -a 'msg={{ email_to }}'
    #try with dbserver: 
    ansible -i inventory.yml dbserver -m debug -a 'msg={{ email_to }}'
    

Rule 1: When you create a sub-directory inside group_vars must be name of the group name, inside that you can define variables.yml file.
Rule 2: Defining the host_vars should contain sub-directories only with hostname(node1) where you can have variables.yml file.

Let's examine the host_vars/node1/variables.yml file content with variable 'var1' is defined then it will be overrides the group_vars-> var1 value.


2022
Here is my new learning about host_vars and group_vars experiment hope you enjoyed 
---
# Filename: varexample.yaml
# Extra Varialble targets [optional]: the hosts that will be tested; if nothing specific boxes are set, then localhost will be targeted

 - name: varibles in group_vars and host_vars
   hosts: "{{ targets | default('localhost') }}"
   gather_facts: false
   tasks:
     - debug:
         msg:
           - "var1= {{ var1 }} var1 type: {{ var1 |type_debug }}"
           - "email_to= {{ email_to }} email_to type: {{ email_to |type_debug }}"
Here are multiple usecases for the same playbook executions outputs
# default all groups 
ansible-playbook varexample.yaml 
# specific target as node1 
ansible-playbook varexample.yaml -e targets=node1
# Specific target as webserver group 
ansible-playbook varexample.yaml -e targets=webserver 
group_vars and host_var examples in a Ansible Playbook

Courtesy by: Maheshwari

Every experiment is useful, every moment you spend for learning new things is valuable, Keep LEARNING

Keep Sharing!


H A P P Y   A U TO M A T I ON !! Enjoy with Ansible!!

References:

Ansible 9 Custom Roles - Reusability

Hello Guys, welcome back to DevSecOps Automations!!
In this post, we will be exploring the Custom role create and usage in a playbook, which is a most industry requirement.


It depends on your use cases. It's always recommended to write a role if you have a complex set of tasks consist of handlers and jinja templates. Roles break down a complex playbook into simple and multiple reusable plays easy to read!

In the last post, we have learned about how ansible-galaxy helps us to install, create, modify the ready-made roles which are provided by the Ansible community freely on the Galaxy site.

What are the roles why we should use them in Ansible?

As per my understanding so far following points :
  1. A role can be defined when we have to do one or many tasks
  2. It is a set of tasks with a single objective (for example reboot of box - stop all process, reboot, start process)
  3. You can organize the code in more readable form using roles it is like functions in Python or C 
  4. Here the main objective is that roles can be exchanged within the company playbooks and if it is more genric public can share in community
  5. You can publish your roles to ansible galaxy community (public roles repository)
  6. Ansible roles can be defined with specific structure of directories and files, role name can be directory vars directory contains main.yml file to define the variables that can be reused in the role's play

Steps to define your Ansible Custom Roles  

Step 1: Create the directory structure using the ansible-galaxy command
cd roles
ansible-galaxy init apache --offline
cd apache/tasks

Step 2: to make more managable vim tasks/main.yml
- include: install.yml
- include: configure.yml
- include: service.yml

Let's create these files which are mentioned in the main.yml file, first install.yml file with
---
# install apache server
- name: install apache
  yum:
    name: httpd
    state: latest
Next configure.yml file with :
---
 - name: httpd configure
   copy: src=httpd.conf dest=/etc/httpd/conf/httpd.conf
   notify:
     - restart apache service

 - name: send index.html
   copy: src=index.html dest=/var/www/html/index.html
   /var/www/html/      

The third file is service.yml with:
---
 - name: start httpd service
   service: name=httpd state=started

Using static files by roles

Step 3: Let's create two static files as index.html file and httpd.conf file
 cp /etc/httpd/conf/httpd.conf .
 vi httpd.conf
 head httpd.conf
#
# ============== This is from ANSIBLE Configuration ======================
# This is the main Apache HTTP server configuration file.  It contains the
The web-page created from index.html file. cat roles/apache/files/index.html

Namaste Ansible configured Apache

Wishing you great learning... HAPPY A N S I B L E automations!!


Event Handlers - notify from roles

Now go to the apache/handlers where the main.yml entry you can use :
---
# Apache handler file
- name: restart apache service
  service: name=httpd state=restarted
Ensure that name of the handler should match to the name in the notify section in the configure.yml otherwise it wont trigger. cat main.yml Now update the meta information about this role
cd /home/vagrant/prod/roles
vim apache/meta/main.yml
Modify the following lines:
  author: Pavan Devarakonda
  description: Sample apache role
  company: Vybhava Technologies
  platforms:
  - name: EL
    versions:
    - all
Now goto the folder roles check with the tree command for 'apache'
tree apache
apache
├── defaults
│   └── main.yml
├── files
│   ├── httpd.conf
│   └── index.html
├── handlers
│   └── main.yml
├── meta
│   └── main.yml
├── README.md
├── tasks
│   ├── configure.yml
│   ├── install.yml
│   ├── main.yml
│   └── service.yml
├── templates
├── tests
│   ├── inventory
│   └── test.yml
└── vars
    └── main.yml

now back to the root of your project (in my casse path is /home/vagrant/prod) or else /etc/ansible vime apache-site.yml
---
- hosts: web
  gather_facts: false
  roles:
    - apache
    #- ntp you can add more roles
Now all set to go, check the syntax
ansible-playbook apache-site.yml --syntax-check
Run the playbook:
ansible-playbook apache-site.yml -b
Here -b is given to become all the install, configure, service commands need root access, where you can mention this inside playbook 'become: yes'
 
Once the playbook is executed successfully there will be 3 changes. Validate that


Sunday, August 1, 2021

Ansible Reusability with roles and ansible galaxy

Ansible Roles

In this post, I've gone thru multiple articles and YouTube videos on 'ansible roles', which helped me to understand into a deeper level of Ansible roles and galaxy site and CLI commands with various options. So, sharing here with you  

What is role in Ansible?

The role is the primary mechanism for breaking a playbook into multiple files. This simplifies writing complex playbooks, and it makes them easier to reuse. 

Why should I use Roles in Ansible?

The following are the reasons to work with roles

  • Address complexity
  • Reusability and sharing
  • Modular code

Learn how to build and create ansible roles to manage remote machines using an ansible configuration management tool.  For example let's create an apache role to install, configure and easy to manage the Apache web server using the roles. 


Ansible roles Galaxy
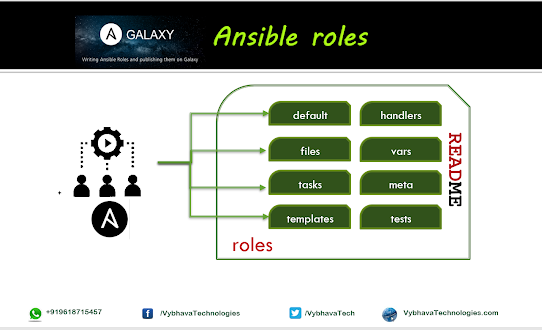
Ansible Galaxy ansible roles structure

Defining Ansible Roles are having major role in simplifying a larger playbook split into multiple small files called roles and they can be used in two ways import or include roles. Ansible roles have a well-defined structured layout that is understood by the Ansible engine and executed accordingly.

Prerequisites

  • Ansible installed ecosystem
  • should aware how ansible works

Roles precedence(priorities) how it works helps you to understand the role flow. the separate folder for playbooks then use ./roles directory top priority.

  1.  ./roles <== top
  2.  ./ansible/roles 
  3.  /etc/ansible/roles 
  4.  /etc/share/ansible/roles <== low

Comparison with other Legacy configuration tools

In puppet - module, Chef - cookbook similarly in Ansible - roles will work for code once and re-use it as many as you wish to.

When you have repeated tasks to be performed, then the role is the way to reuse the play in the playbook.

Ansible HOME  will have the roles folder where you can create new roles and call them in a playbook where you need it.

We can use the ansible-galaxy command to create the directory structure, if you don't want to download from the internet then use --offline Option.

ansible-galaxy init apache --offline

ls -l # check for the apache folder, which is a role created with the above command 

ansible-galaxy execution in offline


Understanding Ansible roles directory structure

The whole directory structure (containing defaults, files, handlers, meta, README.md, tasks, templates, vars) will be created by the ansible-galaxy command.


default directory in roles will be used for OS Booting time executable files, OS related changes or patching.to store default variables that can be used by the role.

files - these are static files which can be pushed to remote machines. 

handlers - based on the events these handlers will be triggered to some action, one-time executors, first time only works.

Example: if httd.conf file changed, it should trigger service restart the httpd 

meta - it will tell about the role, doesn't perform any action.

Example: Who is the author of the role, platform etc.

tasks - actual logic will be stored here, this will have the set of task related YAML files, which are reusable

templates - same like files copied to remote, but the data can be changed at runtime, in Ansible we can have jinja2 templating

vars - are like default variables, they have a higher priority - cannot be overridden

The roles folder should go into the ANSIBLE_CONFIG defined location, Usually, each project may have its own limited roles. If there is a need for some common functionality required for multiple projects then we can use global-level roles.

Ansible Role path configuration

In side your project folder let's say in our case 'qa' directory we will have ansible.cfg file.

Add the following line: 


role_path: /home/vagrant/qa/roles

What is ansible-galaxy does?

It's a command-line tool bundled with ansible installation. The purpose of ansible-galaxy command is to :

  1. download and install roles from Galaxy or from GitHub. 
  2. manages roles on the Galaxy website.


1. Galaxy Search from CLI

To search the roles on the Ansible Galaxy website we can go to the browser and search 🔍 in  Ansible Galaxy page. Similarly from our command line we can use search option to display all available possible roles and collections available on Galaxy.


ansible-galaxy search jenkins


To filter the output of the search with platform-specific to LINUX  platforms RHEL family CentOS, fedora, use will fall into EL type, other than that Ubuntu let me check with EL, then you can see here 177 roles available.

ansible-galaxy search jenkins --platform EL


2. Get info about a role

To get information about the Ansible role, this will give you the clarity about from which author and for which platform it will be useful to use the given role. Most importantly we can also look for how recently it is updated.

ansible-galaxy info bertvv.wordpress


3. Download and install the roles

To download and install the roles from the RedHt Galaxy website

Install a role Syntax: 

ansible-galaxy install authorname.rolename


Example: 

ansible-galaxy install geerlingguy.nginx 


Download and Install Ansible roles from Galaxy website

4. Installing to custom roles directory

ansible-galaxy install --roles-path /path/to/store/role authorname.rolename
ansible-galaxy install --roles-path /home/vagrant/myproject/roles lean_delivery.weblogic

Install Roles from any git-based SCM

We can use Ansible Galaxy roles can be downloaded and install the required Roles from any public SCM URLs  

ansible-galaxy install [git-base-url]

Here we have two Examples for GitHub and GitLab URL:

GitHub

ansible-galaxy install git@https://github.com/acme/role.git,v1.2.0


GitLab

ansible-galaxy install git@gitlab.acme.com:mygroup/ansible-base.git,0b7cd353.

Install using requirements file

You could also install a role from requirements.yml file where we can define requirements.yml file with different software or cloud related roles you should change those parameters as per your Project needs.

    - src: geerlingguy.nginx
      version: 2.7.0
      name: nginx

Now you can run the galaxy command as follows:
ansible-galaxy install -r rolenginx/requirements.yml -p rolenginx/

Here option -p will be specify the directory where we want install the role 

ansible-galaxy command using requirement.yml file


5. Listing installed roles

To check what all the roles installed so far on your machine  will be listed:

ansible-galaxy list


6. Remove a role

To remove the role that is already installed 

ansible-galaxy remove authorname.rolename

Alert! Better to check the installed role list before and after the removal of the role. That will give you the confidence to proceed.

ansible-galaxy remove geerlingguy.nginx


Removal of Ansible role
Ansible role nginx  deletion steps

In the next, we will see the How to create and use the Custom Roles?

Hope you enjoyed this post, Keep learning, Keep smiling Keep sharing ...  :) 

...


HAPPY A U T O M A T I O N S

Categories

Kubernetes (24) Docker (20) git (13) Jenkins (12) AWS (7) Jenkins CI (5) Vagrant (5) K8s (4) VirtualBox (4) CentOS7 (3) docker registry (3) docker-ee (3) ucp (3) Jenkins Automation (2) Jenkins Master Slave (2) Jenkins Project (2) containers (2) create deployment (2) docker EE (2) docker private registry (2) dockers (2) dtr (2) kubeadm (2) kubectl (2) kubelet (2) openssl (2) Alert Manager CLI (1) AlertManager (1) Apache Maven (1) Best DevOps interview questions (1) CentOS (1) Container as a Service (1) DevOps Interview Questions (1) Docker 19 CE on Ubuntu 19.04 (1) Docker Tutorial (1) Docker UCP (1) Docker installation on Ubunutu (1) Docker interview questions (1) Docker on PowerShell (1) Docker on Windows (1) Docker version (1) Docker-ee installation on CentOS (1) DockerHub (1) Features of DTR (1) Fedora (1) Freestyle Project (1) Git Install on CentOS (1) Git Install on Oracle Linux (1) Git Install on RHEL (1) Git Source based installation (1) Git line ending setup (1) Git migration (1) Grafana on Windows (1) Install DTR (1) Install Docker on Windows Server (1) Install Maven on CentOS (1) Issues (1) Jenkins CI server on AWS instance (1) Jenkins First Job (1) Jenkins Installation on CentOS7 (1) Jenkins Master (1) Jenkins automatic build (1) Jenkins installation on Ubuntu 18.04 (1) Jenkins integration with GitHub server (1) Jenkins on AWS Ubuntu (1) Kubernetes Cluster provisioning (1) Kubernetes interview questions (1) Kuberntes Installation (1) Maven (1) Maven installation on Unix (1) Operations interview Questions (1) Oracle Linux (1) Personal access tokens on GitHub (1) Problem in Docker (1) Prometheus (1) Prometheus CLI (1) RHEL (1) SCM (1) SCM Poll (1) SRE interview questions (1) Troubleshooting (1) Uninstall Git (1) Uninstall Git on CentOS7 (1) Universal Control Plane (1) Vagrantfile (1) amtool (1) aws IAM Role (1) aws policy (1) caas (1) chef installation (1) create organization on UCP (1) create team on UCP (1) docker CE (1) docker UCP console (1) docker command line (1) docker commands (1) docker community edition (1) docker container (1) docker editions (1) docker enterprise edition (1) docker enterprise edition deep dive (1) docker for windows (1) docker hub (1) docker installation (1) docker node (1) docker releases (1) docker secure registry (1) docker service (1) docker swarm init (1) docker swarm join (1) docker trusted registry (1) elasticBeanStalk (1) global configurations (1) helm installation issue (1) mvn (1) namespaces (1) promtool (1) service creation (1) slack (1)